Follow Me...

       
Thanks for stopping by! Don't forget to subscribe!

Sunday, December 30, 2012

Bare Metals and Tim Holtz Oh My

4
So I paid a visit to my good friend Suzanne at FlamingoScraps.com yesterday and she gave me a set of the New Tattered Angels Bare Metal Sprays for my birthday.  I was ITCHING to play with them yesterday.  So I pulled out some Tim Holtz Tags from Ranger and started playing.


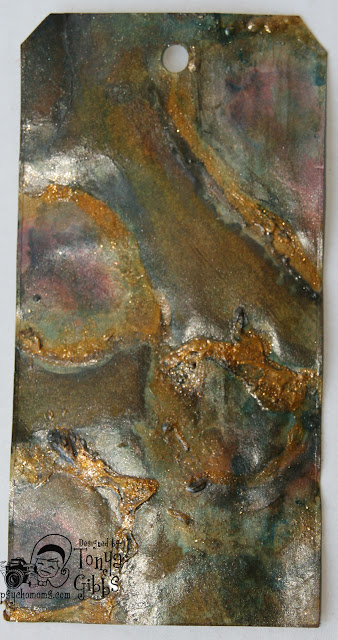
Here is a photo of the tag prior to decorating so you can see all the luscious details in the colors. I love the texture, and the vibrant tones that mixing all these colors brings. When you heat set the Gold and Pewter sprays they bubble and crack which causes the ridged texture that you would find in rust.  LOVE IT!

 
I was so excited that I had to finish the tag - "Tim Style" by using my new mover's and shapers Typewriter die.  The dressform was inspired by Marion Smith's latest Live with Prima where she shared how to make Christmas Ornaments.  I used her technique for the book pages on the mover's and shapers mini dressform die.  


I hope you try out these sprays. They are so much fun.  Thanks for stopping in today! 
 
Happy New Year,
 
Tonya
 
Resources:
 
  • Tattered Angels:  Bare Metal - Rusty Metal Sprays
  • Ranger:  Tag, Rusty Hinge Distress Ink, Distress Markers Barn Door, and Black Soot, Black Soot Distress Stain, Utee 
  • Sizzix:  Tim Holtz Mover's and Shapers - Mini Typewriter, Mini Dress form.
  • Ideaology:  Tim Holtz Pen Nib, Dictionary Tissue Tape
  • Misc:  Book pages, Beaded trim, Seam Binding, Tulle, and tensil
  • Prima: Bling
 
Read More »

Friday, December 28, 2012

Jan. 7, Ustream - Portfolio Layout

0
I hope everyone had a Merry Christmas. I'm looking forward to the 2013 year and all the possibilities that it brings.

I hope you can join me and Flamingo Scraps on January 7, 2013 at 8:30 est on Ustream Live as I create this layout using Pink Paislee's Portfolio and Heidi Swapp's Vintage Chic Collections.

Kit information will be posted soon. Please check http://www.flamingoscraps.com for availability.

Make sure you join the crowd - http://www.ustream.tv/channel/gibbst
 
I hope everyone has a Blessed 2013.
Thanks for stopping in today,
Tonya Gibbs
Resources:
  • Pink Paislee - Portfolio - Unbelievable.
  • Pink Paislee - Vintage Chic - Heidi Swapp, Just Dots paper
  • Pink Paislee - Portfolio - Ephemera Pack
  • Pink Paislee - Artisan Resist Stars
  • Pink Paislee - Artisan Boarders
  • Tattered Angels - Frozen Lake, and Silver Sugar Glimmer Mist
  • Ranger - Distress Ink - Gathered Twigs and Wild Honey
  • Sizzix - Tim Holtz - Tiny Tags and Tabs Die Cut
  • Tim Holtz - Tiny Attacher
  • Glassine Bag
  • Tag
  • Misc. Washi Tape
  • Sewing Machine
  • EK Success Label Punch
Read More »

Friday, December 21, 2012

Prima - December BAP

0
Hi everyone, I hope you have a great time enjoying some family time as we wind down 2012.  I know my house is a buzz right now with preparations for Christmas, and New Years.  Last night I had a little quiet time, and decided to do my layout submission for the Prima December BAP challenge.  

The challenge is to make a Prima layout using this sketch created by Marie-Nicolas Alliot:
 
My daughter got a new haircut yesterday, and took these pictures with her cell phone. I wanted to use these as my three pictures for the layout since she was making some cute sassy faces in the photo.  To make the colors of the photos blend better, I decided to print them black and white.


I used the Prima Tea Thyme Marcella paper as my base for the layout.  I didn't have a chevron so I decided to use a brick stencil with molding paste instead.  To give the brick some color I sprayed it with Chocolate Dylusions Ink Spray (love the rich color of this spray), then for the sparkle a spritz of Glimmer Mist - Hot Chocolate.   To mimic the ink splatters in the sketch I pounced a Black Soot Distress Stain onto the paper until the desired splatter was achieved.


I cut strips of the Tea Thyme 6x6 paper and curled it to give a base and frame for the photo. To soften it and add multiple textures, I used doilies, music paper, and linen canvas as well.   To soften the edges of the photos I decided to use a few layers of  Prima lace, and flanked each side with a journal spot from the paper collection to give a "ticket - tab" edge. Then I finished the layers with some chipboard pieces from Prima's Nature's Garden collection.   For the flower I used one of the white flowers in the Prima Soubrette Collection then used my Tim Holtz Distress Pens in Spun Sugar and Mustard Seed to color the flower to match the Prima Classic rose buds at the bottom of the layout.


The Nature's Garden Chipboard was the perfect element to add my title.  I used the Prima Romance Novel Canvas Alpha letters in two different colors to match the layout.   The classic roses and cherry blossom vine from Prima were the perfect final touch. They remind me of  trellis roses climbing a brick wall.
 
Don't forget that Flamingo Scraps has offered a fantastic coupon with 50% off your Prima purchase from now until December 25. 


Thank you so much for stopping in today,
 
I wish you all a Merry Christmas & A Blessed New Year,
 
Tonya
 
 
Resources:
  • Prima - Cherry Blossom Branch Collection - Flower Embellishments - White
  • Prima - Nature Garden Collection - Chipboard Pieces
  • Prima - Tea-Thyme Collection - Journaling Notecards Set
  • Prima - Romance Novel Collection - Textured Stickers - Alphabet
  • Prima - Say It In Crystals Collection - Self Adhesive Jewel Art - Bling - Mini Swirls - Romance Novel
  • Prima - Soubrette Collection - Flower Embellishments - White
  • Prima - Tea-Thyme Collection - 12 x 12 Double Sided Paper - Marcella
  • Prima - Tea-Thyme Collection - 6 x 6 Paper Pad
  • Prima - Cabachon Collection - Donna Downey - Lace - Natural
  • Prima: Classic Roses
  • Tattered Angels - Chalkboard Collection - Glimmer Mist Spray - 2 Ounce Bottle - Hot Chocolate
  • The Crafter's Workshop - 6 x 6 Doodling Templates - Mini Bricks
  • Ranger Ink - Inkssentials - Dylusions Ink Spray - Melted Chocolate
  • Ranger Ink - Tim Holtz - Distress Marker - Mustard Seed
  • Ranger Ink - Tim Holtz - Distress Marker - Spun Sugar
  • Ranger Ink - Tim Holtz - Distress Stain - Black Soot


Read More »

Monday, December 17, 2012

Prima - Tea Thyme Layout

0
I'm really excited today to share with you a layout I created of my sweet angel niece Addie.  We bumped into her and her daddy at dinner the other night, and this was her leaning over the seat to talk to Brighton and I.  She is just so sweet. 
 
I used the Prima Tea Thyme collection for this layout. 


The Tea Thyme paper is so feminine and offers the perfect backdrop for little Addie's smiling face.  I love layering 6x6 papers to create 12x12 layouts.  The smaller papers offer a nice frame and draw your eye to the photo.  Some vintage and new Prima flowers were used to create the spray, and the wooden Tea Thyme pieces offer great texture.
 
Most of the supplies used in this layout are available for purchase at FlamingoScraps.com.    Flamingo Scraps has graciously offered me a coupon code to extend to my followers for 50% off your Prima order between now and Dec. 25, 2012.   Below is the coupon with the details. 


I hope you guys can take advantage of the sale, and stuff your stocking with some awesome Prima goodness.
 
Thanks for stopping in today,
 
Tonya Gibbs
Lead Educator, FlamingoScraps.com
 

Read More »

Sunday, December 16, 2012

Graphic 45 - Santa Card

0
Christmas is right around the corner, and I've been working on Christmas Cards for my friends.   I wanted to share this holiday card that I created using Graphic 45's Christmas Emporium in 8x8, and my new Tim Holtz Embossing Diffusers. 


I used a standard 4.25 x 5.5 kraft card as my base.   Then placed my embossing folder over the front of the card as you normal would do, but instead of using a top plate, I replaced the top plate with the Oval shaped Embossing Diffuser from Tim Holtz.  This place actually prevents the embossing in the "Cut out" area.   Then using an xacto knife and the place as a template, I carefully removed the center "non embossed area". 
 
 
I then backed the hole with the Christmas Emporium paper and fussy cut the other elements from the unused sections of the page.   The Poinsettia at the top was made using red velvet and a Spellbinder's Poinsettia Die. 
 
I love the layered look of this card.   There are so many rich details in such a small space. 
 
Thank you for stopping in today,
 
Merry Christmas,
 
Tonya Gibbs
 
 
Resources:  
  • Graphic 45 - Christmas Emporium 8x8 paper
  • Ranger  - Forrest Moss Stain, Gold Stickles, Gold Paint Dobber
  • Sizzix -   Tim Holtz Embossing Diffuser Set 1
  • Provo Craft - Embossing Folder
  • Spellbinders - Layered Poinsettie Die
  • Martha Stewat Crafts - Holly Punch, Micro Beads
  • Red Velvet Ribbon


Read More »

Tuesday, December 4, 2012

Thank You - Free Digi Download

21
 
 
Wow this has been an amazing year for me, and I owe a lot of my success to my friends, followers, and mentors. As a special thank you for your continued support, I would like to offer a free 2013 calendar digi download.  This calendar may be used on your personal projects, or projects that you plan to share with friends (as gifts).  The only limitation is that the calendar not be sold, manufactured, redistributed, or product sold using the calendar without written permission. By downloading these files, you agree to the terms and conditions.
 
You can download the file here.  

::NOTE -  You need Acrobat Reader to open these files - you can download it for free from Adobe.com   Also - Media Fire is a little confusing for some - Please click the thumbnail and follow these steps.

 
Thank you again for all your support, and kind words over the past few years. It has been an awesome journey, and I look forward to the opportunities that 2013 brings.

Thanks for stopping in today,

Tonya Gibbs

Read More »

Friday, November 30, 2012

3D Bird House Ornament

2
While pulling out my Christmas decorations this year, I ran across this cute little bird house that I had made using one of Marion Smith's printables.   They were so much fun to make. I think I made dozens the a few years ago. With everyone preparing to decorate for the holidays, I thought it would be fun to share them with you today.  You can download the pattern here...


I printed my pattern onto a transparency then cut it out.  I then embossed it with a  Sizzix folder, and alcohol inked it green to give it a coke bottle effect. I used  crinkled basket paper in kraft to create a nest on the inside.  The roof was made with aluminum foil that was embossed then inked brown with alcohol ink.   I decorated it with some holly and a few Prima Fairy Tale Roses that were died red.  The sign was a small oval balsa wood shape that was stained with walnut ink and I hand wrote Home with a white gel pen.  I added a little mushroom bird that I'd gotten from the floral section, then sprinkled a little snow here and there for a winter look.
 
This little guy has been living on my tree since 2010. That Christmas my husband and I had bought my daughter a car, and we hid the key in the little house.  Since such a sweet gift was enclosed. I kept this one for myself, and every year we talk about the gift as we drag the ornament out of the box.
 
I love making these, and I've given some away with gift cards tucked inside. If you are careful how you attach the roof, it can be opened and closed.
 
I love having hand made ornaments on my tree. If you make these, I would love to see yours on the Artsy Addicts Facebook wall. Please be sure to tag me.
 
Thanks for stopping in today,
 
Tonya Gibbs


Read More »

Tuesday, November 27, 2012

Dec. 3 Ustream - Place In Time Calendar

0
I hope you can join us on December 3, at 8:30 EST on Ustream as Tonya Gibbs creates this Graphic 45 Place In Time Mini Album.  This album is designed to highlight a memory or important photo for each month for a year. At the end of 2013, you will have an entire year documented.

Ustream Channel:   http://www.ustream.tv/channel/gibbst

 
Here is a glimpse at one of the spreads. 


Kit includes:

1  Graphic 45 A Place in Time 8x8 Paper Pad    
1  Graphic 45 A Place in Time 12x12 Sheet Cardstock Stickers   
1  SRM Calendar Numbers Small    
1  SRM Calendar Months Sleek Small  
12”  Maya Road Small Organza Rose Trim Black  
12”  Maya Road Small Organza Rose Trim Sand 
12”  Maya Road Small Organza Rose Trim Cream 
12”  Maya Road Small Organza Rose Trim White 
12”  Maya Road Small Organza Rose Trim Sky Blue 
12”  Maya Road Small Organza Rose Trim Pink  
12”  Maya Road Small Organza Rose Trim Light Pink  
12”  Maya Road Small Organza Rose Trim Brown  
2 Sheets Graphic 45 A Sophisticate 12x12 Paper   
1 Prima Bretton Purity Vine  
1 Yard Prima Cabachon Lace  
1 Prima Wood Clock Face 
TOTAL       $31.99*


*We figured the price of the kit to offset the cost of the shipping, since the new store will not allow us to include shipping in the price of individual items!


Additional Items needed to complete this project:

Available at Flamingo Scraps


8 Sheets 12x12 Black Cardstock    (In Stock  $5.49)
Bind It All and Spine OR 3 Binder Rings (Binder Rings In Stock $.99)
Tim Holtz Alterations Die Pocket Envelope  (Special Order- $21.99   30% off)
Matte Medium, 8oz. (In Stock $10.99 30% off)
Flowers

Other
Tim Holtz Movers & Shapers Cargo Numbers 
Black Chipboard
Border Punch


Read More »

Friday, November 23, 2012

Happy Thanksgiving

0
Today the United States celebrates Thanksgiving.  This is a time for us to reflect on the blessings in our lives, and a time for us to give thanks.  I for one am thankful and blessed for so many reasons personal, professional, and in my hobby.  As you move about your day today I hope you stop to think about the little things as well as the big. 
 
One of my biggest blessings is the friendships I have made in the crafty community. I have been a follower of Marion since before Brooke was born. I had the chance to take one of her classes a few years ago, and since then our relationship has blossomed. It is awesome to now call a mentor friend.  I recently had the opportunity to meet with Marion and her family at the Arsty Escape. I wanted to create a layout of the two of us together. 


A few days ago Marion announced her latest printable the Grand Mini Album collection. I fell in love the second it was downloaded.  The patterns are in rich turquoises, teals, tans, yellows, greens and blacks with chevrons, news ads, damasks, and her signature distressed vintage style. 
 
I couldn't wait to make something with it.  This layout uses 2 sheets of the patterned paper, the note cards, and an envelope.  I used my punches, dies, and Spellbinders to give the individual pages interesting edges.  In the background I distressed the card stock and added some paint to match the colors in the mini. Then drew a grid on the paper leaving some of the grid unfinished for interest.  The scraps were punched with label punches and butterflies.  I collaged the pieces and made this 12x12 layout from mostly 5x7 designs.  To draw you eye to the center. I cut the Chevron strips and made the flags/arrows pointing to the photo.  The photo was an Instagram photo that I cropped to look like an old Polaroid.  I then painted some Prima Pillar White flowers to match the flowers in Marion's designs. 
 
I love the look of this layout, it was so fun playing with these patterns. I'm in the process of making a mini album now, that I can't wait to share with you. 

I hope you guys have a fantastic day with family today, and take sometime for yourself.
 
Thanks for stopping in today,
 
Tonya Gibbs
 
Resources:
Marion Smith Designs: Grand Mini Album Printable
Prima: Flowers, and Leaves, Distress Tool, and Song Bird Ticket stamp, Romance Novel Washi Tape
Hampton Arts: Remember This Background stamp 
Spellbinders: Large Square Nestabilities, Grand Nestabilities Labels 4 Die
Sizzix: Tim Holtz dies: Butterflies, On the Edge File Tabs,  Type Set Alpha die.
EK Success: Label Punch, corner rounder
We Are Memory Keepers: Curly Bracket Tab punch
Golden Gesso
Liquitex Gold Ink
Martha Stewart Paint: Pool, Butterfly Punch
Ranger/Tim Holtz: Archival Ink Sepia, Distress Ink Gathered Twigs, Tiny Attacher, Tissue Tape - Definitions
 

Read More »

Wednesday, November 14, 2012

Nov. Bap Challenge Layout

0
I'm having a lot of fun following along with the Prima BAP challenges. I was too busy in October to participate, so I decided to tackle this one early on.

I created this layout using the Prima Tea Thyme - Linsey paper.


Layers and Layers of Prima goodness are all over the layout. I started by cutting a whole in the center of the paper, rolling it back then placing one of the journaling frames on top of the rolled paper. I backed the hole with a piece of scrap Almanac paper. I cut a strip of hexagons from a My Favorite Things Hexagon die and used it as a stencil for the the gesso. This helped to tone down the busy pattern of the paper. I then cut more the hexagons from the richer brown Marcella paper in the same collection. The Prima journal cards helped to call attention to the small photo and draw your eye back to the center of the layout.


For more information on the Prima BAP contest, please visit their blog. Here is a picture of the sketch created by Steph Devlin.


Thanks for stopping in today,

Tonya Gibbs


Resources:
  • Prima: Tea Thyme Paper: Linsey, Challis and Marcella, Journal Cards 2
  • Prima: Almanac Paper: Composition and Libre
  • Prima Distress Tool
  • Prima: Soubrette A white flowers
  • Prima: Valentine Vine White
  • Prima: Cotton Tape
  • Prima: La Coeur Resin Frame
  • Prima: Tea Thyme Trinkets
  • Prima: Nature's Garden Wooden Ticket
  • My Favorite Things Stamps: Hexagon Die
  • Tattered Angels: Glimmer Mist: Honey Dew Mist
  • White Gesso
  • Cherry Lynn Designs: Doily Die Cut Sophia's Heart
Read More »

Thursday, November 8, 2012

Ustream - Nov. Part 2

0
Thank you to everyone for their support at the Ustream on Monday, Nov. 5.  We had a fabulous turn out.   Ustream was misbehaving, but it did manage to record 90% of the class. It did so in 5 parts, but at least it is there. If you were unable to watch the show live there are multiple parts on the channel at http://ustream.tv/channel/gibbst 


Join us on  Monday, Nov. 12 at 8:30 p.m. EST for Part Two of the City Sidewalks mini album.  In this class we will embellish the book, and learn ways to use the scraps in creative ways. There will also be time for questions since the Ustream Monday night was so choppy.

There is still 1 kit available for purchase. If you are interested, please email Suzanne at Flamingoscraps@yahoo.com.  For full kit details - please visit this blog post.

Thanks for stopping in today,

Read More »

Friday, November 2, 2012

Trick or Treat - Halloween 2012

0
Mr. Cooper, my 5 year old Nephew, decided this year he wanted to be the "Dark Knight" for Halloween. I asked him why, and he said "Because he is cooler than Spiderman".  I believe he was Spiderman last year (lol).  I love to ask all the little ones year after year, why they have decided on their costumes. It is a fun way to add journaling to your layouts, and makes for interesting topics as they get older.
 
This year, I used Marion's digi downloads from the Something Wicked Halloween Mini Album to create my 12x12 layout.  By layering the smaller designs and fussy cutting out the iconic elements, I was able to make the layout interesting and fun.
 
I dropped some Tattered Angels - Clam Bake - Glimmer Mist on the background cardstock,  then blew on the droplets, to create a splattered effect.


I have shared many times, that I love incorporating older products. Sometimes you need to give them a fresh look to match newer lines or themes.  The chipboard letters that spell out Treat were PINK - yes - PINK, and I painted them with Orange Extreme Glitter Paint from Plaid. It took several coats to hide the pink - but it was well worth it.  I used the heat tool to bubbled up the paint, so that it would look grungy.   The buttons were a set of old buttons from 2002 Daisy Dee (who is no longer in business) - it is nice to have them completely used and out of my stash.  From the scrap pile, I used some scrap canvas that I had painted orange for a Prima BAP layout, to create the tab.   Since I didn't have enough letters to spell out Trick or, I just hand wrote them on the canvas.  The 2012 is a piece of Mylar confetti that I got for Brittany's Graduation party.  I love to collect these, they make great date references on your projects.


The real treat here - is the joy I get seeing the kids excited.  I love when they ring my door bell, I act scared, and they just giggle. 
 
Thanks for stopping in today,
 
Tonya Gibbs
 
 
Resources:
  • Black cardstock

  • Marion Smith Designs Digi Downloads - Something Wicked Halloween Mini Album.
  • Plaid - Extreme Glitter Paint Orange
  • Tattered Angels - Clam Bake Glimmer Mist
  • My Favorite Things Stamps - Curly Bracket Tab Die
  • Daisy Dee - Buttons
  • Devine Twine - Orange Bankers Twine
  • EK Success Pumpkin dimensional, Washi Tape - Polk-A-Dot  
  • Ranger, Black Soot Distress Ink
  • Prima - Distress Tool
  • 2012 - Confetti
  • Chipboard Letters
  • Stamping Up - Mini Label Punch
  • Canvas
  •  


Read More »

Wednesday, October 31, 2012

Join Me Live - Ustream Nov. 5 at 8:30 pm

0
Join us LIVE, November 5, 2012 at 8:30 p.m. EST on Ustream, as Tonya Gibbs creates this Vintage Chic Holiday Mini using Pink Paislee's City Sidewalk Collection.  Kit details are below. 
 
USTREAM INFO:
http://www.ustream.tv/channel/gibbst

Please join the crowd early to insure easy access.
 
PROJECT DETAILS:


Video showing more details of the book:


KIT DETAILS
 
We are excited this month to bring you two kits for this project.  Both Kits have shipping costs within the contential US included in the price.  If you are International, please ask about your discounted shipping costs.  Last month kits sold out fast, so be sure to reserve yours today!
 
KIT 1 - DELUXE -   $49 
Includes whole packages of items used:
1 set Teresa Collins Christmas Cottage Clear Stamps
1 package 8x8 single sided Pink Paislee City Sidewalks Paper (24 sheets)
1 package PP City Sidewalks Parcel Tags 16 pcs
1 package PP City Sidewalks Ephemera  47 pcs
1 package PP City Sidewalks Collage Cards 8 pcs
1 package PP City Sidewalks Garland 31 pcs
3 Teresa Collins Mini File Folders
Prima Vintage Tote  Chalk Ink
Christmas  Washi Tape
Crate Paper Bo Peep Wood Veneers 19 pcs
White Lace suitable for dying
3 Manila File Folders (end tabs)
1 yd Twill Ribbon
Green Bloomers (approx. 4 blooms)
2 Transparencies
1 Recipe Card
Exclusive Tonya Designed Download Sheet
Embellishment Pack – bells, Prima Flowers, Webster’s Pages Cameo, Studio Calico Wood Veneer camera, Maya Road Shaped Paperclips, MR Cabachon Flowers, small pearl beads, Artist’s Pin, PP mistable chipboard.  
Order your deluxe kit by contact flamingoscraps@yahoo.com

KIT 2 - STANDARD - $27
Includes partial packages of items used:
1 set Teresa Collins Christmas Cottage Clear Stamps
12 sheets 8x8 single sided Pink Paislee City Sidewalks Paper
5 PP City Sidewalks Parcel Tags
15 pcs PP City Sidewalks Ephemera
2 PP City Sidewalks Collage Cards
10 pcs PP City Sidewalks Garland
3 Teresa Collins Mini File Folders
3 Manila File Folders (end tabs)
1 yd Twill Ribbon
Green Bloomers (approx. 4 blooms)
2 Transparencies
1 Recipe Card
Exclusive Tonya Designed Download Sheet

Embellishment Pack – bells, Prima Flowers, Webster’s Pages Cameo, Crate Paper and Studio Calico Wood Veneers, Maya Road Shaped Paperclips, MR Cabachon Flowers, small pearl beads, Artist’s Pin, PP mistable chipboard

Order your basic kit by contact flamingoscraps@yahoo.com  
 

Additional items needed to complete the project:
Acrylic Paint (red, white, 2 shades of green)
Thumb – anyone’s will do
Toilet Paper roll
Yarn/twine
Cookie Cutter
Washi Tape
Lace
Stamps
1 sheet 12x12 chipboard

Read More »

Friday, October 19, 2012

Something Wicked - Mini Album

4
Something Wicked is Marion's latest Mini Album Printable themed around Halloween.  You can order the download here.   Although this mini has a gothic feel to it, many of the designs could be used with her other printables.  

 
I created this little mini in just a few hours.  My daughter wants to use it to display her Halloween costumes from the past, and incorporate some of her future costumes for years to come.  She has always loved Halloween, and playing dressup, so it should make for an interesting book when it is filled.

In addition to Marion's downloads, I was able to incorporate a lot of dies, and vintage Prima tube flowers, with scraps of lace, and fibers.

When making the album, I cut some tickets from the scraps to make extra journal spots - so save those scraps!


Here is a video showing each page in detail. 


Did you download this mini?  If so please share your version with us on the Artsy Addicts Facebook Page. 

Thanks for stopping in today,
Tonya Gibbs
http://www.psychomomscrapbooks.blogspot.com
Read More »

Friday, October 12, 2012

Friday Night Lights

0
For those who know me - my passion is FOOTBALL. Seriously I even volunteer so that I can stand on the sidelines with my toes in the grass. In my community - I'm known as Psychomom. They dubbed me this years ago. Every child I've ever photographed will tell you the name is well earned. They know if they are playing, I'm on the sidelines for them!  I pace the field with lens in hand, and hold my breath for that perfect SHOT!  I rush home, spend an hour cropping and posting so the kids/parents can see the photos.   It started when my son played his first game as a Pop Warner Mitey-Mite at 7 - he is now 16 and this is his first year at Varsity. 

A few weeks ago,  thanks to a friend who works for a local newspaper, I had a sideline bird's eye view for his first varsity football interception. 

 
That game he had 2 interceptions in the pouring rain.  So I decided to make an 8x10 collage print to hang on his wall.  As you can see I have every single step from before he caught the ball, until he jumped up!  Prints like this are great for sharing a number of pictures with loved ones.  I love making these because at a glance you get the entire story.


This year has been a little different because his stats are not just small talk among family, they are now posted in various newspapers around the state, and broadcast on local news stations.  I'm trying to collect up the stats from the newspapers and Internet highlights to make him a book . I'm so proud of him for giving everything on the field.  He has worked so hard, and it is so rewarding to see him put everything into his passions.  He may not be the largest one on the field, but he plays like he is 10ft tall and bullet proof. 

Thanks for stopping in today,

Tonya Gibbs

Read More »

Friday, October 5, 2012

All Boy!

0
My nephew Cooper, at 4 years old, was wanting to go hunting with the big boys.  So Brighton, my Son, dressed him in Camo (way too big for him), painted his face, and gave him a BB Gun (with no amo).  He was so stink'n adorable, I had to take pictures of him.


Prima's Sept. BAP contest seemed like the perfect opportunity to scrap this photo.   Here is the final layout that I created.


I started with the Prima Script paper as my base, added some molding paste with a Prima Printery mask, then went to town spritzing with copper and bronze shimmering sprays.  I pounced some forest green shimmers in a diagonal across the page to give a hint of green, then finished off with Wheat Fields Glimmer mist.  All these colors remind me of my camo boys in the middle of fall.
 
The Prima Shabby Chic Deer resin was the perfect accent for this layout.  I framed Cooper's picture with corrugated cardboard, a Prima vine, and  Prima large leaves that I cut into palm frown shapes.  I finished off the title with a Nature's Garden Chipboard piece.  
 
Under his picture I tucked in a toy compass that came from a toy machine that Cooper and I had gotten after dinner one night.  I love the addition of one of his toys in the layout. 
 
Here is a look at the Sept. BAP Sketch, designed by Hege Lundquist that was required for the layout design.   For more information on Prima's BAP (Build A Page) Monthly Contests, please visit Prima's blog.


I love how masculine this layout turned out with all Prima products. Prima makes girl layouts a cinch, but I really had to dig into my creative side to achieve this masculine look. I really enjoyed the challenge.
 
Did you participate in the Sept. BAP Challenge?  If so, I would love to see your layout, please tag me in the photo on the Artsy Addicts Facebook page. 
 
Thanks for stopping in today,
 
Tonya Gibbs
 
 
Read More »

Monday, October 1, 2012

Ustream Live Tonight - Oct. 1

0
I can not believe it has been a month since our first  Ustream class.  This month has really been amazing with so much support from our scrappy community.  Wow is all I can say, and Thank you!

I hope you can join us again on Monday, October 1 at 8:30 EST live on Ustream, as  I create this interactive mini.


(The sample was made with Prima's Fairy Belle; however, I will be using Rondelle in the class.)


Make sure you join the crowd at: http://www.ustream.tv/channel/gibbst   to gain easy access to the class.  We are going to try and record the show for those who have schedule conflicts.

Flamingo Scraps was offering a kit for this class - but it sold out in less than 6 hours (WOW) - this made me feel so good.   If  you are still interested in a kit - please email flamingoscraps@yahoo.com. If enough people show an interest, Suzanne has agreed to reorder. Kit prices were $24.99 and included domestic shipping, there is a discount shipping rate for international buyers.

Supplies in addition to the kit that will be used:
Black Cardstock (2) sheets
Prima Distress Tool
Gesso or Modeling Paste
Brick Stencil
Masking Tape (or scotch tape)
Adhesive

Also - Don't forget that Flamingo Scraps is hosting a Design Team Call -  Click here for details.  Submissions need to be sent by 6 p.m. EST Oct. 20. 

Thank you again for all your support.   If you missed the last class, you can watch it here.

Read More »

Friday, September 28, 2012

You Make Me Smile - Card

0
Seriously this is one of my favorite printables by Marion Smith Designs.  The Garment district paper is just awesome and so versatile.  I shared with you guys a mini album, and layout.  Today I want to share with you a card I made from the scraps from both the Mini and the layout. 


I sewed some of the smaller scraps together to create the background, and then proceeded to layer a few of the other journal cards, ephemera, and scraps together to form the focal point of the card. I used a spell binder's label die to showcase the sentiment. Then added some sprigs of flower pieces from a left over Prima vine.  The tiny roses are one of my all time favorite Prima flowers, and they are awesome for cards because of their size.
 
It is so fun using my scraps up, and creating such a wonderful piece.  The tiniest of pieces can be used as banners, or peeking from a layer.
 
Thanks for stopping in today,
 
Tonya Gibbs


Read More »

Friday, September 21, 2012

Heritage Layout - Garment District

2
Garment District Printables from Marion Smith Designs have been at the top of my play list since I downloaded them. Last week,  I shared with you a little mini that I created using these papers. Today I want to share with you a layout I created using the scraps and left over designs that didn't make it to the mini.

I was digging in a box of stuff from my Grandmother's this past weekend, and I found this photo of a woman I believe to be my Great Great Aunt. There is very little information on the back of the photo; however, there is a note that says "Alice, here is the photo of Aunt Jessie's Sister" now I know that Jessie was my Great Grandmother's first name, so I figured out the relationship. I really wish I had a name of this beautiful woman, but that information was lost forever when my Grandmother and all her siblings passed away.  It is quite possible that she passed away at an early age, because my Mother wasn't sure who she was either.  


This brings me to the point of today's post.

When I create a layout - you rarely see my journaling and sometimes the title is subtle. But the 5w's [Who, What, When, Where and Why] are always addressed somewhere on the piece. I love to hide my journaling behind photos on pull out tags because I find it distracting on the layout.  If the design doesn't offer an appealing display of the journaling it is written on the back of the base page.

We often forget to do this because we know the person in the picture, or all of our current family members know the person. It is kind of one of those things that our mind tells us it isn't necessary because everyone knows the person. As time passes the information is lost much like it is with the subject of my layout share today.

While I know little about this woman, I know that Marion's collection fits the time period this photo was taken. It is probably safe to assume that she sewed since it was common in this era for women to make their own clothing.


I love how Marion's Garment district showcases this photo.  I used a lot of layers to frame the photo. This gives the photo more presence on the 12x12 layout.  Although I may not know the name of the woman in the photo, I was able to capture the information that I did know on the back of the layout.

Also note that this is not the original photo, I scanned and reprinted the photo used in the layout.

Thanks for stopping in today,

I hope you have a great weekend.

Tonya Gibbs
http://www.psychomomscrapbooks.blogspot.com


Read More »

Tuesday, September 18, 2012

Blowing Kisses Layout

0

Last week at the high school football game, my cute little niece,  Addie, was standing in the end zone blowing kisses.  I used the picture on a layout that was inspired by Jamie Dougherty's Live with Prima last Thursday night.  I learned some new techniques and thought it would make a nice follow up to my Ustream class.
 
 
From Flamingo Scraps:   Prima: Songbird and Almanac Paper, Vine, distress tool, Flowers, Trinkets. Liquitex: Gesso, Liquitex Molding Paste.  Other: Twine, stencil, charcoal pencil, ribbon, charms, and corrugated card board.
 
I started by distressing all the edges with my new Prima Distress tool.  (LOVE THIS).  To soften the background, I brushed white gesso over the paper, and then used molding paste to add texture.  This is a great way to soften busy or bright patterned paper.  Gesso was also added to some of the layers to try and merge them back into the background.  This technique really helps the photo take center stage, and also makes the smaller photo appear larger.
 
 
I was able to incorporate a lot of scraps from the Almanac collection, and you guys know how much I love using scraps. I cut banners from scraps, and used small pieces of scrap paper to frame around the picture.   Jamie's technique of having the banners travel vertically and horizontally throughout the layout, really make the layout dramatic and serve as arrows leading your eye back to the photo. This is definitely going to be used in more of my future projects.
 
 
While I often cut my vines in half, rarely do I arrange them diagonally, usually mine are in more of  a L shape, horizontal or virticle.  I love how all the elements appear to be drawing your eye back to the center fo the layout.  I incorporated scraps of small vines and leaves from previous projects in the negative spaces of the vines.  Again - love using up those small pieces.   
 
 
Thanks for stopping in today,
Read More »
I love seeing things you create using my tutorials or project shares. Please use the following handles/tags in social media to insure that I get to see your creations:

INSTAGRAM: #FollowingTonyaGibbs    |   TWITTER:  @gibbst    #FollowingTonyaGibbs   |      FACEBOOK:Tag  Tonya Gibbs   #FollowingTonyaGibbs

I Design for:

    http://www.yvonneblair.com

Guest Artist: Click icon to see post!

http://www.teresacollinsdesignteam.blogspot.com/2013/10/family-stories-layout-and-video-by.html#comment-form   http://canvascorp.com/2013/03/21/easter-treat-baskets/


Past Teams

http://www.die-namites.com/     marion