


Happy fall everyone! I've been away for a while - have you missed me? This time of year is a MESS in my world. Just busy busy with lots going on in my personal life. Today, with the kids back in a school, and lots of "sports" photos being taken, I thought I would share with you a masculine layout to inspire you to scrap those teen school photos. My Son graduated last year, and the photo taken here, was one we used in his senior announcement.

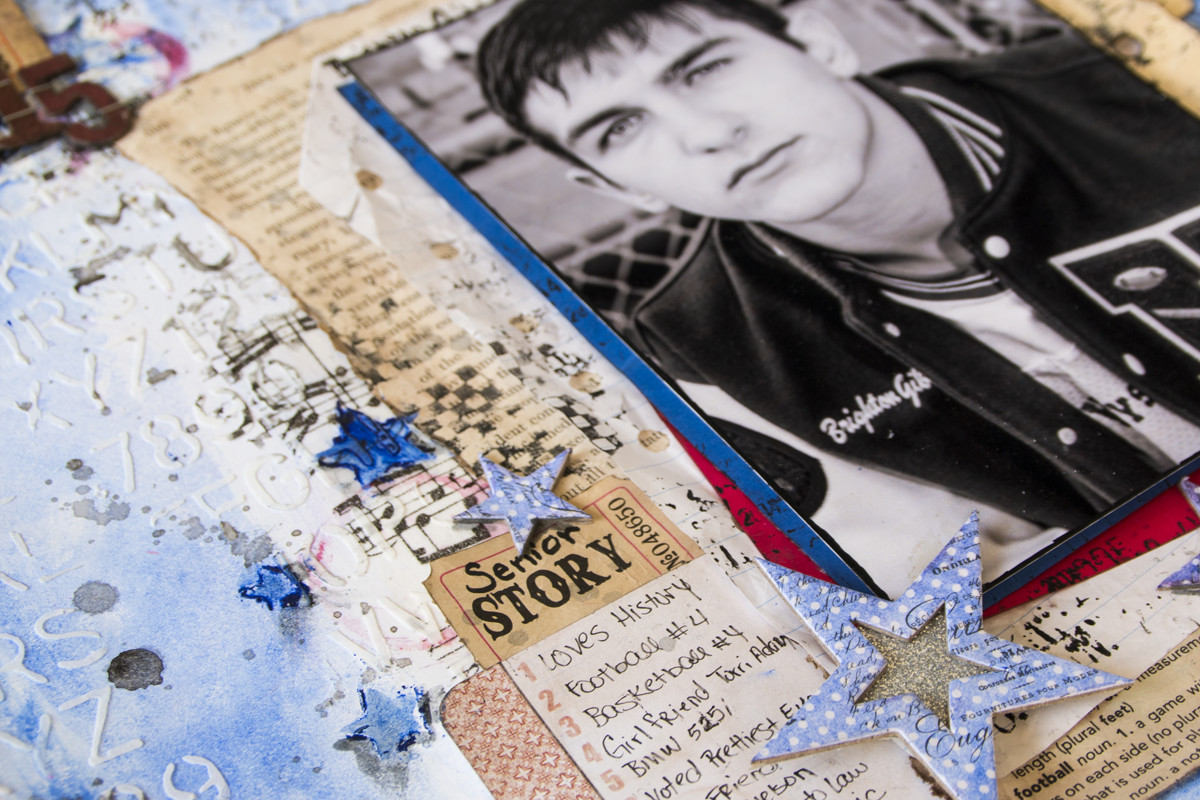
I gathered up lots of Faber-Castell Design Memory Craft® to create a colorful background for my black and white photo. I just love all the texture and grunge.

What teen doesn't have music blaring 24/7? So I used Gel Medium to add music tissue paper to the background. The Boysenberry Gelatos® was the perfect blue to add color to my white card stock and represent his school colors of red and blue. Once it was dry, I applied Whipped Spackle through the School House Stencil from Tim Holtz. This gave me some subtle texture. For my journal area, I add a list of Brighton's top 10 details from his Senior year.

I also used the Boysenberry Gelatos® and the Tim Holtz Stars Stencil to add a few grungy stars to my background. I created a wash with the Double Scoops® Red Cherry® and used a bottle to add a few circles in areas around the background. For more texture, I used my Stamper's Big Brush Pen in Black as a stamping ink with some grungy texture stamps from Tim Holtz.

I also gathered a few items that I thought would set the tone for a "school" themed layout. Since my Son is a HUGE lover of all things historical, I figured a page from the Life of Abraham Lincoln would make the perfect photo mat. I also pulled a few mini file folders, notebook paper, grid paper, dictionary paper with the football definition visible to add to my photo mat layers. If your son is anything like mine, his homework always looked like it had been stuffed in the bottom of a back pack for weeks. To achieve this look, a crumpled up the papers and used the Nougat Stamper's Big Brush Artist pen to distress the edges. I also wanted the entire piece to have a messy handwritten look, so I hand wrote my journaling and titles. To finish off the embellishment clusters, I used tickets and charms for my ephemera. Heidi Swapp's chipboard stars added depth, and show he is my "All-Star".
Here is a quick video showing how I created the layout.
Thanks for stopping in today, I hope you have a great weekend.
Tonya
Supplies:
- Faber-Castell Design Memory Craft® Gel Medium
- Faber-Castell Design Memory Craft® Stamper's Big Brush Artist Pens in Nougat #178
- Faber-Castell Design Memory Craft® Stamper's Big Brush Artist Pen in Deep Scarlet Red #219
- Faber-Castell Design Memory Craft® Stamper's Big Brush Artist Pen in Black #199
- Faber-Castell Design Memory Craft® Stamper's Big Brush Artist Pen Cold Grey III #212
- Faber-Castell Design Memory Craft® Double Scoop® Gelatos® Red Cherry
- Faber-Castell Design Memory Craft® Gelatos® Boysenberry from the Blues Mix & Match Set
- Faber-Castell Design Memory Craft® PITT® Essential Artist Pens
- Tim Holtz - Stamper's Anonymous - School House Stencil
- Tim Holtz - Stamper's Anonymous - Stars Stencil
- Tim Holtz - Stamper's Anonymous - Ultimate Grunge Stamps
- Tim Holtz - Idea-ology - Tissue Wrap - Melange
- Tim Holtz - Idea-ology - Journaling Tickets
- Tim Holtz - Idea-ology - Adage Tickets
- Tim Holtz - Idea-ology - Grunge Board Numbers
- Tim Holtz - Idea-ology - Tiny Attacher
- Heidi Swapp - Color Magic Chipboard Stars
- 7Gypsies - Librarie drawer tabs
- 7Gypsies - Journal Spot
- Dictionary page
- Grid Paper
- Ranger Ink - #10 Tag
- Vintage Book Page - Life of Abraham Lincoln
- Notebook Paper
- Cardstock White 12x12 80lb
- Cardstock Red, Royal Blue


