Hi everyone, I have a cute card share for you today. I had a comment on one of my YouTube videos from Anna, AsianTiger513. She asked me to do a card tutorial, in real time. YIKES I haven't done that in a really long time! I quit doing them, because I felt they were too long, and I could cover more ground by speeding up the process. Some of my projects take hours!
So for you Ms. Anna - I have accepted your challenge.
For my card, I chose to use the My Mind's Eye On Trend 6x6 Collection. I have seriously been hording this collection for a while. I used it a little in a Ustream a few months ago, but the paper is so beautiful, I wanted to keep it forever! AHHHH but I can't.
These are truly my all time favorite colors, mint and coral. I mean seriously so delish, then add the gold foil - my heart literally stopped for second when I saw it!
Ok - back to the tutorial! It is no secret that I love to use my scraps when creating cards. Since the paper collection was fairly new, that meant I must spend some time, looking for items that have been around for a while to help the card come together.
Deep into the bucket of scraps and one hit wonders I went. I pulled out a tube of Prima Flowers - they have been here since early 2009, and a scrap of gold rick-rack. Look at how simple and beautiful, things came together.
\
I know everyone who has paper-crafted for a while, has a stash of Alpha bet stickers/chipboard pieces that are still lingering around, and may not match. The H and I were from two different sets 1 was lavender the other pink. Never fear - I made them play nicely together with my card, by heat embossing them with Gold. Now they are trendy, and match!
The Inside of my card was simple, I created a border with the paper from the collection, then added a piece of white card stock in the center for my hand written message. The final card is an A2 4.25 x 5.5 top folding card.
I added a little Lindy's Stamp Gang in Cocklebells Coral in the negative areas. This spray is also among my favs as it has this nice peach pigment with a gold shimmer (perfect right!).
Here is the video tutorial (warning it is long - because I ramble -LOL)
Thank you Ms. Anna for the challenge, I really appreciate it. I love that you left comments, so that I could get to know you better. It was delightful speaking with you, and I look forward to seeing you around!
Thanks,
Tonya
SUPPLIES:
My Mind's Eye - On Trend 6x6 Paper by Jen Allyson
Lindy's Stamp Gang - Cocklebells Coral
My Favorite Things Stamps & Dies - Die-namics Dizzy Doily Duo
Welcome back for the last day of #LoveSummerArt. What a fun weekend, with TONS of inspiration. I have had so much fun getting to know so many new artists! The event runs from July 17 - 20th. But the content will forever be there on YouTube. To access it all you have to do is type #LoveSummerArt in your YouTube search bar.
This is a super fun way for you to discover new artists on YouTube, and be inspired by their work. All genres of art are participating - Exciting Right!
Today, I have a process video showing you how I created this amazing Ocean scene in my art journal.
Here is a glimpse at the background before I added all the layers.
To create this look I started by adding Gesso to the background. Then with a baby wipe, I added a dark blue acrylic paint at the bottom, then filled in with the lighter blue. The background was very blotchy, but that was the look I needed. When you look through the turquoise colors of the ocean, the landscape of the ocean floor is always looks blotchy. To give a bit of a green tone to the entire thing, I lightly spritzed it with Lindy's Stamp Gang Shabby Tuxline Teal, and Tiffany's Blue. The shimmer in the sprays give the background sparkle like wet water, and the greens in the sprays offer the perfect underwater effect.
For the background areas of my coral, I used a dry sea sponge to pick up various colors of warm toned acrylic paint rotating the sponge to give different effects. You can see the technique in the video tutorial.
Look at my adorable "Doodle Fish". Isn't he just divine? I started by sketching a fish outline shape on a piece of cardstock. Then doodled some lines and dots until he looked like a fish. I used Elmer's Paint Pens in Red, Blue, White, and black to create the doodles on the fish.
For the coral, I used black cardstock as my base. This offers the depth and shadows of my coral. Then using the same sponge techniques, I added various colors to give the scene interest.
I also included the Die-namites Leafy Branch die to create a different texture in my coral. I used my Pink Paislee Nantucket Stamp Set to stamp out the starfish and shells. Then for added sparkle I scattered some Gold Mica Flakes around the bottom.
I think this is one of my favorite pieces I've ever done. This could easily be redone on a canvas. Now that I know "how" to make it look right. On a canvas I could add real shells and coral pieces too. Stay tuned - that just might happen (LOL).
Thank you so much for hanging out with me this past weekend. This venture was super fun!
Don't forget August 3 at 8:30 p.m. is our next Ustream class.
Tonya
Supplies:
Daler Rowney Acrylic Paints - Scarlet, Deep Yellow, Medium Yellow, Violet, Light Blue, Dark Blue, Light Green
Lindy's Stamp Gang - Starburst Sprays - Shabby Tuxline Teal
Lindy's Stamp Gang - starburst Sprays - Tiffany's Blue
Lindy's Stamp Gang - Starburst Sprays - Cocklebells Coral
Lindy's Stamp Gang - Starburst Sprays - Glory Of The Seas Gold
Faber-Castell Design Memory Craft® - Stamper's Big Brush Artist Pens - Green Gold #268 (starfish stamp)
Faber-Castell Design Memory Craft® - Stamper's Big Brush Artist Pens - Medium Flesh #131 (shell stamp)
Faber-Castell Design Memory Craft® - Gesso
Faber-Castell Design Memory Craft® - Gel Medium
Elmer's - Opaque Paint Pens - White, Red, Black, and Blue
EK Success - Zig Writer - Pure Blue
Prima Marketing - Finnabair Art Ingredients - Mica Flakes - Gold Leaf
Hey bloggers - welcome to day 3 of the #LoveSummerArt collaborative project with YouTube Artists around the WORLD! The event runs from July 17 - 20th. To find these artist, just type #LoveSummerArt in your YouTube search bar.
This is a super fun way for you to discover new artists on YouTube, and be inspired by their work. All genres of art are participating - Exciting Right!
Today I would like to share with you a mixed media card. This design is super simple, and could easily be duplicated to create a colorful set of cards for a gift.
Doesn't this ocean remind you of summer and walking the beach in Flip Flops? I used mediums from Faber-Castell Design Memory Craft® to achieve this look. I'll show you how in the video tutorial below.
This is also a great way to use those Gelli Arts® Gelli Prints® that we have been doing the last few months in our Ustream classes. I used one for die-cutting out the Fancy Flip Flops Die from Die-Versions.Isn't it just adorable as the center piece for my card?
I typed the sentiment in a word processor and cut it into a fish tail banner. The fonts that were used were: KG Only Human Reg (Life is better in ) & SA Cinta Normal (Flip Flops).
Here is a quick process video showing how I created the card.
Don't forget to head over to YouTube and see what other artists are doing with #LoveSummerArt. Check back tomorrow I will have a Mixed Media Canvas to share.
Thanks,
Tonya Gibbs
Save The Date: Our next Ustream is scheduled for August 3, 2015 at 8:30 p.m. EST
Supplies:
Faber-Castell Design Memory Craft® - Glass Bead Glitter Gel
Hey bloggers - welcome to day 2 of the #LoveSummerArt collaborative project with YouTube Artists around the WORLD! The event runs from July 17 - 20th. To find these artist, just type #LoveSummerArt in your YouTube search bar.
This is a super fun way for you to discover new artists on YouTube, and be inspired by their work. All genres of art are participating - Exciting Right!
Today I wanted to share with you a layout that I created from some of the Prints we pulled in the July Ustream. Remember these... If you missed the ustream, it is linked up in the right bar.
I decided to create a layout and use these guys as my frame around my photo, and as part of my ephemera in my embellishment clusters.
I have shared many times in the past few months, I'm falling in love with hand lettering. I love the look of the painted imperfect title that I did with watercolors then fussy cut around the. Isn't this just a fun way to add a title to this wonderfully splashy layout?
I also tucked in several of the die-cuts that I've been using to pull prints with in the last few months. Their interesting patterns keep my layout looking fresh, and unique.
I used Faber-Castell Design Memory Crafts® Glaze Medium, Prima's Bubble stencil and little Lindy's Stamp Gang Magicals to create the splashed background. I love customizing my layouts this way.
To see how I did this, I've prepared a process video
Thank you for stopping in today. I hope I have inspired you to create a fun summer layout. Don't forget to check back tomorrow. I have a Mixed Media card for you.
Also don't forget to check out the #LoveSummerArt over on YouTube. I've been inspired by so many wonderful artists this week, and have found some new people to stalk (I mean follow).
Have a great weekend,
Tonya
Save the Date - Our next Ustream is scheduled for August 3, at 8:30 pm est. Supplies:
Lindy's Stamp Gang - Limor Webber Designs Signature Tres Chic - Magicals - Merci Beaucoup Mint
Hey bloggers - welcome to day 1 of the #LoveSummerArt collaborative project with YouTube Artists around the WORLD! The event runs from July 17 - 20th. To find these artist, just type #LoveSummerArt in your YouTube search bar.
This is a super fun way for you to discover new artists on YouTube, and be inspired by their work. All genres of art are participating - Exciting Right! I've already met some super talented artists, just in the planning stage.
Today, I'm sharing with you a Mixed Media Tag that I've created using up some of those pesky scraps and "one hit wonders" that I have laying around on my desk. My tag base is a pair of my husband's old jeans - trust me - they have never looked this pretty, EVER!
My project was actually inspired by the Wander Philosophy Tags from Tim Holtz. In the Summer you should always "Wander" or "travel" and explore. What better to illustrate this philosophy than a Dragon Fly - Right? Here in Florida, we have these black dragon flies that have this beautiful teal iridescent colors, but at first glance they look black. I wanted to duplicate this effect on my tag. I used Lindy's Stamp Gang, Vellum and an IndigoBlu Dragonfly stamp. In the video I will show you how I created this handsome little fellow to mimic the ones in my garden!
Here is the video showing how I created this tag from Start To Finish
WOW - what a fun class. I know I keep saying that, but we had a full house with lots of new faces tonight. So it was fun meeting you, and I hope you had a great time. Look at all these fantastic prints that we pulled tonight. We had enough time to create 2 cards, but we pulled a dozen or so prints.
I also showed you guys how simple it was to give some interesting color patterns to your die-cuts, while making interesting patterns for your backgrounds.
I think this was one of my favorite prints. I didn't have time in tonight's show to make anything with this, but check back each week this month, and I will create cards from all of these prints and the colored die-cuts from tonight's show.
Here is the recording in case you didn't make it to the show live.
Thank you to everyone who came to watch the show live. I had a great time tonight. I can't wait to start making cards for you this month. Don't forget to check back! Our next Ustream will be August 3, 2015 at 8:30 p.m. EST.
Tonya
Supplies:
Gelli Arts® Gelli® Plate - 8x10
Gelli Arts® Gelli® Plate - 3x5
Cardstock - 110lb White
Cardstock - 80lb Black
Hymnal page
Plaid - Apple Barrel - Bimini Blue
Plaid - Apple Barrel - Pink Parfait
Plaid - Apple Barrel - Kiwi
Plaid - Apple Barrel - Yellow Flame
Sizzix - Tim Holtz - Alterations thinlets Scribble and Splat Die
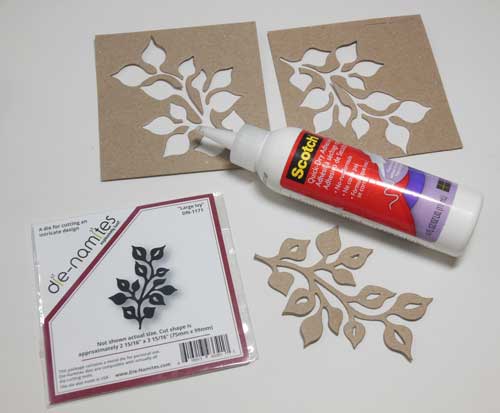
Here is a glimpse at this month's sketch. The Dare was to doodle on your project. I chose the Large Ivy Die and the Flowering Branch die for today's layout.
I cut the large ivy die 4 times from thin chipboard. Then I glued two of the chipboard pieces together, to make a chipboard accent which is a super popular trend at the moment. This gave me two chipboard accent pieces to use on my layout.
I then used the negative pieces from the die-cut with the Prima Textural White Crackle Paste to create a second look on my layout. Then I used the Prima Chalk - Pastel Green to bring out the crackle in the stenciling work.
Here is a process video showing how I created the layout.
Happy Independence Day to my fellow Americans. Today I wanted to bring you a little canvas that I created yesterday for the Gelli Arts® Stars and Stripes Challenge.
I've prepared a step out process of how I did the background image.
Step 1: You want to use full bodied paints for this project, because they allow you more time to work since they dry slower. Start by braying on the red. Tape off your flag with masking tape. Don't forget to tape off the star section in the upper right hand side of the plate, so that when you pull the print the stars on the left. I'm using a 110lb white cardstock for my print, and an 8x10 Gelli Arts® Gelli® Plate.
Step 2: Create your star background. I started by painting a 3x5 Gelli® plate with Ultramarine Blue Paint. Then using the Crafter's Workshop Balzer Designs Mini Punchinella stencil, I removed paint through the stencil with a baby wipe. The stars only cover the bottom section of the plate, so I moved the stencil up and repeated this step for the top area. I know there are more stars here than are needed for an American Flag. But the general concept was here, and I felt it too overwhelming to count out 50 stars, JUST go with it! (LOL) . Also note: It is not necessary to use the 3x5 plate for this project. You could use any size plate that you have, and easily use the taped area as a guide from the previous step. But I had this plate so I decided to use it.
Step 3: The photo above is what the plates looks like after the stars are lifted. Using the plate like a stamp, press it into the area on the print you pulled of the stripes.
I just love how this flag is starting to look. It is rough - but that is really what gives it character.
Step 4: To help the stars really stand out, I applied a coat of Texture Paste from Prima Marketing. This paste must dry before going to the next step. When it is dry, the paste crackles leaving my stars looking more distressed and yummy!
Step 5: Sorry there is no photo for this step - but I added a thin coat of Matte Medium to the entire paper. NOTE: Use Matte Medium, because it is looser than Gel, and you can get a really fine coat. Allowed it to dry before going to the next step.
Step 6: Make sure your print is dry from step 5. Then crumple it into a loose ball. Then flatten the paper out again, to see the texture. Clean off the 8x10 Gelli® Plate.
Step 7: This step will create a stain for our flag. Bray on some light brown paint with yellow ocher, and Golden Acrylic Glaze. Pull another print directly onto your flag. Be sure to press firmly so that the glaze gets past the crinkles in the paper. Sorry I forgot to get a picture, because I had to work super fast and my hands were messy. But I promise, this will look super scary. The entire flag will be a horrible brown color. Allow the glaze to sit for about 30 seconds, Then using baby wipes, begin to remove the brown color. This glaze will stick to the cracks in the stars, and around the negative areas of the stars, and along the crinkles. JUST LOVE THE LOOK!
Step 8: Look at how beautiful my flag looks. I trimmed it down to an 8x10 removing the boarder around the outside. To make your stripes white again, simply apply gesso with a cosmetic sponge. Don't worry with the red or blue, because the off color helps the red and blue areas look antiqued.
Step 9; I prepped an 8x10 canvas with Matte Medium, then applied my flag to the top. Squeegee it well with your fingers, and press hard to make sure there are no air bubbles. I also applied the Matte Medium to the top of the flag.
Then comes the OOPS! That little opportunity for additional embellishment!
Step 10: Never fear! This actually turned out to be a blessing. I combined the Matte Medium with some of the Ranger Tim Holtz Distress Stain in Vintage Photo and painted it into the areas where the paper had peeled back. NOTE: Mixing the Matte Medium with the Distress creates a varnish and seals the distress so it doesn't run when liquid is applied. Now my flag looks as if it were painted onto wood. Once the entire Flag was completely dry! Then take an archival or permanent ink pad in brown in and lightly rub it over the surface of the flag to further enhance the texture.
All that is left is to embellish the flag - unfortunately I did not have time to create a process video and do the editing. So I do not have the step outs for that process. But if you have followed me for a long time, you will know how I did everything in the embellishment clusters, as it is techniques that I use often.
In this video - I will talk you through the embellishment clusters and other details about the canvas.
Here are some close up photos of the other sections of the canvas.
I decided to use Psalm 33:12 for my chalkboard: "Blessed Is The Nation Whose God Is The Lord." I used chalkboard paint to paint a piece of foam board. Several coats were needed. Then I sketched my design with a pencil, and traced over it with a White Gel Pen from Marvy. Allow the ink to dry, then spray with a fixative. I used Clear Acrylic Spray Paint to add a fine mist to protect my drawing.
The Hymnal I chose was "God Save America" by William G. Ballantine The second verse really spoke to me, and I wanted to include it. "God Save America! Here may all races mingle together as children of God, Founding an empire on brotherly kindness, Equal in Liberty made of one blood! "
You can really see the texture in the stars. I used a pair of old Jeans and the Tim Holtz Jumbo Tattered Floral's Die from Sizzix to cut out flowers for my embellishment cluster. Then of course I added my mixture of Finnabair - Clear Beads and Glass Glitter to Glossy Gel Medium to fill in and add a little sparkle.
Thank you so much to the men and women who serve this country in the military, and to the loved ones whom lived without them while they served for our freedom. Your selfless acts have given us our freedoms.
To get more details about the Gelli Arts® Challenge, please visit their Facebook wall! Thank you for visiting.
Now I'm signing out to go celebrate the 4th!
Tonya
SUPPLIES:
Gelli Arts® - 8x10 Gelli® Plate
Gelli Arts® - 3x5 Gelli® Plate
Speedball - Brayer
Daler Rowney - Acrylic Full Bodied Paints - Ultramarine Blue
Daler Rowney - Acrylic Full Bodied Paints - Light Brown
Daler Rowney - Acrylic Full Bodied Paints - Yellow Ochre
Daler Rowney - Acrylic Full Bodied Paints - Scarlet
I love seeing things you create using my tutorials or project shares. Please use the following handles/tags in social media to insure that I get to see your creations:


 \
\