Follow Me...

       
Thanks for stopping by! Don't forget to subscribe!
Showing posts with label Technique. Show all posts

Thursday, February 12, 2015

February Sketch and Dare Challenge for Die-namites

2

Hi everyone, Where did January go?  Yep it is now mid February and time to start thinking about Valentine's Day. I feel like Christmas just ended!

Today I would like to remind everyone about the Sketch & Dare Challenge at Die-namites Dies.


 The dare this month is to use a heart!


 I used the Summer Branch and Heart Doily Dies from Die-namites for my card today:
 
 
http://www.die-namites.com/Summer-Branch_p_63.html     http://www.die-namites.com/Heart-Doily_p_138.html


 For today's card,  I also wanted to highlight a few yummies
recently released  by IndigoBlu
 
http://www.limorwebber.com/product/splattered-heart-limor-webber-designs-stamps-by-indigoblu/
IndigoBlu FlitterGlu Kit in Box
A5 Tuff Storage Box
FlitterGlu (50ml with Easy clean nozzle)Phat Foam
Scoochy sponge
Palette Knife
1x Winter Dawn
Instruction Sheet
All you need to get started, in a box.
 
This kit includes everything you need to start producing fantastic foil effects. Simply choose your stamp and have some fun creating great cards and decorations.

I chose the new Splattered Heart Stamp that was designed by my good friend Limor Webber.  I love the grungy splatter effect and thought it would make a great accent with the foiling.
 
http://www.limorwebber.com/product/splattered-heart-limor-webber-designs-stamps-by-indigoblu/
 
 
Together these products helped produce the drama needed for this card.  I love how the delicate Summer Branch Die easily takes the foiling after it has been die-cut.  By combining the splatters from the stamp with the Flitter foil, I was able to give my card the look of Fireworks!


Here is a process video showing how I made this card:


I love how easily I was able to add the flakes to my delicate die-cut.   Foiling is so HOT right now, so this system makes it super simple to create dramatic cards, that remain flat enough to mail! 

Thanks for stopping in today,

Tonya
Read More »

Monday, September 22, 2014

Mixed Media Autumn Tag

2

 
Hi everyone, I think fall is my favorite time of year.  The air is getting crisp, the leaves are changing, and vibrant pops of color are everywhere.  I was cleaning my studio and found an old vellum quote I've had in my stash forever it says "Everyone must take time to sit and watch the leaves turn."  So I decided to create a tag.
 
For my leaf foliage I used these two Die-Namite Dies
 
Leafy Branch Die
 
 
http://www.die-namites.com/Flowering-Branch_p_51.html
 
Look at all that yummy depth, rich color and texture!


Here is a process video of me creating this tag.


Don't forget to save the date our next Ustream is scheduled for October 6, 2014  at 8:30 p.m. EST. 

Thanks for stopping in today,

Tonya

Supplies:
  • Faber-Castell Design Memory Craft®  Gelatos® Steampunk collection Iced Chai
  • Faber-Castell Design Memory Craft® Stamper's Big Brush Artist Pen Nougat #178
  • Faber-Castell Design Memory Craft® Textural Accents Gel Medium
  • Faber-Castell Design Memory Craft® Textural Accents Gesso
  • Faber-Castell Design Memory Craft® Textural Accents Whipped Spackle
  • Die-Namites Dies  Leafy Branch Die
  • Die-Namites Dies Flowering Branch Die
  • Tim Holtz - Sizzix  Tag & Bookplate Die
  • Tim Holtz - Ranger Ink - Distress Re-Inker  Shabby Shutters
  • Tim Holtz - Idea-Ology - Timepieces
  • Tim Holtz - Idea-Ology - Game Spinners
  • Ranger Ink - Embossing Powder Queen's Gold
  • Zing Embossing Powder Metallic Green
  • Zing Embossing Powder Copper
  • Tsukineko - Versa Ink
  • Liquitex  - Iridescent Bright Gold Ink
  • Stampendous - Dream Text Stamp
  • Amber Gemstones
  • Daisy Dee Vellum Quote
  • Heidi Swapp Butterfly Stencil
  • Prima Sugar Plum Roses - Pink
  • Prima Mini Roses - Cream
  • Gold Scallop Trim
  • Crochet Lace
  • Lindy's Stamp Gang Marigold Yellow Orange
  • Seam Binding
  • Eyelash Fiber - Cream
  • We Are Memory Keepers Large Eyelet
  • Chipboard
  • Cardstock


I love seeing things you create using my tutorials or project share. Please use the following handles in social media to insure that I get to see your creations:
INSTAGRAM: #FollowingTonyaGibbs | TWITTER: @gibbst #FollowingTonyaGibbs | FACEBOOK: Tag Tonya Gibbs #FollowingTonyaGibbs
Read More »

Wednesday, March 26, 2014

Marion Smith Designs and Petaloo Blog Hop Day 3

10
It is so exciting to be a part of this AMAZING blog hop. Make sure to visit all the designer's blogs from March 24th-28th! There are so many amazing projects being shared ALL week! So keep checking back every day.  


 Make sure you comment and subscribe to each blog, as we will be picking some lucky winners to win some awesome new products from both Marion Smith Designs and Petaloo!
 
Links to each blog can be found on the following sites
Marion Smith Designs and Petaloo
 
 
Welcome to day three of the hop!  Today I wanted to share a little mixed media card that I made for Mother's Day. This card could easily be used for any occasion by changing out the sentiment.  


I used scraps from the Never Grow Up Sleep Over paper, Mad Tea Party Wonderland paper, Filigree Doily, Tea Party Stamps, Texture Stamps, and Garden Rose Stamps from Marion Smith S


Petaloo's Velvet Hydrangeas Fuchsia flowers are the star of this card.
 
 
 I really wanted to showcase some of the Marion's amazing stamps on my card.  So I painted the Sleepover paper with white gesso to tone down the paper pattern. I then used Archival Coffee Ink to stamp my images.   I even stamped over the wooden filigree and the flowers, to give them texture. 


This is one of my home made wooden embellishments that I made with the Tea Party stamps and a  balsa wood piece.  I did a tutorial a few months back.  You can view it here.


I added some flat back pearls to the center of the flowers, and painted them with my RV09 Copic Marker to match the flowers.


 A little Heidi Swapp Gold Lame Color Shine finished this card off with the Midas touch!   I know my Mother is going to love this card.
 
Don't forget to check out my projects from Days 1 & 2 as well. 
 
Thanks for hopping with us today,
don't forget to leave a comment, and subscribe! 
 
 
 Angela Carter
 
Aneta Matuszewska

Maggie Armstrong

Sarah Bargo
Ana Paula Leal

Colette Nederhoff

Peggy Baker
 Then hop over to
 
 
Happy Hopping,
 
Tonya
 
 
Card Resources:
 
  • Marion Smith Designs - Never Grow Up Paper Collection "Sleepover"
  • Marion Smith Designs - Mad Tea Party "Wonder"
  • Marion Smith Designs - Filigree Doily  
  • Marion Smith Designs - Texture Stamp
  • Marion Smith Designs - Tea Party Stamp
  • Marion Smith Designs - Garden Rose Stamp
  • Petaloo - Velvet Hydrangeas Fuchsia
  • Flat back pearls
  • Scotch ATG
  • Surebonder Detail Glue Gun
  • Heidi Swapp Pink Archival Ink
  • Heidi Swapp Gold Lame Color Shine
  • Recollections Card sentiment
  • Tattered Angels Timeless Lilac
  • Tattered Angels Tutti Fruiti
  • Bazzil Texture Cardstock
  • Burlap
  • Pearls
  • Dollar Bin - Wood filigree
  • Liquitex Gesso
  • Woodsy - Circles
  • Copic RV09
  • Ranger - Archival Ink Coffee
Read More »

Saturday, February 8, 2014

Embellishment Tutorial Part 2 by Tonya Gibbs

0
Hi everyone, I hope your weekend is off to a great start. A few weeks ago I shared with you a project on making wooden ticket embellishments that coordinate with your paper collections.  Today I want to share with you another idea for embellishing your projects. 


Remember playing with Shrink plastic when you were kid?  I think I made charms in Vacation Bible School for 5 straight years (LOL).  Well here is a grown up project you can make using Marion's super awesome Curious Stamp Set.

I started with Poly Shrink Plastic by the Lucky Squirrel. You can use any brand just make sure it is clear if you want your roses to appear like glass. 


I used the rose & butterfly stamps from the from the Curios set. Stamp them using a permanent ink like Staz-on, or Archival Jet Black Ink from Ranger.


On the OPPOSITE side that you stamped, color the image with a permanent marker. Don't color on the side that you stamped or it will ruin your marker nib.  I used my Copic markers, but no need to worry about shading. The color becomes concentrated when they shrink, so the shading disappears.
 
 
Cut out your Shape.  Remove all negative space, but make sure you keep a thick border in the delicate stem area.   Here is what my Rose looks like when I cut it out. Notice that I colored outside the lines and made my stems a bit thicker.
 
 
Now grab a pair of tweezers, a heat source and start shrinking.  (The plastic will curl as it shrinks, but no worries, keep shrinking it will straighten out). 
 
 
The image shrinks to a 1/3 of the original size.  Once the image is cool enough to touch, I molded the leaves to give them some interest.


Use Glossy Accents or E6000 to adhere the charms to your projects. 
 
 
To show you how beautiful they are on a project,  I created this layout of my amazing parents using Marion's Garment District collection.  I love how tiny the butterflies turned out, and think the roses appear like glass and offer a nice touch of elegance to the layout.  


Here are the supplies from Marion's Garment District that were used to create this layout.
 
 
For more awesome projects using Marion's designs make sure to visit the Design Team's blog at http://www.marionsmithdesigns.blogspot.com 
 
Thanks for stopping in today,
 
Tonya Gibbs

Read More »

Saturday, September 14, 2013

Bubble Art - Watercolor Technique

0
I wanted to share with you a project that I published on Marion Smith Designs today. If you haven't subbed to the Design Team Blog, please go over a follow. The team posts daily. 
 
Hi everyone, today I want to share a mixed media technique that I saw in the April 2013 issue of Martha Stewart Magazine.  In that issue they used paint to achieve this look, but I decided to use my Tattered Angels Mists instead. 


You will need a package of Children's Bubbles, a drinking straw, and your favorite mist colors - make sure you choose a bright color for great contrast.  Also (not shown) you will need a large container for your solution, and a drying mat. I lined a cookie sheet with paper towels.


Pour about a half an inch of bubble solution into a large bowl. Then using the drinking staw blow bubbles. Make sure you don't suck the solution up the staw, and supervise small children.


Then Spray your Tattered Angels sprays over the top of the bubbles. Make sure they are very saturated for even results.

 
Place your cardstock ontop of the bubbles, but do not allow it to touch the liquid below. 

 
Lift the cardstock and blot dry with a paper towl.  Repeat these steps until desired pattern is achieved.

 
I die cut mine with the Tim Holtz Tag and Tab die, and tied a piece of seam binding to the top.


The tag makes an interesting layer on this card.  This technique would also be super cool in mixed media canvases, on layouts, and the article used it on butcher paper as gift wrapping. 


We experimented with adding multiple colors and the results were super fab. Blue, Green, and Gold were my nephew Cooper's favorite combo.  He really enjoyed playing with these bubbles. 

Thanks for stopping in today,

Tonya Gibbs
http://www.psychomomscrapbooks.blogspot.com

Read More »

Friday, May 3, 2013

Tarnished Silver Tag

0
Last week I shared with you a card I created using the Tattered Angels' Naturally Aged Paint System Bare Metal Tarnished Silver.  Today I would like to share a second project that I created using the other pieces created in my sample video.


The background of the tag was embossed with a Cuttlebug - Clockworks embossing jacket after the card stock was dry. As you can see the card stock looks like embossed metal. Below is a sample of the dry paper before it was embossed and die cut into a tag. I really wanted you to see how much texture and shine these mediums give your projects.  Bonus - it is just card stock, not metal. This means it is light weight enough to be mailed, making it perfect for cards.  Also, it can be easily die cut, punched, embossed, or cut with your electronic cutters.

 
 I used the 7Gypsies Paddington Stamp with Ranger Archival Jet Black Ink to give the appearance of dripping oil.  Then I covered over those splotches with Glimmer Mist, Almost Black, to give a little shine to the oil.  The sentiment was created in Photoshop CS6 using the Bookman Old Style Font, and attached to the tag with a 7 Gypsies Mini Paper Clip - SIDE NOTE:  LOVE THESE NEED CASES OF THEM - they come in several different colors, and are so tiny and cute. 
I also cut a Sizzix Primitive Heart from chipboard after covering it with 7 Gypsies Paper tape from the Lille Collection. I love the contrast of the red against the sea of metallic colors. The heart was edged with a silver pigment ink pad from Color Box to make it looked finished. The 7 Gypsies Hardware - Industrial Gears were the perfect touch to bring my clockworks background to the foreground. I found a scrap of DCWV Tattered Time paper and was able to cut the clock face to add to the bottom.

As a reference here is the video I shared last week on how I created the background effect with the Tattered Angels Paint System.


I love how the finished tag came out. It would be perfect on the face of a masculine card, or as an embellishment on a scrapbook page.  Have you tried any of the Paint Systems yet?  If so, please post them on Facebook and be sure to tag me in the post.   I would love to see your creations.
 
Thanks for stopping in today,
 
Tonya Gibbs
 
 
Resources: 
  •  Tattered Angels:
    • Naturally Aged Paint System Bare Metal Tarnished Silver
    • Almost Black Glimmer Mist
  • 7 Gypsies:
    • Hardware - Industrial Gears
    • Mini Paper Clip - Antique Brass
    • Paper Tape - Lille Collection
    • Paddington Stamp
  • Ranger/Tim Holtz:
    • Pumice Stone Distress Ink
    • Archival Ink Jet Black
    • Tiny Attacher
  • Sizzix
    • Primitive Heart Dies
    • Alterations - Tag & Tie  Die
  • Provo Craft: Clockworks  Embossing Jacket
  • DCWV: Tattered Time 4x6
  • Seam binding
  • Font:  Bookman Old Style Font
  • Photoshop CS6
  • Manila Card stock - Recycled File Folders


Read More »

Sunday, December 30, 2012

Bare Metals and Tim Holtz Oh My

4
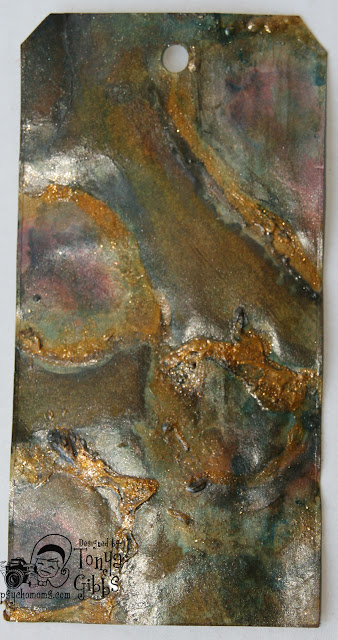
So I paid a visit to my good friend Suzanne at FlamingoScraps.com yesterday and she gave me a set of the New Tattered Angels Bare Metal Sprays for my birthday.  I was ITCHING to play with them yesterday.  So I pulled out some Tim Holtz Tags from Ranger and started playing.


Here is a photo of the tag prior to decorating so you can see all the luscious details in the colors. I love the texture, and the vibrant tones that mixing all these colors brings. When you heat set the Gold and Pewter sprays they bubble and crack which causes the ridged texture that you would find in rust.  LOVE IT!

 
I was so excited that I had to finish the tag - "Tim Style" by using my new mover's and shapers Typewriter die.  The dressform was inspired by Marion Smith's latest Live with Prima where she shared how to make Christmas Ornaments.  I used her technique for the book pages on the mover's and shapers mini dressform die.  


I hope you try out these sprays. They are so much fun.  Thanks for stopping in today! 
 
Happy New Year,
 
Tonya
 
Resources:
 
  • Tattered Angels:  Bare Metal - Rusty Metal Sprays
  • Ranger:  Tag, Rusty Hinge Distress Ink, Distress Markers Barn Door, and Black Soot, Black Soot Distress Stain, Utee 
  • Sizzix:  Tim Holtz Mover's and Shapers - Mini Typewriter, Mini Dress form.
  • Ideaology:  Tim Holtz Pen Nib, Dictionary Tissue Tape
  • Misc:  Book pages, Beaded trim, Seam Binding, Tulle, and tensil
  • Prima: Bling
 
Read More »

Friday, April 20, 2012

Hidden Hinge Binding - March Journal

0
Last week I promised a tutorial on how I bound the March Journal book.

Here is a video explaining, the binding and the cover construction.


Thanks for stoppping in today,
Tonya Gibbs
http://www.psychomoms.com
Read More »
I love seeing things you create using my tutorials or project shares. Please use the following handles/tags in social media to insure that I get to see your creations:

INSTAGRAM: #FollowingTonyaGibbs    |   TWITTER:  @gibbst    #FollowingTonyaGibbs   |      FACEBOOK:Tag  Tonya Gibbs   #FollowingTonyaGibbs

I Design for:

    http://www.yvonneblair.com

Guest Artist: Click icon to see post!

http://www.teresacollinsdesignteam.blogspot.com/2013/10/family-stories-layout-and-video-by.html#comment-form   http://canvascorp.com/2013/03/21/easter-treat-baskets/


Past Teams

http://www.die-namites.com/     marion