Follow Me...

       
Thanks for stopping by! Don't forget to subscribe!
Showing posts with label HowTo. Show all posts

Tuesday, May 5, 2015

May Ustream Re-Cap

0
Oh my goodness we had a blast last night.  We played around with some super simple watercolor and doodling techniques, and made these beautiful cards.


We discussed super simple methods for creating roses, rosebuds, and daisies.  Then we combined these into a floral swag.   Everyone was simply amazed at how easy it was to create these designs.

My best advice is don't over think it, and practice practice practice!

Also Note:   The products listed here, are products that I love and use often.  I have not been compensated by these companies to promote these items. 

For the show I used these supplies:

PAINTS


I have linked to Amazon, but I got mine from Michael's. 


PEN SUGGESTIONS:

Of course there are lots of pens on the market that are amazing, and perfect.  I am only going to talk about the ones that demoed last night.   I have the Microns and love them as well, so if you have them, use them!  Also remember that everyone writes different, and their hands are shaped differently. Left handed vs. Right handed makes a big difference too.  I am suggesting what works for me, but you need to experiment to find your perfect pen!
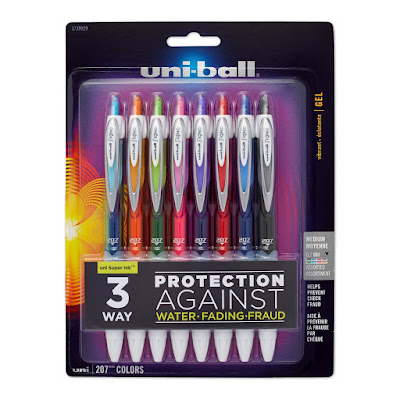

Here are the pens that I used last night:

I'm linking to Amazon for these, but I got this one at Office Depot


OMG - I LOVE THESE!   I used these after I turned the recording off. I wrote the Thank You then Water colored the blue in the background (see pic above).  They are water proof and smear proof almost the second you write.  I would set them with a heat gun just to make sure the fibers of the papers are dry before applying water.   


I'm linking to Amazon for these, but I got this one at JoAnns

This one is one of my favorite outline pens.  It writes the best over the water colors.   The line is kind of thick, but for this technique I'm good with it.  It has a great flow, and I found that I wanted to write with it when I tried it out.  This pen is truly the inspiration for tonight's show.  When I busted it out of the package, I couldn't stop scribbling with it.  I found that it is water proof, but only after I set it with the heat tool.   It takes a bit to dry before it is smear proof. 


I'm linking to Amazon for these, but I got this one at Office Depot

Sorry Sharpie - but I wasn't a fan.  It is water proof, and maybe if I were drawing before applying watercolor it would work better.  But I found it wanted to skip a lot on top of the watercolor.  To be fair though - I was rushing the process and maybe the surface of my paper appeared dry but really wasn't.  I'll test this theory out on some doodles that were made in advance before I pass judgement.  I did use this pen for the first 30 mins or so in the show, so you can see for yourself. 

CARDSTOCK:
In addition to these supplies, I also used 110lb Standard Cardstock.   I would avoid watercolor paper if you plan to doodle.  The texture in the paper may cause issues with sketches. The GP brand paper at Wal-Mart is PERFECT!

We also discussed using a template to practice your hand lettering techniques.  

HAND LETTERING TIP:

I recommend opening your word processor (Word) and type the word you would like to appear on your card, then write the several times down the page, in the font you would like to duplicate.  I chose a soft grey color for the font color.  Place as many of these on the page as will fit.   Do different sizes if you wish.  Then print them out.  This will be your practice sheet.  Trace over the letter shapes until you develop a muscle memory and the lettering techniques become second nature.  

I have created a sample using the word Happy Birthday.  In this example I have used several different fonts for you to practice your handwriting skills. 

Here are a sample with multiple font styles
click on the image to open, then print.


 Here is a sample with one font style.
click on the image to open, then print.


Just print these out and write them, until your brain can tell your hand how to do it!   Practice Practice Practice  is the best advice I have.  Try making your own for sentiments you use a lot.


Here is the recording if you missed the show live: 


Here are a few other cards that I created when prepping for the show:


Thanks again for coming to the show live last night, and hanging out for the post - show!   I had a great time with our "Creative Play Time"  and I hope you guys did too!   Best of all I got to meet a few new friends.  


If you try these out, please please please share them with me!   I would love to see what you create.   Tag me on Facebook, Instagram or Twitter, and don't forget to #FollowingTonyaGibbs

Our next class will be June 2 at 8:30 p.m. EST. 


Read More »

Saturday, September 20, 2014

Mixed Media Tag

0


I just LOVE mixed media tags. I love to create them, I love to get them and I love to share them.  This is one of my favorite ways to use scraps, and experiment with new techniques.  When I created this tag, I gave myself  two little challenges.
  1. ONLY USE THE OLDER PRODUCTS 


This was easy enough -  I really don't think there was a single item on this tag that was new!   I used old Rub-ons that are so old they were cracking (LOL)  It is time for them to go!   And all the other products with exception of the mediums and pearls were found in a bucket of scraps on my desk!


2.  Do something new!    -   I wanted to experiment with different sized pearls and adding them to my floral sprays.  So I decided to use the Glass Bead Glitter Gel from Faber-Castell Design Memory Craft®.  You can see the micro beads from the Glass Bead Glitter Gel adding additional texture to the larger pearls.  LOVED this technique!   They remind me a little of grapes, and may consider that with a grape fine spray in the future! 
 
I just love this transparency that I printed several years ago when I took the Rhonna Designs' 21 Day challenge in 2010.   I added Patina Alcohol Ink to the back so that the lettering was easier to read.

 
This little Nylon butterfly has been around for a long time. I just keep putting him back in the bucket.  Now he has a cozy place to sit!
 
I have prepared a process video of me creating the tag.


Here is the finished tag!  Isn't it GORGEOUS!
 
I love how this tag looks like rusted metal.  The Patina effect is simply gorgeous!  There is a ton of texture, and so much eye candy here!
 
Remember to Save the Date - Our next Ustream will be October  6 at 8:30 p.m. EST.  I hope you can join me.  I plan to do some chalkboard art! 
 
Thanks for stopping in today,
 
Tonya
 
Supplies:
 
  • Sizzix - Tim Holtz®  - Alterations Collection - Movers and Shapers Die - Tag and Bookplates
  • Tim Holtz® Idea-ology® Findings  Adornments – Charm Pack
  • Tim Holtz® Idea-ology® Pearl Baubles
  • Prima flowers & Leaves
  • Prima Cotton Fabric Tape
  • Faber-Castell Design Memory Craft® Textural Accents - Gesso
  • Faber-Castell Design Memory Craft® Textural Accents - Glass Bead Glitter Gel
  • Dry Wall Tape
  • Ranger Ink - Adirondack Earthtone Dye Ink Reinker Butterscotch
  • Ranger Ink - Alcohol Ink Vintaj Patinas
  • Lindy's Stamp Gang - Tiffany Blue
  • Tsukineko Staz-On Ink Refills Black
  • Small Tag
  • Charm
  • Garment Pin
  • Nylon Butterfly
  • Marion Smith Designs Junque & Gems Metal Filigree
  • Seam Binding
  • Rub On Letters
  • Music Note Stamp
  • Viva precious Metal Gold Paint
  • We Are Memory Keepers Large Eyelet Black
  • Rhonna Designs 21 Day Challenge Art Quote
  • Loose pearls (2 sizes)

I love seeing things you create using my tutorials or project share. Please use the following handles in social media to insure that I get to see your creations:
INSTAGRAM: #FollowingTonyaGibbs | TWITTER: @gibbst #FollowingTonyaGibbs | FACEBOOK: Tag Tonya Gibbs #FollowingTonyaGibbs
Read More »

Thursday, August 7, 2014

August 4 Ustream Recap

1


Wow we had a fantastic time last Monday night. Lots of Yummy techniques using our Gelatos®, Whipped Spackle, Gesso, Gel Medium, and Glaze from Faber-Castell Design Memory Craft®, Bo Bunny Sentiments, Heidi Swapp Stencil, and Tim Holtz Distress Watercolor paper. 


As always thank you to the Scrapbooking with M.E. Boutique for managing the sales of the kits, and to their amazing Design Team for promoting and following up with future posts using these products!

In the show we created 4 very different card designs!


On this card, I showed you how to avoid "mud" and create colorful backgrounds.  We mixed the Margarita and Watermelon Gelatos® to create this lovely orange that we mixed with the Whipped Spackle for texture and depth. I also demoed how to resist with Gesso. 


I showed how the Gelatos® look on a black cardstock.  I love that they look just like chalk!  So pretty. This card could easily be a masculine card by changing out the feminine colors. 


On this card, we did a resist with embossing powder.  I also showed you how to combine stamps in the set to create a word cloud effect, and interesting background! 


And finally we used the Gelatos® as a watercolor medium. Sometimes "Mud" is what you really want. Like when I created the tree branch above.   So I showed you how to use the Margarita Mix, Snow Cone, and Raspberry Gelatos® to create a pastel brown. 

Congrats to our winner - Jeanie Ellis on being our winner of the Faber-Castell Design Memory Craft® Mixed Media Kit!

Here is a link to the Playlist with all three parts of the video tutorial.


In addition to the supplies above, I also used the following:

  • Faber-Castell Design Memory Craft® PITT® Stamper's Big Brush Artist Pen in Black
  • Studio Calico - Wood Veneer Bird
  • Cardstock  Black, White, and Cream
  • Cuttlebug Embossing Jacket - James' set
  • Twine
  • Die-Namite Dies Flowering Branch Die
  • Die-Namite Dies Swirly Butterfly
  • Prima Flower
  • Sequins
  • Tissue Paper (white)
  • Butterfly Stamp (brand unknown)
  • Stampendous Dream Text Stamp
Thank you so much to everyone who came to the show live.  I hope those of you joining in the recordings have as much fun as we did live.   Share with me in the comments below how you use your Gelatos®.

The September Ustream Kit is up for sale now!  Make sure you grab yours before it is gone!

Thanks for stopping in today,
Tonya


I love seeing things you create using my tutorials or project share. Please use the following handles in social media to insure that I get to see your creations:
INSTAGRAM: #FollowingTonyaGibbs | TWITTER: @gibbst #FollowingTonyaGibbs | FACEBOOK: Tag Tonya Gibbs #FollowingTonyaGibbs
Read More »

Wednesday, August 6, 2014

Full Bloom Chalkboard for Faber Castell Design Memory Craft

0


Hi everyone,  I'm super excited to bring  you today's project. I've created this Chalkboard Art that would make an awesome gift for someone.   This project is one of those that started out being one thing and ended up being something totally different.  I started out wanting to make watercolor card gift sets to share with friends. But when I finished the Art Panel it was just too beautiful to turn into a card. It needed to be displayed on a wall!

I have created a process video that is included in the post on the Faber-Castell Design Memory Craft Website.

Continue reading "Full Bloom Chalkboard by Tonya Gibbs" »


Thank you so much for stopping in today.

Tonya


I love seeing things you create using my tutorials or project share. Please use the following handles in social media to insure that I get to see your creations:
INSTAGRAM: #FollowingTonyaGibbs | TWITTER: @gibbst #FollowingTonyaGibbs | FACEBOOK: Tag Tonya Gibbs #FollowingTonyaGibbs
Read More »

Tuesday, June 17, 2014

Rosebud Tutorial on Marion's Blog

0
HI everyone, over on Marion's blog a few weeks ago I was asked to do a tutorial for  making Rosebuds.  For my blog post today, I have given a step out tutorial on creating these rosebuds.


I used Marion Smith Designs Bloom Impression Dies - Large Roses, Glue Dots®, and Tattered Angel's Sunshine Glimmer Mist for my roses.


I used these rosebuds on the canvas that I featured last week  for the blog hop.


Look at how gorgeous these buds look wrapped in this floral spray.


I hope you have fun making these rosebuds. If you do, please share your projects with us in social media by using the #MarionSmithDesigns  #BloomImpressionDies


Thanks for stopping in today.
Tonya


Read More »

Wednesday, June 4, 2014

Urban Market Mini Album FAQ

0
WOW -  the response to this mini album has been super overwhelming. Everyone is really enjoying playing along with me.   I have had a lot of fun myself.


We had some great questions on the last follow up post.  SO I hope I can answer them here!

  1. Julie asked:    Thank you for class last night. The photos here are lovely - shows the colors up so much better than the live broadcast. Each page has its own beauty. You mentioned in the video and on here that you would discuss alternatives to binding (although I do have the cinch I am open to other suggestions too) but I think we must have run out of time. Maybe you are thinking of doing that in your update posts. Anyway - thanks again.
I'm SOOOO SORRY  I didn't bring this up that night. I think my brain was so overwhelmed, and  I JUMPED right into creating the pages.   
Solution 1:  I found this awesome video by my Friend Tracy - From Tracy's Treasures 24 on YT.   Called "NO BIND IT ALL - NO PROBLEM!" 
Solution 2:   Use your hole punch and just use jump rings.  Here is a quick 5 hole cutting guide that I created for you! 


  1. Claire aka zanysisters  asked:   Tonya, As I said in my comment on Scrapbooking with ME, last night's class was fabulous. I do have a question. I don't have have any kind of large die cut to use on the Dots paper. I can make do with border punches for the other bracket pieces. I am kind of at a loss for a solution. Any suggestions? Thank you so much 
Solution:    There are lots of options for achieving this look,  Cricut has some, as well as the Silhouette.  But if you don't have an kind of electronic cutting systems, then I have prepared this PDF with a comparable shape.   You can Download it here!    Print this out and cut along the black lines,  then use this shape as a guide for cutting your paper.  
  1. If you missed the live class - you can watch the videos here.   Remember that you don't have to purchase a kit to follow along.  You can substitute these products for things that are in your stash.  I always encourage you to use what you have.  Look in your supplies and see if you can find things that are comparable! 

Part 1 of the Ustream

Part 2 of the Ustream


If you are playing along with us, please make sure you post pictures to the Scrapbooking With M.E. Boutique Members Facebook group so we can see your version of the album.  #TonyaGibbsJuneUstream in other social media outlets so I will be able to find it! Check back on Friday for a follow up post with additional page embellishments.
Thanks for stopping in today,Tonya
Read More »

Monday, June 2, 2014

Ustream Tonight - June 2 PREP GUIDE

2
Oh I'm so excited about tonight's class at 8:30 p.m. EST.  We are using Teresa Collin's Urban Market Collection. Tonight's show is sponsored by Scrapbooking With M.E. Boutique.  I hope you can join us live the Boutique is planning to host a give away! You do not need to purchase a kit to come enjoy the class.  We have lots of fun chatting with friends, and learning new tricks and techniques.  What a fun way to kick off the first Monday of the month.  If you can't join us live - never fear -  you can catch up on the recording.  A recap post will be posted later in the week. 


This kit had so many yummy goodies, that I decided to create a little mini book.  Since we only have 1.5 hours live - I decided to go ahead and give you guys some homework! 


Here is a walk through video of the mini book. 


As an added note -  I went ahead an bound my book with my Cinch.  If you don't have a Cinch, or Bind It All, We will discuss other options for binding in the class.  In the video I said Don't bind, but you can if you wish!


I hope you guys can join me. It is going to be so much fun! 

Thanks 
Tonya 
Read More »

Thursday, May 22, 2014

You Are Loved Layout using Die-Namite Dies

1
Hi everyone, over on the Die-Namites blog today I'm sharing a layout that I created of me and my daughter Brittany. 


Here are the Die-namties Dies that I used for this layout.

http://www.die-namites.com
 
 
Here is a process video of me making this gorgeous layout.


Supplies Used:
  • Die-Namites Dies
  • Faber-Castell Design Memory Craft PITT Big Brush Artist Pens
    • Medium Flesh  131
    • Green Gold 268
    • Cold Grey VI 235
    • Light Cobalt Turquoise 154
    • May Green 170
    • Phthalo Blue 110
    • Dark Sepia 175
  • Tattered Angels Glimmer Mists
    • Dried Hydrangea
    • Honey Dew Melon
    • Cherub Pink
  • Heidi Swapp
    • Gold Lame Color Shine
    • Heart Lattice Stencil
  • Recollections
    • Microbeads
    • Resin Bird Houses
  • Prima - Shabby Chic Resin Birds
  • Liquitex
    • Gesso Prep Surface
    • Light Modeling Paste
  • Krylon - Gold Metalic Spray Paint
  • Glitz - Giant Roller Doodle Triangles
  • Ranger 
    • Archival Jet Black Ink
    • Tim Holtz Distress Ink - Vintage Photo
  • Stampabilities - Faded Script Stamp
  • EK Success - 1" Circle Punch
  • Tim Holtz Idea-o-logy - Word Plate
  • Fab Scraps -  Flat back Pearls
  • Amy Tangerine - "Yes Please" Roller stamp
  • 7Gypsies  - Library Drawer Naked Tabs


Read More »

Tuesday, May 6, 2014

May Ustream Follow up

0
Thank you to everyone who came out to support the show last night - we had a few technical difficulties but we got through them, and look at this super fab canvas we finished! 


Thank you to the Team at Scrapbooking With M.E. Boutique for sponsoring this event and all they did to make the kits happen.  We sold out in less like 5 mins.  WOW that was so crazy.  You can get more information about their store and awesome ideas from their design team from their blog: 


For some reason Ustream was hating on my show last night.  I'm having difficulty getting Video 3 to YouTube so I'm including links to the show on Ustream to lessen the confusion.    All three are in great working order on Ustream.  

Video 1   |    Video 2  |    Video 3


Supply List: 
  • Marion Smith Designs - Motley Paper Collections in 12x12
  • Marion Smith Designs - Junque & Gems - Filigree Doily
  • Marion Smith Designs - Junque & Gems - Filigree Flower
  • Marion Smith Designs - Junque & Gems - Filigree Butterfly
  • Marion Smith Design - Printable Life Journal 
  • McCalls - Vintage Pattern
  • Liquitex - Fluid Matt Medium
  • Liquitex - Light Modeling Paste
  • Plaid - Bimini Blue Paint Apple Barrel
  • Folk Art  - Metalic Gold Paint
  • Krylon - Metallic Gold Spray Paint 
  • Doily - 6 inches
  • Recollections - Microbeads Beads
  • Splash of Color - Mist Irish Blue
  • Ranger Ink - Archival Ink Coffee
  • Ranger Ink - Tim Holtz Distress Ink Vintage Photo
  • Ranger Ink - Gold Utee
  • Ranger Ink - Queen's Gold Embossing Powder
  • Prima - Distress Tool
  • Michael's Wood Filigree 
  • Fiskars Jenni Bowlin  Punch - Blue Ribbon
  • Marvy Jumbo Punch - Pennant
  • Lace
  • Recollections White Daisy Flowers
  • Heidi Swapp - Color Shine Prim Rose
  • Heidi Swapp - Color Shine Gold Lume
  • Heidi Swapp - Layer Stencil - Heart Lattice 
  • Sizzix Alterations - Tim Holtz Movers and Shapers  Tag/Book Plates Die
  • Cheese Cloth
  • Burlap
  • Pearls


Save the Date - Our next Ustream will be June 2!

Thanks again, 

Tonya Gibbs

Read More »

Friday, April 18, 2014

Mixed Media Masculine Card

2
 
I've been sharing a lot of pretty cards lately, and today thought it would be fun to share with you a masculine card.  Lately I've abandoned my art journal for pieces of 4.25 x 5.5 inch sheets of mixed media paper.  I try out new mediums, play with techniques, and then recycle these panels into card backgrounds.  I find that mixed media techniques make masculine cards come together much easier!  And you could always keep the card 1 layer and display your art rather than lots of layers.
 
Here are the steps I took to create the background
 
 
  1. Apply modeling paste to your card with stencil of choice (I used Heidi Swapps Honeycomb)
  2. Use A Faber-Castell Design Memory Craft Pitt Pen to apply color around the image. 
  3. Use your finger to smooth out the ink.
  4. Select a texture Stamp (I used Marion Smith Designs' Texture Stamp)  Apply ink to the stamp with a contrasting PITT Pen 
 
  1. Apply archival ink around the image to give a distressed look. NOTE: you can use distress inks, but if you add water, they will react with that water.  Archival ink is permanent when dry.) 
  2. Spray a wet medium onto a pallet.  I used Lindy's Stamp Gang Moon Shadow Mist in Gossamer Gold  
  3. Stamp a round object into the ink and apply it to your card
  4. You will see a water ring just like it were left from coffee or tea. 
To finish off the background I added pieces of tissue tape with matt medium.   I added the panel to a piece of black cardstock and created this card for my nephew's birthday.


He loves photography, so I took advantage of using up some scraps to create this photo layers.   The Camera and Polaroid Frame were a Spellbinder's Die.  I then added the Tim Holtz Film Strip Ribbon, and Marion Smith's Washi Tape from her Romance Novel Prima line.   Happy Birthday stamp was from Studio G.  My nephew was turning 13 so I added a few school aged elements like notebook paper, music tape, geometrical shapes, tag and paper clip.  
 
Don't forget about the Artsy Addicts Sketch Challenge through out the month.  You can get details here!
 
 
Thanks for stopping in today,
 
Tonya Gibbs
 
 
Read More »

Tuesday, April 15, 2014

Shabby Fabric Flower Tutorial by Tonya Gibbs

0

Hi everyone HAPPY IRS day if you are here in the US (LOL - GRUMBLE GRUMBLE)   Here is a post that will help you get over those tax day blues!


I'm sharing with you a simple tutorial for creating these beautiful Shabby Flowers using Marion Smith Designs Rose Petal Die (the one in the center of the photo below). Oh and BTW -  the Bloom tools are shipping to retailers now - so exciting I hope you got one. I used embossing powder to recolor the filigree flowers from antique brass to gold and silver.

For my tag I used the Garment District collection and Marion's Junque and Gems for my Flower centers.


I've attached my flower to this tag.  I created the tag background during my January Ustream.  Can you say ohhhhhhh soooo Shabby?


Here is a process video of me making the flower.


 I'm working on a few projects now using these flowers.  My next few posts will be using them. 


Thanks for stopping in today,

Tonya Gibbs
http://www.psychomoms.com


Flower Supplies:

Marion Smith Designs - Junque & Gems
Marion Smith Designs - Bloom Impressions Dies  - Rose Petal (Large die)
Unbleached Muslin
Needle
Thread
Desired Flower Center


Tag:
Golden Gesso (Black)
Liquitex - Matt Medium Fluid
Marion Smith Designs - Garment District Paper - 12 x 12
The Crafter's Workshop - 6 x 6 Doodling Templates - Mini Bricks
Advantus - Tim Holtz - Idea-ology - Sanding Block - also known as Sanding Grip
Ranger Ink - Archival Ink Pad - Jet Black
Ranger Ink - Archival Ink Pad - Coffee
Ranger Ink - Inkssentials - Dylusions Ink Spray - Melted Chocolate
Ranger Ink - Inkssentials - Heat It Craft Tool
Ranger Ink - Tim Holtz - Distress Paint - Metallic - Tarnished Brass
Ranger Ink - Tim Holtz - Distress Paint - Walnut Stain
Ranger Ink - Tim Holtz - Distress Ink Reinkers - Walnut Stain
Ranger  Ink - Tim Holtz Distress Ink Pads - Antique Linen
Ranger Ink - Inkssentials - Specialty Stamping Paper - 12 x 12
Prima - Bretton Vines Collection - Flower Embellishments - Purity
Prima - Flower Embellishments
Prima - Vintage Trinkets Collection - Metal Embellishments - Keys
Prima - Julie Nutting - Cling Mounted Stamps - Mixed Media Doll - Six
Sizzix - Tim Holtz - Alterations Collection - Movers and Shapers L Die - Vintage Valise
Sizzix - Bigz Die - Wings, Angel
Silhouette America - Cameo - Electronic Cutting System
Tattered Angels - Glimmer Mist Spray - 2 Ounce Bottle - Antique Brass
Tattered Angels - Glimmer Mist Spray - 2 Ounce Bottle - Wheat Fields
Copic - Sketch Marker - E50 - Egg Shell
Copic - Sketch Marker - E55 - Light Carmel
Copic - Sketch Marker - E30 - Bisque
Copic - Sketch Marker - E37 - Sepia
Copic - Sketch Marker - E11 - Bareley Beige
Copic - Sketch Marker - E01 - Pink Flamingo
Copic - Sketch Marker - R20 - Blush
Copic - Sketch Marker - 0 - Colorless Blender
Copic - Sketch Marker - BV23 - Grayish Violet
Tsukineko - Memento - Dye Ink Pad - Tuxedo Black
Faber-Castell Design Memory Craft - Color Gelatos - Metallic - Gold
Vintaj Metal Brass Company - Metal Jewelry Chain - Flat Link

Misc.  Pocket Watch
Misc. Vintage Hymn paper

- See more at: http://www.psychomomscrapbooks.blogspot.com/2014/01/ustream-baggage-mixed-media-canvas-by.html
Read More »

Monday, March 24, 2014

Marion Smith Designs and Petaloo Blog Hop

18
It is so exciting to be a part of this AMAZING blog hop. Make sure to visit all the designer's blogs from March 24th-28th! There are so many amazing projects being shared ALL week! So keep checking back every day.  


 Make sure you comment and subscribe to each blog, as we will be picking some lucky winners to win some awesome new products from both Marion Smith Designs and Petaloo!
 
Links to each blog can be found on the following sites
Marion Smith Designs and Petaloo
 
 
Don't you just love spring?  It is my favorite time of year.  Today's project is a Shabby Chic layout of my Niece Adalyn at Easter last year egg hunting.   
 
 
 These gorgeous Botanicals from Petaloo complimented Marion's paper lines beautifully! Here are the products I used to create this layout.  


The flowers remind me of the azaleas blooming in my front yard at the moment.  I wanted to create a Shabby Chic Mixed media layout that I could hang on my fireplace mantle, and bring the spring in doors.  Marion's Never Grow Up line had these beautiful spring patterns that made the entire piece come together.   


I have created a process video showing you how I made the layout!


Thanks for hopping with us today,
don't forget to leave a comment, and subscribe! 
 
 
 Angela Carter

Maggie Armstrong

Sarah Bargo
Ana Paula Leal

Colette Nederhoff

Peggy Baker
 Then hop over to
 
 
Happy Hopping,
 
Tonya
 
 
Layout Resources:
 
  • Marion Smith Designs - Never Grow Up Paper Collection "Self Portrait"
  • Marion Smith Designs - Never Grow Up Paper Collection "Sleepover"
  • Marion Smith Designs - Doily
  • Marion Smith Designs - Junque & Gems Filigree
  • Marion Smith Designs - Junque & Gems Resin Roses
  • Marion Smith Designs - Junque & Gems Filigree Butterflies
  • Marion Smith Designs - Junque & Gems  Bird's Nest 
  • Petaloo - Botanica Blooms - Purple
  • Petaloo - Velvet Hydrangeas Fuchsia
  • Petaloo - Velvet Hydrangeas Cream
  • Petaloo - Botanica Minis Lav/Purple
  • Petaloo - Spring Berry Clusters    
  • Liquetex - Matt Medium
  • Liquetex - Gesso
  • Cosmo Cricket - Sliver Glitter Adhesive sheets
  • Copic Sketch RV09, RV55
  • My Mind's Eye - Alpha Stickers Sky's the Limit Collection
  • Zutter - Corrugated Sheets
  • Folk Art 2556 Medium Blue Acrylic Paint
  • Ranger - Crackle Paint Clear Rock Candy
  • Heidi Swapp - Pink Archival Ink
  • Pure Ice Nail Polish - Spitfire 
  • Paper Shaper Egg Punch
  • Satin Ribbon
  • Small Luggage Tag
  • Martha Stewart 3-1 Classic Butterfly Punch
  • Martha Stewart Foam Adhesive
  • Wooden filigree
  • Scotch Foam Adhesive
  • Scotch ATG
  • Surebonder Detail Glue Gun
  • Tonic Scissor
  • EK Success Craft Tweezers


Read More »
I love seeing things you create using my tutorials or project shares. Please use the following handles/tags in social media to insure that I get to see your creations:

INSTAGRAM: #FollowingTonyaGibbs    |   TWITTER:  @gibbst    #FollowingTonyaGibbs   |      FACEBOOK:Tag  Tonya Gibbs   #FollowingTonyaGibbs

I Design for:

    http://www.yvonneblair.com

Guest Artist: Click icon to see post!

http://www.teresacollinsdesignteam.blogspot.com/2013/10/family-stories-layout-and-video-by.html#comment-form   http://canvascorp.com/2013/03/21/easter-treat-baskets/


Past Teams

http://www.die-namites.com/     marion