Follow Me...

       
Thanks for stopping by! Don't forget to subscribe!

Saturday, November 30, 2013

Mad Tea Party Chalkboard by Tonya Gibbs

0
Hi everyone, I hope you are having a fantastic weekend.   Today I would like to share with you a Mirror that I altered with Marion's super fab Mad Tea Party Line. 


I used these patterns from the paper collection


I bought an unfinished wooden mirror and frame from a craft supply story.   I removed the mirror and stained the sides and back with Tattered Angels' Cork Glimmer Mist.  This frame is 11.25 x 9.25 inches with a 5x7 opening.


After the Glimmer Mist has dried, I covered the entire frame with Claudine Hellmuth Studio Matte Medium.  I applied several coats to the top surface to insure my paper overlay would adhered to the wood.  The Matte Medium seals the wood and the Tattered Angels spray.


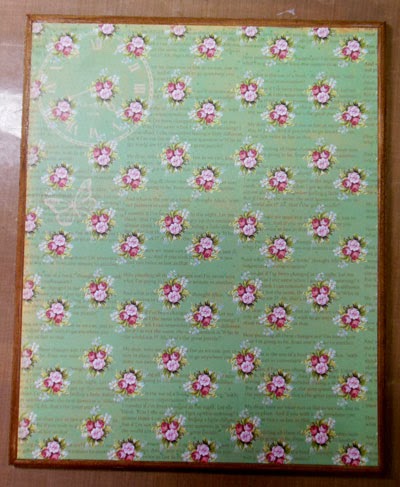
I then added my paper to the top of the frame.  To insure that I didn't get the hole cut incorrectly, I decided to affix the entire paper to the frame.  I used a brayer to make sure all the air bubbles were removed from the paper. I allowed the paper to completely dry. 
 
 
Then I flipped the frame over and trimmed out the hole with an x-acto knife.   I then applied another coat of Matte Medium over the paper.  Set this aside and allow it to dry.


Then I painted several coats of this Glass Chalkboard Paint by DecoArt on the Mirror. Make sure you don't leave streak marks in the paint, and allow it to dry completely between each coat. If you plan to paint a surface that is going to be used in a dishwasher, make sure you follow the directions on the bottle and bake the item to cure the paint. Since I'm not washing this project, I let it completely dry for 24 hours before I wrote on the chalkboard.  


Once the board was completely dry, I added it back to the frame.  I rubbed chalk over the board and cleaned it off with a dry paper towel.  This seasons the board so that the chalk runs smoothly over the surface.  Then I decorated the left and bottom to make the frame more interesting.  


I made the flower that is used for the focal piece.
 
Here is a Youtube video showing you how I made these flowers.


This frame will make a nice Christmas gift for one of my friends.  I love how simple it was to create. It could be hung on the wall, or propped on an end table with a decorative easel. 
 
Thanks for stopping in today,
 
Tonya Gibbs

Read More »

Friday, November 29, 2013

December Daily Update

0
I hope everyone had a fantastic Thanksgiving!  Today starts BLACK FRIDAY and the beginning of the Holiday Season.  Every year, I try to do a December Daily, and it seems that I get started then BOOM life gets crazy, and I totally drop the ball.  This year I want to try a different approach.  I'm going to share my weekly progress here, with you guys.  Each Friday, I will share with you my pages from the week! Hopefully, this will hold me accountable, and encourage me to finish mine, while  inspiring  you to finish yours!

This year I'm using Basic Grey's 25th & Pine.  I love the vintage feel of this collection, and thought the simple patterns allowed for a lot of layering options.  As you can see the collection has lots of Yummy embellies to bring the book to life.


I created the covers during my November Ustream. My December Ustream will be Monday, Dec. 2 at 8:30 pm est,  and I will created the first few days and couple of tags.  If you have time, I hope you join us!  My channel name is:  http://www.ustream.tv/channel/gibbst


I love the ornaments in this collection, so I wanted to use them on the covers. 

 
Chalkboards are very popular this year, so I thought it would be fun to include some in my book. 
 
 
Aren't these ADORABLE and fun? I thought this would be a cute embellishment cluster for a few of the number sets.   I have a video in the playlist showing you how to make them. 
 
This was an "Uh Oh" from another project that ended up being an awesome addition to this project. (Never throw away the mistakes - you just never know when they will work for something else.  Basically this is a 6 inch x 9.5 inch  sheet of red cardstock.  With an on the edge die cut from the top and the bottom.  Then I folded the bottom up to form a 6x6 square sewed the edges to make the flap into a pocket.  Then trimmed the edge with washi tape.  Now this mistake will make a great pocket for one of my days.  I may trim it out with paper, when I decided to use it. 
 
 
Follow on YouTube as well as here.
There will be weekly videos with additional tutorials and helpful hints along the way.  I've created a YouTube Play list that includes all of my Ustreams, and individual tutorials that you need to create this project with me.    There are already 8 videos in the list for you to enjoy. 
  1.  November Ustream (this was recorded in 3 parts for some strange reason). Part 1
  2.  November Ustream. Part 2
  3.  November Ustream. Part 3
  4. Coffee Staining Small tags for the books
  5. Organizing yourself, FAQ, and Page 1
  6. Library Pockets
  7. Poinsettia tutorial
  8. Polaroid Shaker frame for a few of the number sets.  
I know several who have already started sharing photos of their projects.  If you create a project inspired by this one, please be sure to share it on the Flamingo Scraps Facebook page and be sure to tag me in the post, so I can admire your work. 
 
Now - I must go see if I can find some good Black Friday deals. 
 
Thanks for stopping in today,
 
Tonya


Read More »

Monday, November 25, 2013

Santa's List Holiday Organizer by Tonya Gibbs

1
Hi everyone, 

The Holiday season is quickly approaching, and I'm not sure about you, but my house hold is a whirl-wind of activities this time of year.  Each year I create an Organizer/Planner to keep track of the craziness. When I started this project several years ago, I was looking for a place to trap receipts menus, calendars, card lists, shopping lists, groceries lists, coupons, sales fliers etc...  It has evolved into a true keepsake throughout the years.  It is fun to look back at all the ciaos from year to year.

This year, I created my planner with Teresa Collins Designs' Santa's List.   I just love the red and whites they are so clean, and really get me into the Christmas mood.  


I altered an Avery 6x9 inch white 3 ring binder that you can find at any department store in the office supply section.


I added lace and trims along the edge to soften up binder's hard exterior.  I also used Gold paper to accent my papers. Since the book would be tossed in the car, and dragged in and out of stores, I decided to sew down all the stickers


The Dividers
I have 3 dividers in this notebook,   Planner,  Cards, and Gifts. The dividers were cut on my silhouette using 3 bracket file folders by Lori Whitlock. I cut the folders in half with the knife tool in the design studio software and only "cut" the half that had the tabs.  This allowed me to make the folders wider so they fit the proportions of my notebook. I used the alpha set on the sticker sheet to label my tabs, then sewed across the bottom of them to make sure that they don't fall off from over use.  


I included the sticky notes from the collection for extra labeling and note taking.


Inside Cover
I love having a little something to take notes in that can easily be added to my purse and then replaced in the planner later.  Teresa's Sewed Journals fit nicely in the pockets.  I love that the December Stamp in the Santa's List Stamp set starts on Sunday with day 1.  Since this year December 1st in on a Sunday it made it a great visual reference for the dates through out the book.


Here is a video with a complete walk through of the book.


I hope this organizer will help give you some ideas for your own holiday planning.   I'm so happy I've adopted this and it will be fun to go back and flip through it after the first of the year when it is a documented mess.

I hope everyone has a wonderful Thanksgiving weekend.

Thanks for stopping in today.  If you haven't subbed yet, please do so.

Tonya

Read More »

Friday, November 22, 2013

This Makes Me Happy - Layout by Tonya Gibbs

0
Hi everyone, today I wanted to share with you a layout that I created of my newest niece and I.  I finally got to meet her this past weekend, and couldn't wait to add her sweet photo to my album.
 
 
My only photo was a small Instagram photo. To keep from over powering the small photos,  I wanted to keep the design simple, yet girly and elegant.    I reached deep into my stash for a few scraps, and some odd and ends products. 
 
 
Since the label on the right mentions "...moment with you"   I decided to frame a Prima Romance Novel Clock inside a Prima Resin Frame. Then flanked it with soft Prima Roses.  It still needed a little something so I went DEEP into the hoard vault and pulled out a Say It in Pearls spray and framed it around the flower cluster.   I wanted my journaling to blend into the layout, so I wrote it along the boarder with a pink pen from Zig.
 
Sometimes the simplest projects are really the most powerful.  I challenge you this week to make a layout with a small photo, and keep it simple.  Share your samples with me on Facebook.
 
Thanks for stopping in today,
 
Tonya 
 
 
Resources:    
  • Bazzill - Smooth white cardstock
  • Teresa Collins - Family Stories Collection - 12 x 12 Double Sided Paper - Numbers
  • Teresa Collins - Family Stories Collection - 12 x 12 Die Cut Paper
  • Teresa Collins - Family Stories Collection - Border Strips with Glitter Accents
  • Teresa Collins - Family Stories Collection - Sequins
  • Prima - Say It In Pearls Collection - Self Adhesive Jewel Art - Bling - Mini Flourish with Roses - Cream
  • Prima - Flower Embellishments - Conventry Serene
  • Prima - Romance Novel Collection - Wood Embellishments - Clocks and Tickets
  • Prima - Resin Collection - Ingvild Bolme - Resin Embellishments - Marvelle
  • Prima - Junk Yard Findings Collection - Ingvild Bolme - Trinkets - Metal Embellishments - Rusty Typo Zippers
  • American Crafts - Studio Calico - Snippets Collection - Wood Veneer Pieces - Chevron
  • American Crafts - Studio Calico - State Fair Collection - Wood Veneer Pieces - Hearts
  • Tattered Angels - Chalkboard Collection - Glimmer Mist Spray - 2 Ounce Bottle - Tutti Fruity

Read More »

Thursday, November 21, 2013

Christmas Daily - Recap

0
In our November 4, Ustream I told everyone that we would work on our December Daily Journals TOGETHER.   To catch everyone up to speed, we created our covers.  The back covers are plain at this point, I may get inspired to add to them as we go. Here is a photo of the front and inside covers.


I have created a play list on my YouTube channel titled December Daily 2013, that includes tutorials, and the Nov. Ustream recordings.  Hopefully, this Playlist will provide an easy reference for you to follow along. 

> Click here to begin watching.

As a recap - we are using the beautiful 25th & Pine from Basic Grey for this year's journal. Kits are available at Flamingo Scraps  for $29.99.

http://flamingoscraps.com/product/tonya-live-ustream-class-25th-pine-december-daily-kit/


In our December 2 Ustream, we will begin building week 1 of the journal.  Then follow me on my blog, and the Flamingo Scraps Facebook page, for weekly updates as I create my own journal.  Hopefully it will help inspire you to create your own.

Thanks for stopping in today,

Tonya

Read More »

Friday, November 15, 2013

Christmas Cards

2
We are quickly approaching the hustle of the Holiday Season. I don't know about you, but my world is a whirl wind of constant motion this time of year.  I barely have time to sleep, let alone knock out STACKS of Christmas cards.  I'm sure I'm not alone!  Although I don't "mail" out stacks of Christmas Cards, I do like to have a few handy just in case.  This is a great opportunity to pull out last year's paper collections, and use those holiday scraps from this year's projects.

Today, I would like to share with you a few "simple" designs that will encourage you to simplify without compromising elegance. Both of these cards can be made by ANYONE in a matter of seconds.


I just finished a major project, that I will share with you later, and I took this opportunity to quickly knock out  these cards with scraps.  As you know, my philosophy is always USE those scraps immediately, and cards are the perfect way.

For elegance my advice is keep it simple.  A monochromatic color selection will maintain sophistication without a lot of fuss. 


For this card, I decided to use a simple clean white label to break up the busy pattern in the background.   A few simple touches like the punched border, fancy label shape and script stamp make this simple design elegant and fun.
 
Supplies needed for above card:
  • Card base - White Card stock 11 x 4.25inches folded in half to yield a 4.25inches x 5.5 inches.
  • A scrap of paper to use as a base.  I used Teresa Collins' Santa's List - Red Flakes.
  • Border Punch (I used Martha Stewart Crafts Pinking Scallop Edge Punch)
  • Labels Punch (I used Spellbinders Nestabilities Dies, Labels 4)
  • Sentiment Stamp (I used Inkadinkado Merry Christmas)
  • Ranger Archival Ink Vermilion
  • Baker's Twine
  • Gelly Roll pen -  stardust  (I traced around the label with this pen, you could also trace the snowflakes with it).
 
 
The pop of glitter, and one iconic simple image, makes this card pack a powerful statement.  I love that it looks complicated, without much effort! My advice is find a simple iconic image that conveys your message, and remember less is sometimes more!
 
Supplies needed for the above card:
  • Card base - White Card stock 11 x 4.25inches folded in half to yield a 4.25inches x 5.5 inches.
  • 1/2 Inch  Corner Punch (I used the We R Memory Keepers)
  • Cosmo Cricket Glitter Sheets in Starlet (THESE GLITTER SHEETS DO NOT SHED - AMAZING!)
  • Sentiment Stamp (I used Inkadinkado Merry Christmas)
  • Ranger Archival Ink Vermilion
  • Sizzix Tim Holtz Alterations - Embossing Diffuser.
  • Provo Craft - Cuttlebug Swiss Dots Embossing Folder
  • Silver Ribbon
  • Silhouette Cameo (Ornament) from Echo Park

I encourage you to go through Christmas past paper collections and see if you can duplicate a few of these simple designs.   Don't have a Silhouette?  Never fear, lots of companies have similar images available in dies, go through your stash and see if you can substitute another design. Just remember simplicity is key, especially if you want to mail these cards.

I just love that  both card designs can easily be modified to work with any occasion.

Hope I have inspired you to use up your scraps and make some great simple Holiday cards.  Remember to keep it simple, so you have time to make the memories that matter!

Thanks for stopping in today,

Tonya Gibbs
http://www.psychomomscrapbooks.blogspot.com


Read More »

Tuesday, November 12, 2013

My Honey Bee Layout by Tonya Gibbs

0
When my sister-in-law called and asked me to take pics of this little honey bee in the pumpkin patch,  I didn't hesitate.  She was  buzzing around the pumpkins, like she was pollinating a garden. The entire time, her wings were upside down, her tongue hanging out, and buzzing noises coming from her mouth. She was so busy and absolutely ADORABLE! 


Marion's Nirvana collection was the perfect backdrop for this photos.  I used the Photo Ops for my base, because it has a nice muted turquoise color and orange damask on the b-side.  The contrast was just what I needed for my photo to take center stage.   I used smaller pieces of the Typograph paper as accents around the photo.  


For embellishments, I reached for Marion's stamps.   


The  alpha stamps were used to spell out My Honey Bee on a banner cluster at the bottom of the layout.


I used the large rose from the Curious set with some water colors in pinks and gold.  To make the flowers have a little depth I decided to mix them in with mulberry flowers, colored to match.   I also used clear gold glitter nail polish in the centers of the stamped images to give them a little texture.  


The Doilies were stamped with black ink onto a scrap of  paper from the collection, and I trimmed around them to make them look like border.  For a little added shimmer I dripped Gold Ink and the Tim Holtz bronze metallic distress paint all over the layout near the photo cluster. I love how it looks like dripping honey.  The camera really doesn't do justice to the shimmer on this layout. 


Thanks for stopping in today, please don't forget to subscribe.  If you like what you see here, please visit my blog at  for more great projects! 


Tonya Gibbs
http://www.psychomomscrapbooks.blogspot.com 

Read More »

Monday, November 4, 2013

Ustream TONIGHT!

0
Hi everyone, I hope you had a great weekend.  December is right around the corner, and I know everyone is going to get BUSY!   So tonight we are starting our December Daily journals early.

I hope you can join us at 8:30 p.m. est. on Ustream.

This month we are going to feature the 25th and Pine line by Basic Grey.

http://flamingoscraps.com/product-category/basic-grey/

We decided to break this project up into sections so that we can cram as many techniques and details as possible, without feeling rushed.  Tonight's class is going to focus on making our covers, and perhaps a few embellishments. 

Then, on December 2nd, we will focus on making our embellishments and parts of our book.  Each week, I will feature my pages from the week on my blog at http://www.psychomomscrapbooks.blogspot.com  so you can follow along through the entire month of December. These blog posts will also be posted to the Flamingo Scraps Facebook page.  Don't forget to sub to both so you don't miss the weekly tutorials!

Pinkie is trying to put together a mini kit for the covers, but you can still follow along. Make sure you purchase the 25th & Pine collection so you get it before the December Class! We would love to see how your books look.

We hope to see you there!  As always, we will do our best to record for those who can't make it live. 

Tonya Gibbs
http://www.psychomomscrapbooks.blogspot.com
Read More »

Friday, November 1, 2013

Fright Night Layout by Tonya Gibbs

1
Ok, how many of you are now on a sugar overload?  Go ahead raise your hands. I know you were hoarding all the good chocolates for yourself!   Come on confess....
Just kidding.....

My nephew, Cooper, came over a few hours last weekend and we carved a pumpkin. Then had a scary vampire photo shoot.  

For today's project, I decided to use the paper and embellishment packs that were left over from my Sept. Ustream class.  In that class we used Basic Grey's Persimmon line. My objective was to use as much of the left overs as possible and kill off this kit.

To make this process fun, I decided to give myself a few prompts.


PROMPT 1:  Use Burlap and Jute. I love the look of burlap and jute twine on a fall layout.  I think the natural tones really help to enforce the theme of fall, and give your layouts an organic element.


PROMPT 2:  Use chunky glitter nail polish and dark pens to help your title pop!  The nail polish gives a glossy texture to the lettering, and the glitter looks like bubbly potion (haaa) or night time stars.  The dark outline around the letters gives them depth and weight, making your spooky title pop!
 
 
PROMPT 3:  Use navy blue instead of black on your Halloween layouts!  One thing I liked about the Persimmon line, is its use of navy blue instead of black.  Love the unexpected color shift from the traditional black. Since chalkboards are super trendy right now, I used the solid navy blue from the 6x6 paper pad, and a white gel pen for my journaling.   
 
 
PROMPT 4:  Die cut your scraps from the collection and use them immediately. Gather up the scraps from this collection, pull those punches out of hiding, and eliminate the scrap pile! Great layers have multiple items of different sizes and textures. I used a Fiskar's Leaf punch and a small scrap of the patterned paper for my leaves.  Then another EK Success labels punch for another accent.  I challenge you to free your punches/dies and start making elements to use for layers.

My favorite neutral punches/die shapes are:  hexagons, banners, tickets, birds, butterflies, branches, leaves, flowers, cameras, labels, frames, hearts, arrows, chevrons, doilies, tabs, and tags.   All of these can be used anytime, and any place.  Your objective is to USE THOSE SCRAPS.
 
Here is a process video on me completing this layout. 


I hope you have enjoyed this layout share.

Thanks for stopping in today,

Tonya A. Gibbs
http://www.psychomomscrapbooks.blogspot.com

Resources for this layout:
Read More »
I love seeing things you create using my tutorials or project shares. Please use the following handles/tags in social media to insure that I get to see your creations:

INSTAGRAM: #FollowingTonyaGibbs    |   TWITTER:  @gibbst    #FollowingTonyaGibbs   |      FACEBOOK:Tag  Tonya Gibbs   #FollowingTonyaGibbs

I Design for:

    http://www.yvonneblair.com

Guest Artist: Click icon to see post!

http://www.teresacollinsdesignteam.blogspot.com/2013/10/family-stories-layout-and-video-by.html#comment-form   http://canvascorp.com/2013/03/21/easter-treat-baskets/


Past Teams

http://www.die-namites.com/     marion