Follow Me...

       
Thanks for stopping by! Don't forget to subscribe!
Showing posts with label Grunge. Show all posts

Friday, June 19, 2015

Father's Day Card Tutorial

0

Hi everyone, today is my day over on Limor Webber Designs' DT Inspiration Blog.    I hope you get a chance to stop in and take a look at this deliciously grungy Father's Day Card that I have created using the Limor's Signature products with Lindy's Stamp Gang and IndigoBlu.   


Thanks for stopping in today! 
Tonya 


Read More »

Tuesday, March 3, 2015

With Love Canvas Recap

1

Thank you to everyone who came to my debuted show as a Guest Designer for Limor Webber Designs on Ustream. I had a great time meeting so many new friends!  I thank Limor for the opportunity.

We created this canvas filled with lots of YUMMY texture.


If you missed the show, you can access the recording from Limor's Ustream: 


In this tutorial  I featured the new stamps designed by Limor Webber and manufactured by IndigoBlu.  These stamps are selling out World Wide!  I'm so happy and excited for Limor's success.


Here are a list of supplies:

For the chipboard butterfly, I used a chipboard mini album that I had in my stash.  However, if you don't have one, I'm including a pattern here for you to download and use as a template for cutting the butterfly out of Med. Weight chipboard.   I don't recommend recycled packaging as you will see both sides of the butterfly and you don't want the printing visible through the painted layers. Here is the butterfly.  Please print at 100% so that the size is accurate (click the image below to see the full size).

Thanks for stopping in today. If you decided to create this canvas, I hope you share it with me on Facebook! 

Tonya 


Read More »

Friday, May 9, 2014

Varsity Layout by Tonya Gibbs - May Challenge

0

Hi everyone, wow can you believe that school is almost out?  Where did the time go? Seriously It was just fall in my mind.   My son, Brighton, is a Jr. this year and I'm going to spend some time in the next year crying - no seriously - documenting his high school story!   I know it is hard to sometimes create Masculine Layouts so I have a few tips to kick start your creative process.

 
First of all GRUNGE makes masculine layouts come together so easily.  And what better way to get grunge then Mixed Media.  Just like little boys - the messier the better! Texture is my next hint!  I think you can't have too much texture on a boy layout!  


Second - stick to masculine colors.  Like Blues, Greens, black, browns.  Since my son's high school colors are Blue, White & Red, I decided to use them for my focal color pallet.


I typically avoid flower clusters and stick to masculine paper elements.  7Gypsies Vintage Varsity line was perfect for this layout - since it offered so many 'sports' themed elements that could be fussy cut and used for layers. 
 
Here is a process video of me making this layout.


I challenge you to post some masculine projects this month in the AA Facebook page.  From little boys, to grown me, it is a challenge sometimes to work with their photos, but they deserve to be documented too!    With Father's Day in a few short weeks, this will kick start your brain into thinking masculine!  
 
 
Thanks for stopping in today,
 
Tonya Gibbs
 
 
Layout Supplies:  
  • Canvas Corp - White smooth Cardstock
  • 7Gypsies - Vintage Varsity 8x8 pad
  • Stamper's Anonymous & Tim Holtz - The Ultimate Grunge
  • Tattered Angels - Silver Glimmer Mist
  • Faber Castell - Design Memory Craft   PITT Big Brush Artist Pens in the following Colors:
    • Black,
    • White,
    • Cold Grey I 230,
    • Cold Grey IV 233,
    • Phthalo Blue 110,
    • Dark Sepia 175,
    • Deep Scarlet Red 219
  • Faber - Castell Design Memory Craft Gelatos in the following colors:
    • Dark Blue
    • Silver
  • Faber-Castell Design Memory Craft Glaze
  • The Crafter's Workshop 6x6 stencils in the following Patterns:
    • Mini Numbers
    • Mini Well Rounded (this is the grunge stencil)
    • Mini Wonky Circles
  • Liquitex - Full Body Gesso
  • Prima - Distress Tool
  • Pearl Ex -  Interference Red
  • Score Tape
  • Scotch - ATG
  • Scotch - Mounting Foam
  • Idea-ology - Tim Holtz - Grunge Board Numbers
  • Idea-ology - Tim Holtz - Sanding Block
  • Ranger Ink - Dyan Reavely Dylusions Sprays White Linen
  • Cosmo Cricket  - Silver Glitter Adhesive Sheets
  • Studio Calico - Wood Veneer Speech Bubbles
  • Studio Calico - Wood Veneer Abroad Cameras
  • Clear Glitter Nail Polish
  • EK Success - Square Binding Edge Punch
  • EK Success - ZIG Wink of Stella Clear
  • Silhouette Cameo - Primitive  Stars
  • Stars - Rhinestone buttons
  • Index Card
Read More »

Wednesday, March 12, 2014

Rainy Days of Summer by Tonya Gibbs

2
Hey everyone, I bet some of you are ready for a little sunshine.  I know I am!   I was thumbing through some old Facebook photos and ran across this photo of my nephew Cooper when he was about 3 years old.  My sister-in law had taken them to the park to play in the rain, and captured the perfect photo collection!  So fun.  I wanted my layout to mimic the fun times shared during this photo shoot.  


Marion's Never Grow Up Collection is perfect for this Rainy Days of Summer layout! It is full of playful images and vibrant colors.  I love that this collection can be masculine and feminine.   Here is a sample of the products that I used from Marion's lines.


I used my Faber-Castell Design Memory Craft Pitt Artist Pens on the texture stamps from Marion's winter release,  to add depth and texture to the plain cardstock.   Pitt pens are made with India ink and have a slow dry time on a prepped surface allowing for blending. However, on a non-prep surface they make an awesome permanent ink solution!  


I added splashes of aqua watercolor paint to mimic that rainy day, and ground my photo to the layout.  Lots of yummy ephemera were cut from the collection to give the layout that "all boy" feel.   The journaling spot was a scrap from Marion's Digi line!  Here is a glimpse at the final layout!
 
 
I just love how playful this layout is.  These colors remind me of how vibrant it is in the summer just  after a rain shower. 
 
Thanks for stopping in today,
 
Tonya Gibbs


Read More »

Friday, May 3, 2013

Tarnished Silver Tag

0
Last week I shared with you a card I created using the Tattered Angels' Naturally Aged Paint System Bare Metal Tarnished Silver.  Today I would like to share a second project that I created using the other pieces created in my sample video.


The background of the tag was embossed with a Cuttlebug - Clockworks embossing jacket after the card stock was dry. As you can see the card stock looks like embossed metal. Below is a sample of the dry paper before it was embossed and die cut into a tag. I really wanted you to see how much texture and shine these mediums give your projects.  Bonus - it is just card stock, not metal. This means it is light weight enough to be mailed, making it perfect for cards.  Also, it can be easily die cut, punched, embossed, or cut with your electronic cutters.

 
 I used the 7Gypsies Paddington Stamp with Ranger Archival Jet Black Ink to give the appearance of dripping oil.  Then I covered over those splotches with Glimmer Mist, Almost Black, to give a little shine to the oil.  The sentiment was created in Photoshop CS6 using the Bookman Old Style Font, and attached to the tag with a 7 Gypsies Mini Paper Clip - SIDE NOTE:  LOVE THESE NEED CASES OF THEM - they come in several different colors, and are so tiny and cute. 
I also cut a Sizzix Primitive Heart from chipboard after covering it with 7 Gypsies Paper tape from the Lille Collection. I love the contrast of the red against the sea of metallic colors. The heart was edged with a silver pigment ink pad from Color Box to make it looked finished. The 7 Gypsies Hardware - Industrial Gears were the perfect touch to bring my clockworks background to the foreground. I found a scrap of DCWV Tattered Time paper and was able to cut the clock face to add to the bottom.

As a reference here is the video I shared last week on how I created the background effect with the Tattered Angels Paint System.


I love how the finished tag came out. It would be perfect on the face of a masculine card, or as an embellishment on a scrapbook page.  Have you tried any of the Paint Systems yet?  If so, please post them on Facebook and be sure to tag me in the post.   I would love to see your creations.
 
Thanks for stopping in today,
 
Tonya Gibbs
 
 
Resources: 
  •  Tattered Angels:
    • Naturally Aged Paint System Bare Metal Tarnished Silver
    • Almost Black Glimmer Mist
  • 7 Gypsies:
    • Hardware - Industrial Gears
    • Mini Paper Clip - Antique Brass
    • Paper Tape - Lille Collection
    • Paddington Stamp
  • Ranger/Tim Holtz:
    • Pumice Stone Distress Ink
    • Archival Ink Jet Black
    • Tiny Attacher
  • Sizzix
    • Primitive Heart Dies
    • Alterations - Tag & Tie  Die
  • Provo Craft: Clockworks  Embossing Jacket
  • DCWV: Tattered Time 4x6
  • Seam binding
  • Font:  Bookman Old Style Font
  • Photoshop CS6
  • Manila Card stock - Recycled File Folders


Read More »

Sunday, December 30, 2012

Bare Metals and Tim Holtz Oh My

4
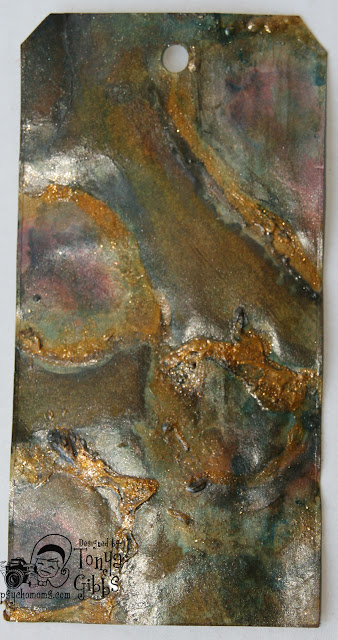
So I paid a visit to my good friend Suzanne at FlamingoScraps.com yesterday and she gave me a set of the New Tattered Angels Bare Metal Sprays for my birthday.  I was ITCHING to play with them yesterday.  So I pulled out some Tim Holtz Tags from Ranger and started playing.


Here is a photo of the tag prior to decorating so you can see all the luscious details in the colors. I love the texture, and the vibrant tones that mixing all these colors brings. When you heat set the Gold and Pewter sprays they bubble and crack which causes the ridged texture that you would find in rust.  LOVE IT!

 
I was so excited that I had to finish the tag - "Tim Style" by using my new mover's and shapers Typewriter die.  The dressform was inspired by Marion Smith's latest Live with Prima where she shared how to make Christmas Ornaments.  I used her technique for the book pages on the mover's and shapers mini dressform die.  


I hope you try out these sprays. They are so much fun.  Thanks for stopping in today! 
 
Happy New Year,
 
Tonya
 
Resources:
 
  • Tattered Angels:  Bare Metal - Rusty Metal Sprays
  • Ranger:  Tag, Rusty Hinge Distress Ink, Distress Markers Barn Door, and Black Soot, Black Soot Distress Stain, Utee 
  • Sizzix:  Tim Holtz Mover's and Shapers - Mini Typewriter, Mini Dress form.
  • Ideaology:  Tim Holtz Pen Nib, Dictionary Tissue Tape
  • Misc:  Book pages, Beaded trim, Seam Binding, Tulle, and tensil
  • Prima: Bling
 
Read More »

Friday, August 24, 2012

Averie Kay - Mixed Media

3
It is so much fun watching my pages evolve as the trends change.  My latest obsession is mixed media, and I love incorporating it into my scrapbook projects. While I've been doing this for a few years, I love how my technique has evolved. I just can't get enough of the stencils, molding paste, India inks, and gesso. I mean really -  this takes dirty to an entirely new level. 

In today's share - I wanted to showcase this layout that I created of my Niece Averie. The picture was taken last year during an impromptu photo shoot.  She just propped up and I snapped. Tell me she isn't a natural!


This piece is mounted on a piece of Donna Salzar's Corrugated Card board that was distressed and painted with white gesso.  Then a sheet of Prima Madeline Parkway paper was used for the backdrop. I ripped it, tore it, and distressed it with the new Prima Distress tool. Then to add texture, I glued down all the scraps laying on my desk which included pieces of a doily, hymnal pages, linen strips, and I also included a few strips of Masking tape. I tried not to glue the edges of these elements down so that I could "fluff " them up for texture.   Then I used the stencil and molding paste to add even more texture.  Once the molding paste dried (over night), I then gave the entire background a coat of gesso to make all the elements become cohesive.  To define certain areas of the background I sprinkled a few drops around the canvas of the Iced Spruce Distress reinker.  Then spritzed it with water to dilute it and make it drip.  I love how the background is soft yet course with texture.


I then began to work with my floral spray and layered elements. All the metal pieces were different colors and I found this distracting.  So I grabbed my Snow Cap alcohol ink, and began recoloring them.  This helped them blend into the background, I then dry brushed a bit of the Prima Worn Jean Chalk over the top to give them a little more pop.  The burgundy roses in the Tendrils Grape vine were a bit too bright, so I dry brushed some gesso over them.  I love how this technique made them look shabby like they were part of the wall when it was painted.

I tucked a tag in behind the picture so that I could write Ms. Averie a message.  I think that journaling becomes distracting when I use these as canvases on my wall. However, I feel that journaling is important so I try to hide it somewhere on the layout or place it on the back.  To make the tag blend better with the layout - I distressed it with the Iced Spruce, and Antique Linen. Then I tied off a shabby torn piece of seam binding that I had died with the Ice Spruce.  This made it more elegant, and called attention to the fact that it needed to be pulled out.

Who would have thought that you could take all those grungy supplies and create something this beautiful?

Thanks you all for stopping in today.

Tonya A. Gibbs
http://www.psychomoms.com


Resources:
  • Prima: Distress Tool, Madeline: Parkway Paper, Chalk: Worn Jeans, Millinery Collection Oatmeal, Flowered Tendrils Grape, Marion Smith Trinkets: Metal Flowers #4, Metal Flower #3, Shabby Chic Metal Treasures: Hitches (Birdcage)
  • Pink Paislee: Butterfly Charm
  • Ranger: Tim Holtz Idea-ology Adornments (bird), Adirondack Alcohol Ink: Snow Cap, Distress Reinkers: Iced Spruce, Distress Ink: Antique Linen, #5 Shipping Tag (manila)
  • Zutter: Donna Salzar Corrugated Card Board.
  • Golden: White Acrylic Gesso, Molding Paste, Gel Medium Matt
  • Crafter's Workshop: Brick Stencil 6x6
  • Misc. Lace, Hymnal Pages, Doily, Burlap, Seam Binding (ivory), linen cloth, Masking tape,
  • Silhouette Cameo
  • Font: Alexie Cooperplate
Read More »
I love seeing things you create using my tutorials or project shares. Please use the following handles/tags in social media to insure that I get to see your creations:

INSTAGRAM: #FollowingTonyaGibbs    |   TWITTER:  @gibbst    #FollowingTonyaGibbs   |      FACEBOOK:Tag  Tonya Gibbs   #FollowingTonyaGibbs

I Design for:

    http://www.yvonneblair.com

Guest Artist: Click icon to see post!

http://www.teresacollinsdesignteam.blogspot.com/2013/10/family-stories-layout-and-video-by.html#comment-form   http://canvascorp.com/2013/03/21/easter-treat-baskets/


Past Teams

http://www.die-namites.com/     marion