Follow Me...

       
Thanks for stopping by! Don't forget to subscribe!

Thursday, November 8, 2012

Ustream - Nov. Part 2

0
Thank you to everyone for their support at the Ustream on Monday, Nov. 5.  We had a fabulous turn out.   Ustream was misbehaving, but it did manage to record 90% of the class. It did so in 5 parts, but at least it is there. If you were unable to watch the show live there are multiple parts on the channel at http://ustream.tv/channel/gibbst 


Join us on  Monday, Nov. 12 at 8:30 p.m. EST for Part Two of the City Sidewalks mini album.  In this class we will embellish the book, and learn ways to use the scraps in creative ways. There will also be time for questions since the Ustream Monday night was so choppy.

There is still 1 kit available for purchase. If you are interested, please email Suzanne at Flamingoscraps@yahoo.com.  For full kit details - please visit this blog post.

Thanks for stopping in today,

Read More »

Friday, November 2, 2012

Trick or Treat - Halloween 2012

0
Mr. Cooper, my 5 year old Nephew, decided this year he wanted to be the "Dark Knight" for Halloween. I asked him why, and he said "Because he is cooler than Spiderman".  I believe he was Spiderman last year (lol).  I love to ask all the little ones year after year, why they have decided on their costumes. It is a fun way to add journaling to your layouts, and makes for interesting topics as they get older.
 
This year, I used Marion's digi downloads from the Something Wicked Halloween Mini Album to create my 12x12 layout.  By layering the smaller designs and fussy cutting out the iconic elements, I was able to make the layout interesting and fun.
 
I dropped some Tattered Angels - Clam Bake - Glimmer Mist on the background cardstock,  then blew on the droplets, to create a splattered effect.


I have shared many times, that I love incorporating older products. Sometimes you need to give them a fresh look to match newer lines or themes.  The chipboard letters that spell out Treat were PINK - yes - PINK, and I painted them with Orange Extreme Glitter Paint from Plaid. It took several coats to hide the pink - but it was well worth it.  I used the heat tool to bubbled up the paint, so that it would look grungy.   The buttons were a set of old buttons from 2002 Daisy Dee (who is no longer in business) - it is nice to have them completely used and out of my stash.  From the scrap pile, I used some scrap canvas that I had painted orange for a Prima BAP layout, to create the tab.   Since I didn't have enough letters to spell out Trick or, I just hand wrote them on the canvas.  The 2012 is a piece of Mylar confetti that I got for Brittany's Graduation party.  I love to collect these, they make great date references on your projects.


The real treat here - is the joy I get seeing the kids excited.  I love when they ring my door bell, I act scared, and they just giggle. 
 
Thanks for stopping in today,
 
Tonya Gibbs
 
 
Resources:
  • Black cardstock

  • Marion Smith Designs Digi Downloads - Something Wicked Halloween Mini Album.
  • Plaid - Extreme Glitter Paint Orange
  • Tattered Angels - Clam Bake Glimmer Mist
  • My Favorite Things Stamps - Curly Bracket Tab Die
  • Daisy Dee - Buttons
  • Devine Twine - Orange Bankers Twine
  • EK Success Pumpkin dimensional, Washi Tape - Polk-A-Dot  
  • Ranger, Black Soot Distress Ink
  • Prima - Distress Tool
  • 2012 - Confetti
  • Chipboard Letters
  • Stamping Up - Mini Label Punch
  • Canvas
  •  


Read More »

Wednesday, October 31, 2012

Join Me Live - Ustream Nov. 5 at 8:30 pm

0
Join us LIVE, November 5, 2012 at 8:30 p.m. EST on Ustream, as Tonya Gibbs creates this Vintage Chic Holiday Mini using Pink Paislee's City Sidewalk Collection.  Kit details are below. 
 
USTREAM INFO:
http://www.ustream.tv/channel/gibbst

Please join the crowd early to insure easy access.
 
PROJECT DETAILS:


Video showing more details of the book:


KIT DETAILS
 
We are excited this month to bring you two kits for this project.  Both Kits have shipping costs within the contential US included in the price.  If you are International, please ask about your discounted shipping costs.  Last month kits sold out fast, so be sure to reserve yours today!
 
KIT 1 - DELUXE -   $49 
Includes whole packages of items used:
1 set Teresa Collins Christmas Cottage Clear Stamps
1 package 8x8 single sided Pink Paislee City Sidewalks Paper (24 sheets)
1 package PP City Sidewalks Parcel Tags 16 pcs
1 package PP City Sidewalks Ephemera  47 pcs
1 package PP City Sidewalks Collage Cards 8 pcs
1 package PP City Sidewalks Garland 31 pcs
3 Teresa Collins Mini File Folders
Prima Vintage Tote  Chalk Ink
Christmas  Washi Tape
Crate Paper Bo Peep Wood Veneers 19 pcs
White Lace suitable for dying
3 Manila File Folders (end tabs)
1 yd Twill Ribbon
Green Bloomers (approx. 4 blooms)
2 Transparencies
1 Recipe Card
Exclusive Tonya Designed Download Sheet
Embellishment Pack – bells, Prima Flowers, Webster’s Pages Cameo, Studio Calico Wood Veneer camera, Maya Road Shaped Paperclips, MR Cabachon Flowers, small pearl beads, Artist’s Pin, PP mistable chipboard.  
Order your deluxe kit by contact flamingoscraps@yahoo.com

KIT 2 - STANDARD - $27
Includes partial packages of items used:
1 set Teresa Collins Christmas Cottage Clear Stamps
12 sheets 8x8 single sided Pink Paislee City Sidewalks Paper
5 PP City Sidewalks Parcel Tags
15 pcs PP City Sidewalks Ephemera
2 PP City Sidewalks Collage Cards
10 pcs PP City Sidewalks Garland
3 Teresa Collins Mini File Folders
3 Manila File Folders (end tabs)
1 yd Twill Ribbon
Green Bloomers (approx. 4 blooms)
2 Transparencies
1 Recipe Card
Exclusive Tonya Designed Download Sheet

Embellishment Pack – bells, Prima Flowers, Webster’s Pages Cameo, Crate Paper and Studio Calico Wood Veneers, Maya Road Shaped Paperclips, MR Cabachon Flowers, small pearl beads, Artist’s Pin, PP mistable chipboard

Order your basic kit by contact flamingoscraps@yahoo.com  
 

Additional items needed to complete the project:
Acrylic Paint (red, white, 2 shades of green)
Thumb – anyone’s will do
Toilet Paper roll
Yarn/twine
Cookie Cutter
Washi Tape
Lace
Stamps
1 sheet 12x12 chipboard

Read More »

Friday, October 19, 2012

Something Wicked - Mini Album

4
Something Wicked is Marion's latest Mini Album Printable themed around Halloween.  You can order the download here.   Although this mini has a gothic feel to it, many of the designs could be used with her other printables.  

 
I created this little mini in just a few hours.  My daughter wants to use it to display her Halloween costumes from the past, and incorporate some of her future costumes for years to come.  She has always loved Halloween, and playing dressup, so it should make for an interesting book when it is filled.

In addition to Marion's downloads, I was able to incorporate a lot of dies, and vintage Prima tube flowers, with scraps of lace, and fibers.

When making the album, I cut some tickets from the scraps to make extra journal spots - so save those scraps!


Here is a video showing each page in detail. 


Did you download this mini?  If so please share your version with us on the Artsy Addicts Facebook Page. 

Thanks for stopping in today,
Tonya Gibbs
http://www.psychomomscrapbooks.blogspot.com
Read More »

Friday, October 12, 2012

Friday Night Lights

0
For those who know me - my passion is FOOTBALL. Seriously I even volunteer so that I can stand on the sidelines with my toes in the grass. In my community - I'm known as Psychomom. They dubbed me this years ago. Every child I've ever photographed will tell you the name is well earned. They know if they are playing, I'm on the sidelines for them!  I pace the field with lens in hand, and hold my breath for that perfect SHOT!  I rush home, spend an hour cropping and posting so the kids/parents can see the photos.   It started when my son played his first game as a Pop Warner Mitey-Mite at 7 - he is now 16 and this is his first year at Varsity. 

A few weeks ago,  thanks to a friend who works for a local newspaper, I had a sideline bird's eye view for his first varsity football interception. 

 
That game he had 2 interceptions in the pouring rain.  So I decided to make an 8x10 collage print to hang on his wall.  As you can see I have every single step from before he caught the ball, until he jumped up!  Prints like this are great for sharing a number of pictures with loved ones.  I love making these because at a glance you get the entire story.


This year has been a little different because his stats are not just small talk among family, they are now posted in various newspapers around the state, and broadcast on local news stations.  I'm trying to collect up the stats from the newspapers and Internet highlights to make him a book . I'm so proud of him for giving everything on the field.  He has worked so hard, and it is so rewarding to see him put everything into his passions.  He may not be the largest one on the field, but he plays like he is 10ft tall and bullet proof. 

Thanks for stopping in today,

Tonya Gibbs

Read More »

Friday, October 5, 2012

All Boy!

0
My nephew Cooper, at 4 years old, was wanting to go hunting with the big boys.  So Brighton, my Son, dressed him in Camo (way too big for him), painted his face, and gave him a BB Gun (with no amo).  He was so stink'n adorable, I had to take pictures of him.


Prima's Sept. BAP contest seemed like the perfect opportunity to scrap this photo.   Here is the final layout that I created.


I started with the Prima Script paper as my base, added some molding paste with a Prima Printery mask, then went to town spritzing with copper and bronze shimmering sprays.  I pounced some forest green shimmers in a diagonal across the page to give a hint of green, then finished off with Wheat Fields Glimmer mist.  All these colors remind me of my camo boys in the middle of fall.
 
The Prima Shabby Chic Deer resin was the perfect accent for this layout.  I framed Cooper's picture with corrugated cardboard, a Prima vine, and  Prima large leaves that I cut into palm frown shapes.  I finished off the title with a Nature's Garden Chipboard piece.  
 
Under his picture I tucked in a toy compass that came from a toy machine that Cooper and I had gotten after dinner one night.  I love the addition of one of his toys in the layout. 
 
Here is a look at the Sept. BAP Sketch, designed by Hege Lundquist that was required for the layout design.   For more information on Prima's BAP (Build A Page) Monthly Contests, please visit Prima's blog.


I love how masculine this layout turned out with all Prima products. Prima makes girl layouts a cinch, but I really had to dig into my creative side to achieve this masculine look. I really enjoyed the challenge.
 
Did you participate in the Sept. BAP Challenge?  If so, I would love to see your layout, please tag me in the photo on the Artsy Addicts Facebook page. 
 
Thanks for stopping in today,
 
Tonya Gibbs
 
 
Read More »

Monday, October 1, 2012

Ustream Live Tonight - Oct. 1

0
I can not believe it has been a month since our first  Ustream class.  This month has really been amazing with so much support from our scrappy community.  Wow is all I can say, and Thank you!

I hope you can join us again on Monday, October 1 at 8:30 EST live on Ustream, as  I create this interactive mini.


(The sample was made with Prima's Fairy Belle; however, I will be using Rondelle in the class.)


Make sure you join the crowd at: http://www.ustream.tv/channel/gibbst   to gain easy access to the class.  We are going to try and record the show for those who have schedule conflicts.

Flamingo Scraps was offering a kit for this class - but it sold out in less than 6 hours (WOW) - this made me feel so good.   If  you are still interested in a kit - please email flamingoscraps@yahoo.com. If enough people show an interest, Suzanne has agreed to reorder. Kit prices were $24.99 and included domestic shipping, there is a discount shipping rate for international buyers.

Supplies in addition to the kit that will be used:
Black Cardstock (2) sheets
Prima Distress Tool
Gesso or Modeling Paste
Brick Stencil
Masking Tape (or scotch tape)
Adhesive

Also - Don't forget that Flamingo Scraps is hosting a Design Team Call -  Click here for details.  Submissions need to be sent by 6 p.m. EST Oct. 20. 

Thank you again for all your support.   If you missed the last class, you can watch it here.

Read More »

Friday, September 28, 2012

You Make Me Smile - Card

0
Seriously this is one of my favorite printables by Marion Smith Designs.  The Garment district paper is just awesome and so versatile.  I shared with you guys a mini album, and layout.  Today I want to share with you a card I made from the scraps from both the Mini and the layout. 


I sewed some of the smaller scraps together to create the background, and then proceeded to layer a few of the other journal cards, ephemera, and scraps together to form the focal point of the card. I used a spell binder's label die to showcase the sentiment. Then added some sprigs of flower pieces from a left over Prima vine.  The tiny roses are one of my all time favorite Prima flowers, and they are awesome for cards because of their size.
 
It is so fun using my scraps up, and creating such a wonderful piece.  The tiniest of pieces can be used as banners, or peeking from a layer.
 
Thanks for stopping in today,
 
Tonya Gibbs


Read More »

Friday, September 21, 2012

Heritage Layout - Garment District

2
Garment District Printables from Marion Smith Designs have been at the top of my play list since I downloaded them. Last week,  I shared with you a little mini that I created using these papers. Today I want to share with you a layout I created using the scraps and left over designs that didn't make it to the mini.

I was digging in a box of stuff from my Grandmother's this past weekend, and I found this photo of a woman I believe to be my Great Great Aunt. There is very little information on the back of the photo; however, there is a note that says "Alice, here is the photo of Aunt Jessie's Sister" now I know that Jessie was my Great Grandmother's first name, so I figured out the relationship. I really wish I had a name of this beautiful woman, but that information was lost forever when my Grandmother and all her siblings passed away.  It is quite possible that she passed away at an early age, because my Mother wasn't sure who she was either.  


This brings me to the point of today's post.

When I create a layout - you rarely see my journaling and sometimes the title is subtle. But the 5w's [Who, What, When, Where and Why] are always addressed somewhere on the piece. I love to hide my journaling behind photos on pull out tags because I find it distracting on the layout.  If the design doesn't offer an appealing display of the journaling it is written on the back of the base page.

We often forget to do this because we know the person in the picture, or all of our current family members know the person. It is kind of one of those things that our mind tells us it isn't necessary because everyone knows the person. As time passes the information is lost much like it is with the subject of my layout share today.

While I know little about this woman, I know that Marion's collection fits the time period this photo was taken. It is probably safe to assume that she sewed since it was common in this era for women to make their own clothing.


I love how Marion's Garment district showcases this photo.  I used a lot of layers to frame the photo. This gives the photo more presence on the 12x12 layout.  Although I may not know the name of the woman in the photo, I was able to capture the information that I did know on the back of the layout.

Also note that this is not the original photo, I scanned and reprinted the photo used in the layout.

Thanks for stopping in today,

I hope you have a great weekend.

Tonya Gibbs
http://www.psychomomscrapbooks.blogspot.com


Read More »

Tuesday, September 18, 2012

Blowing Kisses Layout

0

Last week at the high school football game, my cute little niece,  Addie, was standing in the end zone blowing kisses.  I used the picture on a layout that was inspired by Jamie Dougherty's Live with Prima last Thursday night.  I learned some new techniques and thought it would make a nice follow up to my Ustream class.
 
 
From Flamingo Scraps:   Prima: Songbird and Almanac Paper, Vine, distress tool, Flowers, Trinkets. Liquitex: Gesso, Liquitex Molding Paste.  Other: Twine, stencil, charcoal pencil, ribbon, charms, and corrugated card board.
 
I started by distressing all the edges with my new Prima Distress tool.  (LOVE THIS).  To soften the background, I brushed white gesso over the paper, and then used molding paste to add texture.  This is a great way to soften busy or bright patterned paper.  Gesso was also added to some of the layers to try and merge them back into the background.  This technique really helps the photo take center stage, and also makes the smaller photo appear larger.
 
 
I was able to incorporate a lot of scraps from the Almanac collection, and you guys know how much I love using scraps. I cut banners from scraps, and used small pieces of scrap paper to frame around the picture.   Jamie's technique of having the banners travel vertically and horizontally throughout the layout, really make the layout dramatic and serve as arrows leading your eye back to the photo. This is definitely going to be used in more of my future projects.
 
 
While I often cut my vines in half, rarely do I arrange them diagonally, usually mine are in more of  a L shape, horizontal or virticle.  I love how all the elements appear to be drawing your eye back to the center fo the layout.  I incorporated scraps of small vines and leaves from previous projects in the negative spaces of the vines.  Again - love using up those small pieces.   
 
 
Thanks for stopping in today,
Read More »

Friday, September 14, 2012

Garment District - Mini Album

0
 

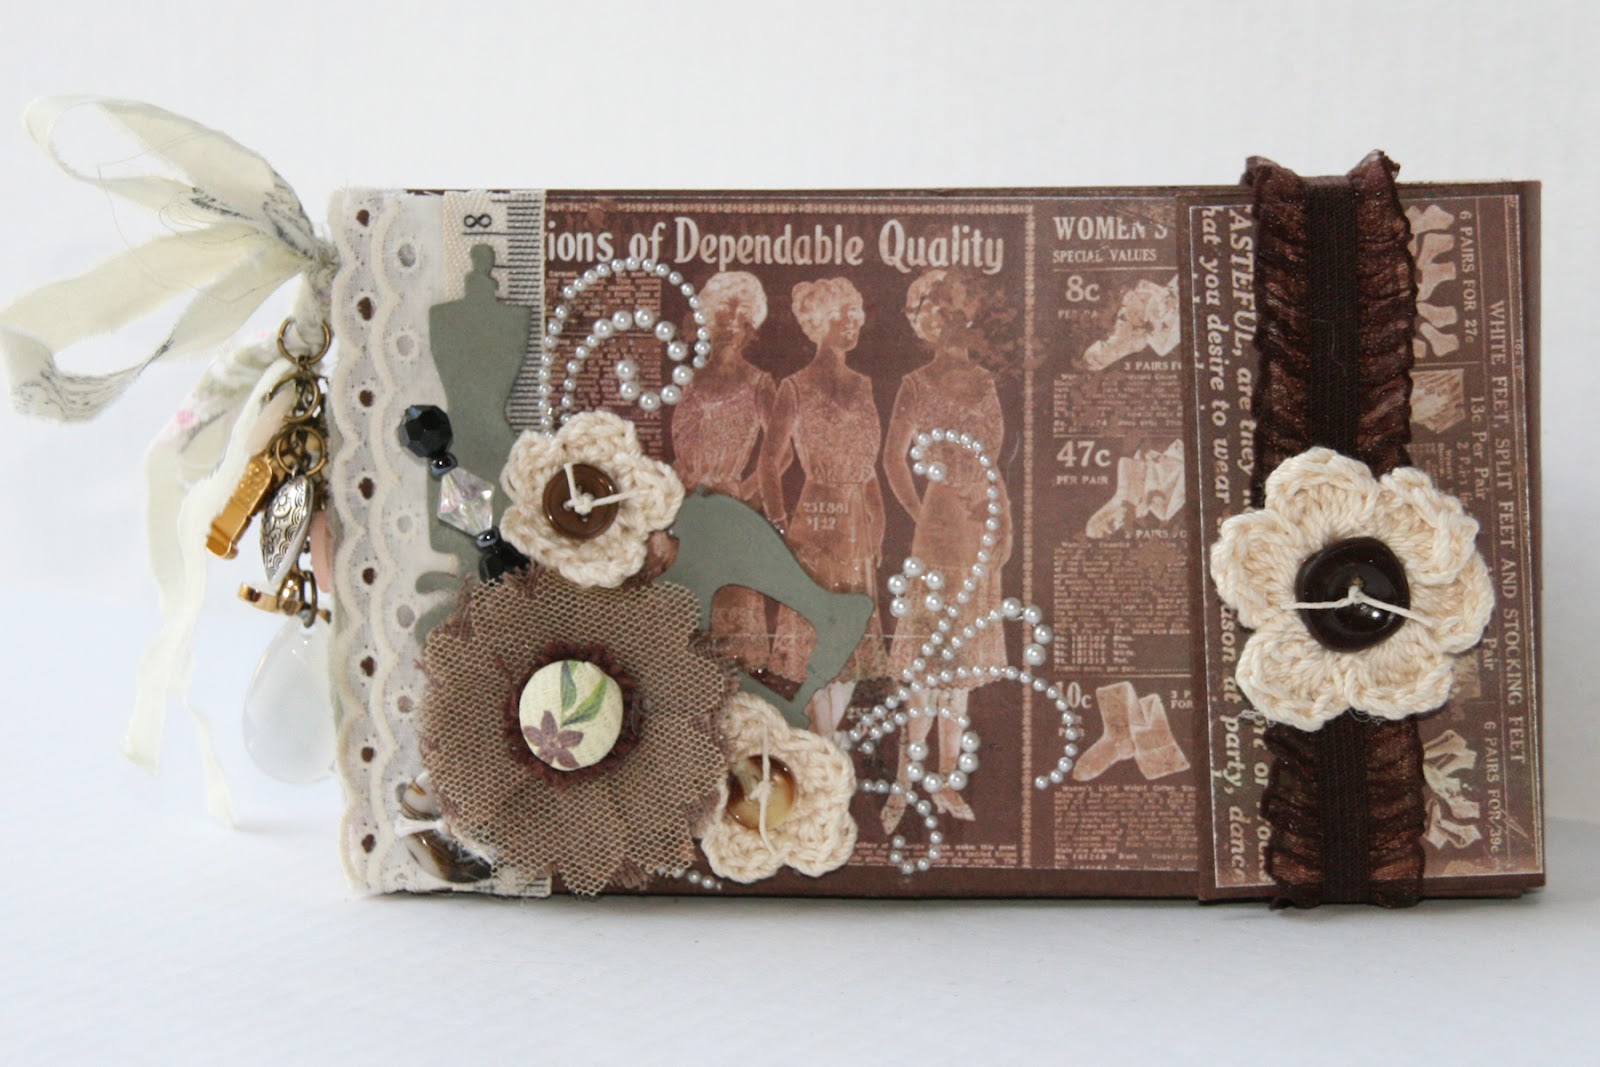
Garment District is the latest digi collection by Marion Smith Designs. It is full of rich color tones, and vintage dressmaker style ads.  The designs print as a full bleed on 8 1/2 x 11 paper which make it easy for you to design your own cards, layouts, mini albums, journals, or altered projects.   There are a few add ons to this kit that includes journal cards, ephemera and extra page designs.

I decided to make this simple mini using policy envelopes.  The album took about an hour to put together. It would make an awesome gift for someone, or a personal journal.  I thought about cataloging some of my fav. Sewing tips in this little cutie.


Here are the instructions on how to put the mini book together.


To see a complete walk through of the mini please watch this video.


Have you created any projects with this collection?  If so, please post them in Artsy Addicts and be sure to tag me in the photo.  I would love to see your creations. 
 
Thanks for stopping in today,
 
Tonya Gibbs
 
Read More »

Monday, September 10, 2012

Amber - Ombre Style Layout

0
I stumbled across this photo that I took a year ago of my Niece Amber.  I decided to use it for the Prima BAP contest for August. When chosing the color pallet for the layout - I wanted to play off her name Amber and chose an orangish/amberish tone.   I've been really inspired lately by the "Ombre" style  (Note: Ombre is a French word meaning "Shaded") where you create something monochromatic that starts with the richest value and fades into the lightest value. I thought the Songbird collection would be perfect for incorporating my color choices as well as the sketch.
 
 
 I love how the branches on the printed paper, lead your eye back down to the soft focused photo of Amber. To enhance the sunburst and add a few layers, I used my Silhouette to cut a doily shape from a sheet of Flights of Fancy Prima paper that has the Fruit of the Spirit written all over it. This is one of my favorite sheets and has been in my hoard vault for years. The floral spray also sends your eye back to the journaling that flanks the burst of linen. I painted one of the Prima Shabby Resin birds with Worn Jeans, and Shabby Tote Prima Chalks and perched him over the title.


Since the sketch used a sunburst as the focal point I decided to rip linen into small strips and soak it in Pumpkin Color wash on one end and then let it fade to a more watered down wash on the other end. After it dried, I spray the entire linen piece with gold glimmer using a Prima Floral screen. This gave a subtle pattern to the rich orange tones. I used some molding paste and circle stencil on the linen with a Prima Hexagon stamp to give a little depth.


Here is the sketch designed by Prima's Marie-Nicolas Alliot. 


I love how this layout turned out.  It has lots of details but still maintains the integrity of the sketch.  Did you participate in the Prima August BAP?  I would love to see your entry, please post them on the Artsy Addicts Facebook Group Wall and make sure to tag me so I see it.
 
Thanks for stopping in today,
 
Tonya Gibbs
Read More »

Thursday, August 30, 2012

Watch me Live - Monday, Sept. 3, 2012

5
I am thrilled to announce that I have partnered with Flamingo Scraps to bring you live Ustream classes the first Monday of the month at 8:30 p.m. EST. I have  been a designer for Flamingo Scraps for the past 2 years and contributes to our blog weekly. So many of you have expressed interest in me teaching on Ustream, and this marriage seems like the natural next step in our creative journey.

Our first class will be Monday, September 3, at 8:30 p.m. EST.  I will create this lovely  Mixed Media layout, sharing tips and techniques with style and smiles!!!!


Future classes will include pre-ordered kits in limited supplies. Additional information will be available soon.

All classes start at 8:30 pm EST

Save the dates:
Sept. 3, 2012
October 1, 2012
November 5, 2012
December 3, 2012

To access the class please visit: http://www.ustream.tv/channel/gibbst

Please join Tonya Gibbs and Flamingo Scraps  on Monday, Sept 3, at 8:30pmEST! Take a break from cleaning up after your Labor Day cookout, grab your fave beverage, and tune in to the fun!!! We look forward to seeing you there!

We HOPE we will be recording, so the show will be available later!

A big pink birdie told us there might be some giveaways!!!!


Read More »

Friday, August 24, 2012

Averie Kay - Mixed Media

3
It is so much fun watching my pages evolve as the trends change.  My latest obsession is mixed media, and I love incorporating it into my scrapbook projects. While I've been doing this for a few years, I love how my technique has evolved. I just can't get enough of the stencils, molding paste, India inks, and gesso. I mean really -  this takes dirty to an entirely new level. 

In today's share - I wanted to showcase this layout that I created of my Niece Averie. The picture was taken last year during an impromptu photo shoot.  She just propped up and I snapped. Tell me she isn't a natural!


This piece is mounted on a piece of Donna Salzar's Corrugated Card board that was distressed and painted with white gesso.  Then a sheet of Prima Madeline Parkway paper was used for the backdrop. I ripped it, tore it, and distressed it with the new Prima Distress tool. Then to add texture, I glued down all the scraps laying on my desk which included pieces of a doily, hymnal pages, linen strips, and I also included a few strips of Masking tape. I tried not to glue the edges of these elements down so that I could "fluff " them up for texture.   Then I used the stencil and molding paste to add even more texture.  Once the molding paste dried (over night), I then gave the entire background a coat of gesso to make all the elements become cohesive.  To define certain areas of the background I sprinkled a few drops around the canvas of the Iced Spruce Distress reinker.  Then spritzed it with water to dilute it and make it drip.  I love how the background is soft yet course with texture.


I then began to work with my floral spray and layered elements. All the metal pieces were different colors and I found this distracting.  So I grabbed my Snow Cap alcohol ink, and began recoloring them.  This helped them blend into the background, I then dry brushed a bit of the Prima Worn Jean Chalk over the top to give them a little more pop.  The burgundy roses in the Tendrils Grape vine were a bit too bright, so I dry brushed some gesso over them.  I love how this technique made them look shabby like they were part of the wall when it was painted.

I tucked a tag in behind the picture so that I could write Ms. Averie a message.  I think that journaling becomes distracting when I use these as canvases on my wall. However, I feel that journaling is important so I try to hide it somewhere on the layout or place it on the back.  To make the tag blend better with the layout - I distressed it with the Iced Spruce, and Antique Linen. Then I tied off a shabby torn piece of seam binding that I had died with the Ice Spruce.  This made it more elegant, and called attention to the fact that it needed to be pulled out.

Who would have thought that you could take all those grungy supplies and create something this beautiful?

Thanks you all for stopping in today.

Tonya A. Gibbs
http://www.psychomoms.com


Resources:
  • Prima: Distress Tool, Madeline: Parkway Paper, Chalk: Worn Jeans, Millinery Collection Oatmeal, Flowered Tendrils Grape, Marion Smith Trinkets: Metal Flowers #4, Metal Flower #3, Shabby Chic Metal Treasures: Hitches (Birdcage)
  • Pink Paislee: Butterfly Charm
  • Ranger: Tim Holtz Idea-ology Adornments (bird), Adirondack Alcohol Ink: Snow Cap, Distress Reinkers: Iced Spruce, Distress Ink: Antique Linen, #5 Shipping Tag (manila)
  • Zutter: Donna Salzar Corrugated Card Board.
  • Golden: White Acrylic Gesso, Molding Paste, Gel Medium Matt
  • Crafter's Workshop: Brick Stencil 6x6
  • Misc. Lace, Hymnal Pages, Doily, Burlap, Seam Binding (ivory), linen cloth, Masking tape,
  • Silhouette Cameo
  • Font: Alexie Cooperplate
Read More »

Monday, August 20, 2012

Forever In My Heart

0
Saturday I received word that my friend Liz had passed away after a long battle with Leukemia. She was a follower of mine on YouTube and we had chatted a lot online. I had spent quite a bit of time getting to know her through the last few years. Liz  was one of those people that despite her problems, she was always positive and fun. She had an infectious spirit about her, that was a testimony of her faith.

My way of dealing with emotional things is through Art. I love to create as I talk to God and meditate on my feelings. I find that it helps me to focus my energies and clear my head. I feel like God is guiding the creativity, instead of myself.

Brittany, my daughter, saw that I was emotional, and she joined in to help me create this piece as a tribute to Liz. It was so nice to have her finger paint with me.

Prima Build A Swirl Stamps, Ranger: Distress Ink - Picked Raspberry, Claudine Helmeth Matt Medium, Paint, Molding Paste, Hymnal, Sizzix Wings die Cut, Faber Castell PITT artist pens in light Cobalt Turquoise, and Black, Windser Newton Irrodescent Medium.


Liz will forever be in my heart, and written around the heart are some thoughts I had of Liz and the way she lived her life.  The clouds are made with molding paste, and the wings were cut from a sizzix die from hymnal pages I used "Beyond the Sunset" and "Sweet By and By", Then blended them into the canvas with irredescent medium.

Do you create when you are feeling emotional?  I felt at peace when this was finished, and Liz got her "Momma Tonya Original."

Thanks for stopping in today,


Tonya Gibbs
Read More »

Stashed Treausers 2

0

Last week I shared with you a layout that I was making. The layout is going to be used as a collaborate book with a group of other friends.   My theme was to use something that I had never used before or scraps. 

Today I wanted to share with you the other side to the layout.


Everything on this side was a scrap. The paper in the background was scraps from the other side, and was quilted together to form the base. A Strip of Prima Almanac paper was used to form a pocket in the middle of the page.  The Inspire label was a remnant from the April Journal from Marion, and the Pocket was also one of the left over pieces from one of Marion's Journals.  The two flowers were cut from scraps of book pages, and the trim and lace were all less than 3 inch pieces that were in my stash.

I love using my scraps, and look how beautiful this all turned out.  I hear people say all the time, I toss my scraps.  Well I don't when I'm between projects I pull those scraps out and I make cards, layouts, journal pages.  

I love how the small pieces of trim on the right side mimic the piano keys on the left.  Funny thing was I didn't realize I had done that until the photographs were taken.

Don't forget about the challenge that ends Sept. 1  -  See previous post for details.

 
Thanks for stopping in today,

Tonya

 
RESOURCES:   
  1. Prima:   Reflections Paper - Shalamar, Almanac Paper. Black sequin fiber
  2. Graphic 45:  Stamped Girl - Ladies Diary
  3. Ranger:  Distress Markers (colored the girl with them).
  4. Marion Smith Designs:  Envelope and  Journal Card
  5. Tonya Gibbs Designs:  Inspire Label
  6. EK Success Scallop Circle Punch
  7. Tonic Studios: Lacy Scallop Border Punch
  8. Misc. Pearl Trim, Lace, Twine, Buttons, Doily, Black Cardstock.

Read More »

Tuesday, August 14, 2012

Distress Markers - How to

0
I have had a ball playing with my distress markers.  I decided to make a card for my niece's 7th birthday that is the first week of Sept.
I colored two images of the Ms. Anya Hats from - The Greeting Farm, and cut pieces of her out and popped them up on pop dots to giver her more depth.  She was colored with the Tim Holtz Distress Markers, then placed on a sheet of the Celebration's Paper from Webster's Pages.  

Webster's Pages Celebration 6x6, Trims, Roses, Tim Holtz Distress Markers.  Making Memories #7, Baker's Twine, Washi Tape, The Greeting Farm -  Ms. Anya Hats, and Inkadinkadoo - Birthday Stamp.


For a complete step by Step of me coloring Ms. Anya.  Please watch this video.


Here is a video of me making the card:
Thanks for stopping in today, Tonya
Read More »

Friday, August 10, 2012

Stashed Treasures

1
I was involved in a conversation the other day in a group about buying supplies that are "MUST HAVES" that never get used.  Guilty as charged - I buy and I hoard.  But in the past few years I have issued myself a challenge to "USE" what I have and for every new item I must use something old -  either scraps or products in my stash doesn't matter - but something old for everything new.

So, after the conversation with the friend,  I decided to use what I had in my stash to create this 8x8 layout.  But I wanted to take it one step further and use a tool or stamp that I've never used that has been in my possession for at least a year or more.
NOTE: Part of my journaling is missing from the layout, because I'm mailing it to someone to add to a book, and I would like that to stay private.


So the Telephone is the thing I've had for years and never used it was a Sizzix Original Die that I bought on clearance for $2.00.  Had to HAVE IT - You hear me?   And have never ever used it.  I love how it looks with the Almanac paper from Prima. JUST Gorgeous.  I cut it from black chipboard then used UTEE to make it shiny.

Take a closer look at the handle to the phone  I fussy cute that element from the paper then fused it to the die cut with UTEE.  Love how it looks engraved.


You can really see all the layers in the close ups   I used papers from scraps, and papers from 6x6 pads that I've been hoarding.


My photo and journaling is hidden behind the telephone.  The phone is held closed with a magnet.


Do you have things in your stash that you "had to have" but have never used?   I challenge you to take those items out and use them on a project. 

 
Contest - Announcement:
Use something in your stash that you have had for a long time and have never used.  For everything new on the project there must be at least 1 thing that is old (It can be scraps, or hoarded product). But you are not allowed to BUY anything to create the project. 
Create a blog post or Video Response (on the video above).  Link to the blog post here or send me a PM on YouTube with the link to your post. In you post make sure you reference the following:
  • This blog address, or the my YouTube Channel and the link to the video above.
  • Make sure you show the item that has been in your stash for a while and never used, and highlight all the other older products. 
  • Submit your project videos/blog post links  to me prior to Sept. 1 MIDNIGHT EST.
  • A winner will be selected sometime that week - randomly from all submissions.

Thanks for stopping in today & good luck!
Tonya Gibbs

Resources: 
  • Prima: Almanac Paper 6x6, Reflections Paper: Shalimar, Fairy Belle Paper, Almanac - die cuts, Flowers, Distress Tool.
  • My Favorite Things:  Bracket Tab die
  • Tim Holtz: Ideaology - Number Plaques
  • Sizzix: Telephone #2 Original Die
  • Ranger: UTEE
  • Martha Stewart Leaf Punch
  • Twine, Rhinestones
  • Bazzil Black Card stock
  • Sewing Machine
  • Doilies
  • Recollections Washi Tape Silhouette Lady


Read More »

Sunday, August 5, 2012

Tim Holtz Distress Markers - Card

1
I wanted to share with you today a card that I created with the Graphic 45 Ladies' Diary paper collection.  I LOVE the vintage look of this paper, and thought the stamped image would be beautiful colored with my Distress Markers by Tim Holtz.


These markers are a bit tricky to color with, but I think the image turned out beautiful.  I used the Ranger Stamping Paper for the base.  Then used Spun Sugar and Victorian Velvet to color her dress.  To achieve the shading I just put a small amount of water on the paper before applying the ink.  Then I spread the ink with a water brush, and tapped the excess water away with a paper towel to keep the paper from buckling.  Here is a close up of the girl.


In this photo, you can see the Prima Cabbage roses were also painted with the Tim Holtz Spun Sugar pen,  I put streaks of color onto the roses then used the water brush to spread the ink around.  This technique gave the flowers a variegated look.


Here is a video of me demonstrating how to use the Distress Markers to color this image.


Do you have the Distress Markers?  If so, how are you using them.
Thanks for stopping in today.

Tonya Gibbs


Resources:
  • Graphic 45:   Ladies' Diary "Moment in Time" paper, Lady's Diary Stamp No. 6
  • Prima: wooden clock, cabbage roses, mini roses
  • Ranger: Tim Holtz Distress Markers:  Spun Sugar, Victorian Velvet (Dress & Hat), Aged Mahogany (Hat), Tattered Rose (Skin), Pumice Stone (shadow), Scattered Straw (background)
  • Gelly Roll - Crystal Star Glitter pen (hat), gold pen for buttons.
  • lace
  • black card stock


Read More »

Wednesday, August 1, 2012

Cards - Scraps

0
I've been making cards with scraps again, and I know a few weeks back I shared a few projects I've made lately with the Fairy Belle and the Sunkiss papers from Prima.  Today I thought I would share with you the cards I made from the scraps.


I find that making cards with my scraps is so rewarding.  Since I participate in a lot of swaps I usually stuff one of these in the box before I mail it.    What do you do to control the scrap population?
Thanks for stopping in today,

Tonya
Read More »
I love seeing things you create using my tutorials or project shares. Please use the following handles/tags in social media to insure that I get to see your creations:

INSTAGRAM: #FollowingTonyaGibbs    |   TWITTER:  @gibbst    #FollowingTonyaGibbs   |      FACEBOOK:Tag  Tonya Gibbs   #FollowingTonyaGibbs

I Design for:

    http://www.yvonneblair.com

Guest Artist: Click icon to see post!

http://www.teresacollinsdesignteam.blogspot.com/2013/10/family-stories-layout-and-video-by.html#comment-form   http://canvascorp.com/2013/03/21/easter-treat-baskets/


Past Teams

http://www.die-namites.com/     marion