Follow Me...

       
Thanks for stopping by! Don't forget to subscribe!
Showing posts with label Lindys Stamp Gang. Show all posts

Friday, July 21, 2017

Neon Graffiti - One HOT MESS Layout

0


Confessions -  this layout was created about a few years ago. The blog post has been sitting dormant, and I almost didn't share it with you.  But today I was updating my blog and stumbled across the draft and decided why not? I'm sure everyone has days like this!  So here it goes for better or worse...


Hi everyone, today I have a layout that I want to share with you using the Neon Graffiti Line by Lindy's stamp Gang and Limor Webber Designs.  The colors are so rich and vibrant, and REALLY make a statement!  They are flat, meaning no shimmer!


Unfortunately, there is no video showing how I achieved the look of this layout. When I set out to create it, I was not in a super stellar frame of mind. My thoughts were cluttered. I was feeling overwhelmed. The post man had just delivered these products, and I really wasn't sure how they were going to react with different surfaces. My goals were not originally a layout but to find out how the mediums reacted on different surfaces.


I sat down and started to play without thinking about an end project. The process was really about clearing my mind and clearing my desk.  Spritzing the colors on dark paper, white book text, and metal. 


I have sat on this project for a few months now, and never really intended to share it with the world.  But today I realized that I can't be the only person who goes through this feeling of constant chaos.  Today's layout demonstrates that through the chaos in my brain art does emerge.  When you read some of the passages around the page it becomes apparent that I am truly blessed. I brainstormed lots of the craziness around the page graffiti style with a white gel pen. 

I never loved this project because I detest the color HOT PINK!  Those who know me, know how I feel!  It has it's place in the color spectrum, but man these colors are bright and sassy, and I guess that is why I avoided showing the layout to you, because MAN is this one hot pink mess! But when I stepped back, and thought about the layout as a whole, I think I love that it is a mess. Because that is truly how I felt the day that I created the page. My brain was cluttered with these crazy thoughts, and they needed to escape! 


Fall is crazy here.  I'm a mother, I work full time, I volunteer for a youth football program, and I'm a local sports photographer, on top of all that madness, I decided to return to school. WHAT WAS I THINKING?  As you guys have probably noticed, this time of year, my artsy projects become sparse.  I'm still creating, but WHEN I retreat to my crafty space, it is for refuge not for work. Admit it, we have all been there!   So I didn't want to create a video, or hassle with step by steps. I just wanted to PURGE my inner thoughts, and spend some time creative playing.


I almost didn't share this layout with the world. But I wanted to remind you guys that it is ok, to create layouts like this that document your inner thoughts.  Not only do they help you process how you feel at the moment, but 10, 20 years or a lifetime from now, they help to document you the person!  


This particular day I had a photo of myself on my desk, the quality of the photo wasn't great, but neither was my frame of mind.  And all these pieces and parts inside my one hit wonder box, helped this mess come to life!  Sometimes life isn't perfect, it is a MESS.  It is ok to document that mess!
 
Thanks for helping me process, and vent from time to time! Thanks for being patient followers when I neglect this part of my world!  Thanks for understanding that sometimes you have to get out of your room, and go make some memories so that you can come back you have the energy to be creative!
 

Read More »

Tuesday, January 31, 2017

Love Like Crazy Cards

0


Hi crafty friends, I hope you have lots of inspiring ideas after the sneak peeks from Creativation 2017. I know my head is SPINNING AROUND!   Yvonne has released some fancy new word stamps along with a few cute little sketch stamps. Here are a few of my favorites from this release I picked to feature in today's post. I have linked them up for you to purchase from  Impression Obsessions Website,  but I also encourage you to support your local retailers if they carry Yvonne's stamps.


http://www.iostamps.com/1NEW/D17166.html

http://www.iostamps.com/1NEW/E17162.html


http://www.iostamps.com/1NEW/C17153.html


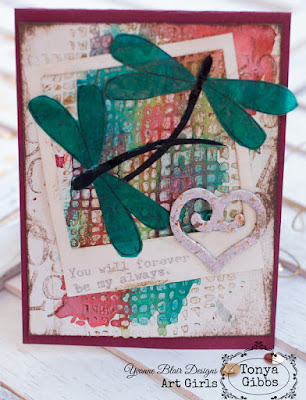
It is sometimes difficult to create masculine cards.  With Valentine's Day around the corner, I thought I would use these stamps to create a few cards that could be used for multiple purposes. Either simple "I love you cards", "Happy Birthday", "Thinking of  You" or you could even add "Happy Father's Day" to the inside of these cards to use all year long. The concept for both cards are the same; however, one card is flat for mailing, and the other is dimensional in case you are sharing face to face. 

 This is the flat design:

Both cards are top folding A2 sized cards.  The background cardstock is measured at:
4.25 in. wide  x  11 in. long (scored at 5.5 in.) 

Then I used a pieces of Canson 140lb white  watercolor paper as my base (Smooth side)
cut to 3.75 in. x 5 in.  (this leaves a 1/4 inch border)
Using watercolor paper insures that it will hold up
to the wet mediums and won't buckle or peel.

For my background I used:
Prima's Finnebar White Crackle Texture Paste
with a Tim Holtz Burlap stencil
allow this to dry

To apply color to my background I used
Lindy's Stamp Gang Starburst Stains:
Tibetan Poppy Teal
Edelweiss Moss Green
Rudolph's Nose Red

 
This is the dimensional card:

Here is a quick video showing the process of how these cards came together:


I love the dragonflies, and now I have lots more to use in different posts, and other mixed media projects.  It is hard to see in the photos, but they are super shiny. While they are primarily the same cards, they do have distinctly different looks.  


Stay tuned in the coming weeks as my fellow Art Girls share more from the Winter 2017 Collection.  You are going to want them all!  Thanks for hanging out with me today.
Read More »

Thursday, January 14, 2016

January Live - Layout Tutorial Recap

1

Thank you to everyone who came to the live class on Monday night.  I had a lot of problems getting the show to air live on YouTube so we moved over the Ustream. If you guys had trouble finding us, I'm so sorry. I'm just going to keep at it until I figure it out!  Good news! We did get it recorded. 

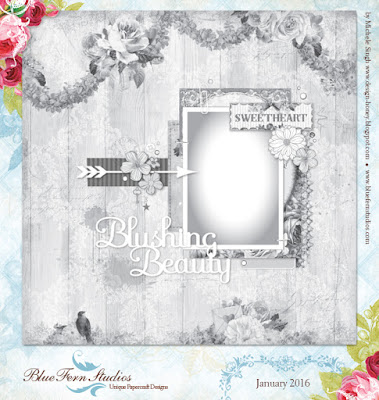
We kept it light and discussed the CHA releases.  I based this month's class on a sketch challenge by Blue Fern Studios. Details can be found on their blog!


 I used the Love Story Collection and their Doodle Flowers Chipboard Coordinates for my layout.  


Here is the sketch...


Here is what my finished layout looked like: 


I used a photo that I had taken during the Holidays of my Mom & I for the layout. In the class I shared with you how to use the Pentel Fude Brush Pen to draw a trendy title.  Here is the pen that I used.  The ink from this pen takes a LONG time to cure.  Sometimes a day or so depending on the paper.  It is also a bit tricky to use.  If you purchase the pen, don't forget to remove the washer that separates the ink well from the brush tip (or it will never work - ::WINK WINK::) 


Here is a close up of how the title turned out.   


I also shared with you how I created & painted these cute little clay birds.  Aren't they adorable?  They are the perfect embellishment to compliment this paper collection.  So affordable and easy to create.  I love including small clay pieces like this in my embellishment clusters. 


Here is the video of the class. 


Happy New Year everyone. Thank you again to everyone who came  to the show live. 

Tonya 

Supplies: 
  • Blue Fern Studios - Love Story - True Harmony 12x12 paper
  • Blue Fern Studios - Love Story - Calling Cards 12x12 paper
  • Blue Fern Studios - Doodle Flowers Chipboard Coordinates
  • Pentel Fude  Brush Pen - Medium Black
  • Stickles (Glass dots) - Peach
  • Martha Stewart - Silicone Mold - Birds & Lady Bugs
  • Polyform - Model Air Air Dry Modeling Clay 
  • Versa Ink
  • American Crafts - Paper Clips - Gold Hearts 
  • Graphic 45 - Staples Collection - Antique Typewriter Wood Stamp Set 
  • Little B - Decorative Paper Tape - Light Grey Diagonal Stripes - 15mm 
  • Lindy's Stamp Gang - Glitz Spritz - Shimmer Mist - 2 Ounce Bottle - Blazing Sun 
  • Faber-Castell - Mix and Match Collection - Gesso 
  • Ranger Ink - Archival Ink Pad - Jet Black 
  • Advantus - Tim Holtz - Idea-ology Collection - Adornments - Arrows 
  • Ranger Ink - Specialty 1 Embossing Powder - Holographic 
  • Stampers Anonymous - Tim Holtz - Layering Stencil - Flourish 
  • Ranger Ink - Tim Holtz - Distress Marker - Barn Door 
  • Prima - Wildflowers Pillar Pack Collection - Botanical Flower Mix - White 
  • Prima - Trim - Jute - 200 Yards - Wheat 
  • Prima - Vintage Trinkets Collection - Metal Embellishments - Keys 
  • Ranger Ink - Tim Holtz - Distress Ink Pads - Mini - Vintage Photo 


Read More »

Monday, January 4, 2016

Yvonne Blair Designs Art Girls

2


Happy New Year everyone! I hope your year is off to a great start. I have some exciting news to share with you to kick start the year in the right direction! My great friend Yvonne Blair, whom I met several years ago when hanging out at my Local Scrapbook Store, She Scrapbooks, contacted me over Christmas break and told me she was releasing her second line of art journal stamps this week with Impression Obsession. She then asked me to be one of her Art Girls! A lot of SQUEALS took place, as I'm sure you can imagine. I'm so very excited for her, she is so sweet and talented, and I know my sweet followers are going to love her stamps and journaling products.

http://www.yvonneblair.com/2016/01/very-very-exciting-news.html

I'm so excited to be along talented group of ladies. Yvonne Blair in the top left, then Lynne Forsythe, and bottom right Bobbie Smith. Get to know all of these wonderful ladies here...

Yvonne's collections will be perfect quotes and doodle art drawings for all your art journals, Bible journal pages, cards, and mixed media projects. I can't wait to share more with you! Here is a little sneak peek at two of the stamps that Yvonne is releasing this week at CHA.


Her pieces are painted with turquoise on the tag so that they "shine" against the warm colors of pink and gold on the tag. The Shine Your Light Stamp says "Shine The Unique Light That is Only Yours To Shine." I added the sentiment onto a piece of acetate (recycled packaging) with gold foil, then painted the back with turquoise paint to make it pop. I just love the hand Sketch Butterfly Stamp was foiled onto a piece of cardstock painted turquoise, then I added doodled white lines with a gel pen to fill in the negative spaces. I love that the areas of the butterfly are left open so that you can doodle inside the wings, giving it a unique look every time you use it.

To find out more about Yvonne and her stamps, please visit her blog at: http://www.yvonneblair.com/

Her stamps can be purchased at: http://www.iostamps.com/

Thanks for stopping in today! Happy New Year!

Tonya

Tag Supplies:
  • Impression Obsession - Yvonne Blair - Shine Your Light Stamp CHA 2016 Release
  • Impression Obsession - Yvonne Blair - Sketch Butterfly Stamp CHA 2016 Release
  • Advantus - Tim Holtz - Idea-ology Collection - Baubles
  • Advantus - Tim Holtz - Idea-ology Collection - Loop Pins
  • Tombow - The Craft Collection - Mono Gel Pen - White
  • Lindy's Stamp Gang - Flat Fabio - Color Mist Spray Set - Caribbean Cruise
  • Lindy's Stamp Gang - Starburst Glitz Spray - Blazing Sun
  • Maya Road - Chipboard Collection - Chipboard Mini Set - Love
  • Martha Stewart Crafts - Crafter's Clay Collection - Silicone Mold - Flower Garden
  • Martha Stewart Crafts - Crafter's Clay Collection - Silicone Mold - Romantic
  • Martha Stewart Crafts - Crafter's Clay Collection - Silicone Mold - Birds  
  • Ranger Ink - Dina Wakley Media - Heavy Body Acrylic Paint - Turquoise
  • Stampers Anonymous - Tim Holtz - Layering Stencil - Rays
  • Ranger Ink - Tim Holtz - Distress Glitter - Picked Raspberry
  • Prima - Fairytale Roses Collection - Miniature Mulberry Flower Embellishments - French White
  • Prima - Fairytale Roses Collection - Miniature Mulberry Flower Embellishments - Baby Pink
  • Prima - Trinket Collection - Fabric Flower Embellishments - Reflections
  • Studio Calico - Snippets Collection - Wood Veneer Pieces - Chevron
  • Sizzix - Tim Holtz - Alterations Collection - Movers and Shapers Die - Tag and Bookplates
  • Sizzix - Tim Holtz - Alterations Collection - Bigz Die - Tiny Tabs and Tags
  • IndigoBlue - Flitterbox - Gold Foil 

Read More »

Wednesday, November 11, 2015

Amazing Heart Layout Tutorial

3
 
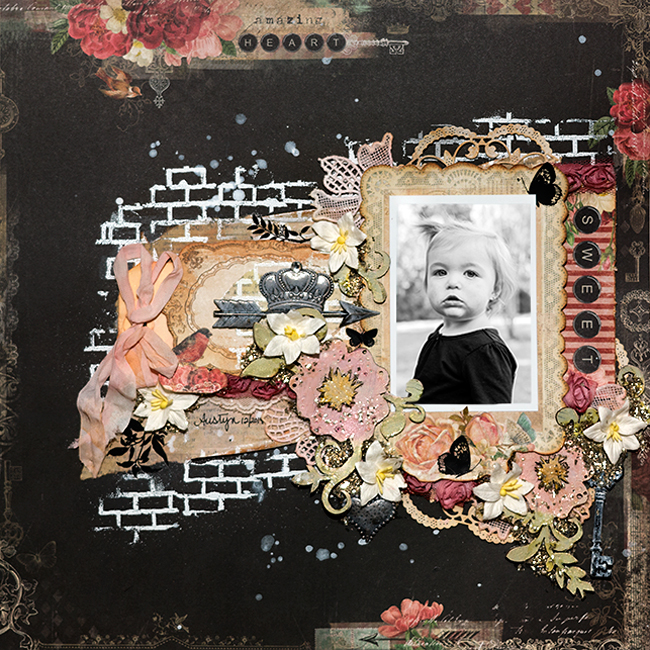
Hi everyone, I hope you are having a great day!   I have a super cute mixed media layout to share with you today using lots of YUMMY Blue Fern Studios' products.    For today's layout I selected these beautiful papers from the new Love Story Collection.
 
 
Amazing Heart
 
 
Calling Cards
 
 
I don't think beautiful begins to describe these papers.  They are a really nice heavy stock and hold up well to wet mediums, and heavy embellishments.  The patterns are so romantic. I used the papers today to scrapbook a photo of my sweet niece Austyn. 
 
I selected these lovely Paisley & Vine Coordinating Chipboard pieces from Blue Fern Studios to play center stage in my embellishment cluster. 
 
 
As you can see from the photo below they work fantastic in your embellishment clusters to add texture, and weight without adding a lot of bulk.
 
 
I covered them in Crackle Texture Paste.  Then painted them with Lindy's Stamp Gang Rudolph's Nose Red, and Edelweiss Moss Green. Since the paste has a bit of silicone it did resist the pigment.  If you do this technique, remember to choose dark colors.   The center of the flowers were removed and the holes were filled with hot glue to keep it elevated. This gives my flowers more depth.  Then I used a Wink of Stella Gold Glitter pen to give them more pop and a hint of sparkle. The entire piece was also distress with Tim Holtz' Tea Die Distress Ink to make them ore vintage looking, and bring out the crackle.  
 
 
For added texture around the layout, I used white embossing powder and the brick patterned stamp from Blue Fern Studios' Autumn Anthology Line -  Essentials Texture.  The stamping offers a great foundation for my embellishment cluster and framing.
 
 
For the embellishment clusters, I tucked in pieces of lace, lace applique flowers, organza roses, and mulberry lilies.   I also used a few Tim Holtz remnant rubs to add a few butterflies.  These black elements help to bring the black from the background up into the foreground, and help ground the elements.   Every good embellishment cluster needs a little metal.  So I mimicked the patterned paper and added an arrow, crown, heart and key.  The arrow helps to draw your eye back to the photo.  Since all these pieces were different finishes,  I added gesso to them to help them look cohesive.   To finish off the layout I created a mixture of Glossy Accents, silver German glass glitter, and clear beads then tucked it into the shadows, and  odd transitional areas around the base of the layout.  This offers a sophisticated sparkle. 
 
Here is a video showing you the step by step process


I think this is one of my all time favorite layouts.   I absolutely adore this paper collection. You will probably see me use it quite a bit!   I love how my photo just pops against the softer colors.  The Layout has lots of  details, but is not over done! 
 
Thank you for stopping in today.  I hope you have a learned a few new techniques.
 
Tonya
 
Supplies:
 
  • Blue Fern Studios - Love Story - 12 x 12 paper Amazing Heart 
  • Blue Fern Studios - Love Story - 12 x 12 paper Calling Cards 
  • Blue Fern Studios - Coordinating Chipboard - Paisley & Vine 
  • Blue Fern Studios - Autumn Anthology - Essentials Texture Stamps 
  • Ranger Ink - White Embossing Powder 
  • Ranger Ink - Tim Holtz - Distress Ink - Tea Dye 
  • Ranger Ink - Tim Holtz - Glossy Accents 
  • Ranger Ink - #10 Manila Tag 
  • Tim Holtz - Idea-ology - Adornments - Arrows 
  • Tim Holtz - Idea-ology - Adornments - Heart & Crown 
  • Tim Holtz - Idea-ology - Remnant Rubs - Botanical 
  • Lindy's Stamp Gang - Starburst Spray - Rudolph's Nose Red 
  • Lindy's Stamp Gang - Starburst Spray - Edelweiss Moss Green 
  • Lindy's Stamp Gang - Limor Webber Designs - Tres Chic - Chateau Rose 
  • Lindy's Stamp Gang - Limor Webber Designs - Tres Chic - Café au Lait 
  • Lindy's Stamp Gang - Limor Webber Designs - Neon Graffiti - Sidewalk Chalk 
  • Faber-Castell Design Memory Craft® - Gesso 
  • Faber-Castell Design Memory Craft® - Gel Medium 
  • Versa Ink Pad 
  • Silhouette Pick Me Up Stick
  • Rhinestone 
  • Zig - Wink of Stella Gold Glitter Pen 
  • Prima Finnabair - Art Ingredients - Glass Beads Crystal 
  • Prima Finnabair - Art Ingredients - Glass Glitter Sterling 
  • Prima Finnabair - Texture Paste - White Crackle 
  • Tissue Paper 
  • Cherry Lynn Designs - Heart Doily Die Cut 
  • Lace 
  • Maya Road - White Organza Rose Trim 
  • Lace Applique Flowers 
  • Metal Key
  • Seam Binding
Read More »

Tuesday, August 4, 2015

August 2015 Ustream Recap

0

Thank you to everyone who came out to watch the Ustream live last night.  We had a lot of fun creating this beautiful tag. 


In this show, I shared with you the technique that I used to create the roses seen in the background of the tag. Isn't this just scrumptious all by itself? 


Here you can really see the details in the painted flowers.  I decided to decorate the tag with a scene using Prima's Parlor  Resin pieces.  you can see here how the flowers in the scene match the ones in the background, offering a beautiful 3D effect. 


Don't forget to use those scraps when creating floral clusters.  This tag project has a few remnants that I found in my stash.  A small piece of lace is used as the screen in the window, a small stem from a floral spray, half a piece of metal filigree is just enough to tuck into the edge of my spray, and the butterfly was actually punched from the branding strip of  apiece of wood paper packaging.   


Adding a little glass glitter mixed with glossy accents, really helps to add sparkle to the shadows, and bridges the gaps between the embellishment cluster elements. 

Want to see how I created this beautiful tag from start to finish.  Here is the video recordings from last night's show.  I was interrupted briefly by a lighting storm, so the show is broken up into two videos. 


Watch on YouTube


I really love all the details on this tag.  This painting technique would make an amazing background on all of your projects.  See if you  can create one similar and share it with me in your social media outlets by adding #FollowingTonyaGibbs, or tag  me on Facebook.  I love to see what you create!

Thanks for stopping in today,

Tonya Gibbs


Supplies List: 

  • Vintage text paper in a variety of styles
  • Faber-Castell Design Memory Craft® - Gesso
  • Faber-Castell Design Memory Craft® - Gel Medium
  • Faber-Castell Design Memory Craft® - Stamper's Big Brush Artist Pens - May Green #170
  • Faber-Castell Design Memory Craft® - Stamper's Big Brush Artist Pens - Scarlet Red #118
  • Faber-Castell Design Memory Craft® - Stamper's Big Brush Artist Pens - Caput Mortuum #169
  • Lindy's Stamp Gang - Glitz Spritz - Blazing Sun
  • Lindy's Stamp Gang - Starburst Spray - Cocklebells Coral
  • Ranger Ink - Glossy Accents
  • Ranger Ink - Archival Ink - Jet Black
  • Liquitex Iridescent Bright Gold Ink 
  • Glitz Roller Stamp - Wavy Chevron
  • German Glass Glitter - Green
  • Plaid - Apple Barrel Paint - Jack-O-Lantern
  • Plaid - Apple Barrel Paint - Kiwi
  • Plaid - Apple Barrel Paint - Bimini Blue
  • Plaid - Apple Barrel Paint - Yellow Flame
  • Plaid - Apple Barrel Paint - Pink Parfait
  • Prima - Resin - Parlor
  • Prima - Mini Roses
  • Prima - Lace
  • Floral Lace Applique
  • Metal Filigree
  • Martha Stewart - Butterfly Punch
  • Sprig of Vine Floral Stem
  • Gold Button
  • Tim Holtz- Idea-o-logy - Philosphy token
  • Tim Holtz - Idea-o-logy - Loop Pin
  • We Are Memory Keepers - Large Eyelet - White
  • We Are Memory Keepers - Crop-a-dile
  • Sizzix - Tim Holtz - Alterations  Bookplate and Tag Die 
  • Gold Button


Read More »

Thursday, July 30, 2015

On Trend - Card Tutorial

4


Hi everyone,  I have a cute card share for you today.  I had a comment on one of my YouTube videos from Anna, AsianTiger513.   She asked me to do a card tutorial, in real time.  YIKES I haven't done that in a really long time!   I quit doing them, because I felt they were too long, and I could cover more ground by speeding up the process.  Some of my projects take hours! 

So for you Ms. Anna - I have  accepted your challenge.  

For my card, I chose to use the My Mind's Eye On Trend 6x6 Collection.  I have seriously been hording this collection for a while.  I used it a little in a Ustream a few months ago, but the paper is so beautiful, I wanted to keep it forever!  AHHHH but I can't.   


These are truly my all time favorite colors,  mint and coral.  I mean seriously so delish, then add the gold foil - my heart literally stopped for second when I saw it! 


Ok - back to the tutorial!     It is no secret that I love to use my scraps when creating cards.  Since the paper collection was fairly new, that meant I must spend some time, looking for items that have been around for a while to help the card come together.   

Deep into the bucket of scraps and one hit wonders I went.  I pulled out  a tube of Prima Flowers - they have been here since early 2009, and a scrap of gold rick-rack.  Look at how simple and beautiful, things came together. 

\


I know everyone who has paper-crafted for a while, has a stash of Alpha bet stickers/chipboard pieces that are still lingering around, and may not match.  The H and I were from two different sets 1 was lavender the other pink.   Never fear -  I made them play nicely together with my card, by heat embossing them with Gold.  Now they are trendy, and match! 


The Inside of my card was simple,  I created a border with the paper from the collection, then added a piece of white card stock in the center for my hand written message.   The final card is an A2  4.25 x 5.5  top folding card. 


I added a little Lindy's Stamp Gang in Cocklebells Coral in the negative areas. This spray is also among my favs as it has this nice peach pigment with a gold shimmer (perfect right!). 

Here is the video tutorial (warning it is long - because I ramble -LOL) 


Thank you Ms. Anna for the challenge,  I really appreciate it.  I love that you left comments, so that I could get to know you better.   It was delightful speaking with you, and I look forward to seeing you around!


Thanks, 
Tonya 


SUPPLIES:

  • My Mind's Eye - On Trend 6x6 Paper by Jen Allyson
  • Lindy's Stamp Gang - Cocklebells Coral
  • My Favorite Things Stamps & Dies - Die-namics Dizzy Doily Duo
  • Prima - tube flowers
  • The Paper Studio - Gem Stones  Gold
  • Chipboard letters
  • Versa Embossing Ink
  • Ranger Ink, Queen's Gold Embossing Powder
  • GP 110lb White Card stock
  • Unibal - Signo - Micro 207 Gel Pen - Black


Read More »

Monday, July 20, 2015

Love Summer Art - Journal Page Kissing Fish

1

Welcome back for the last day of #LoveSummerArt.  What a fun weekend, with TONS of inspiration.  I have had so much fun getting to know so many new artists!   The event runs from July 17 - 20th.   But the content will forever be there on YouTube.  To access it all you have to do is type #LoveSummerArt  in your YouTube search bar. 


This is a super fun way for you to discover new artists on YouTube, and be inspired by their work. All genres of art are participating - Exciting Right!     

Today, I have a process video showing you how I created this amazing Ocean scene in my art journal.   


Here is a glimpse at the background before I added all the layers. 


To create this look I started by adding Gesso to the background.  Then with a baby wipe, I added a dark blue acrylic paint at the bottom, then filled in with the lighter blue.   The background was very blotchy, but that was the look I needed.   When you look through the turquoise colors of the ocean, the landscape of the ocean floor is always looks blotchy.    To give a bit of a green tone to the entire thing, I lightly spritzed it with Lindy's Stamp Gang Shabby Tuxline Teal, and Tiffany's Blue.  The shimmer in the sprays give the background sparkle like wet water, and the greens in the sprays offer the perfect underwater effect. 


For the background areas of my coral,  I used a dry sea sponge to pick up various colors of warm toned acrylic paint rotating the sponge to give different effects.  You can see the technique in the video tutorial. 


Look at my adorable "Doodle Fish".  Isn't he just divine?  I started by sketching a fish outline shape on a piece of  cardstock.  Then doodled some lines and dots until he looked like a fish.  I used Elmer's Paint Pens in Red, Blue, White, and black to create the doodles on the fish. 


For the coral,  I used black cardstock as my base.  This offers the depth  and shadows of my coral. Then using the same sponge techniques, I added various colors to give the scene interest. 

I also included the Die-namites Leafy Branch die to create a different texture in my coral.  I used my Pink Paislee Nantucket Stamp Set to stamp out the starfish and shells.  Then for added sparkle I scattered some Gold Mica Flakes around the bottom. 


 I  think this is one of my favorite pieces I've ever done.    This could easily be redone on a canvas.  Now that I know "how" to make it look right.   On a canvas I could add real shells and coral pieces too.   Stay tuned - that just might happen (LOL).

Thank you so much for hanging out with me this past weekend.  This venture was super fun!

Don't forget August 3 at 8:30 p.m. is our next Ustream class.   

Tonya

Supplies:
  • Daler Rowney Acrylic Paints - Scarlet, Deep Yellow, Medium Yellow, Violet, Light Blue, Dark Blue, Light Green
  • Lindy's Stamp Gang - Starburst Sprays - Shabby Tuxline Teal
  • Lindy's Stamp Gang - starburst Sprays - Tiffany's Blue
  • Lindy's Stamp Gang - Starburst Sprays - Cocklebells Coral
  • Lindy's Stamp Gang - Starburst Sprays - Glory Of The Seas Gold
  • Faber-Castell Design Memory Craft® - Stamper's Big Brush Artist Pens - Green Gold #268  (starfish stamp) 
  • Faber-Castell Design Memory Craft® - Stamper's Big Brush Artist Pens - Medium Flesh #131 (shell stamp)
  • Faber-Castell Design Memory Craft® - Gesso
  • Faber-Castell Design Memory Craft® - Gel Medium
  • Elmer's - Opaque Paint Pens - White, Red, Black, and Blue
  • EK Success - Zig Writer - Pure Blue
  • Prima Marketing - Finnabair Art Ingredients - Mica Flakes - Gold Leaf
  • The Natural - Faux Artist Sea Sponge
  • Die-namites - Leafy Branch Die 
  • Pink Paislee -  Nantucket Stamp Set
  • Strathmore Mixed Media Journal
  • White Cardstock - 110lb
  • Black Cardstock - 80lb
Read More »
I love seeing things you create using my tutorials or project shares. Please use the following handles/tags in social media to insure that I get to see your creations:

INSTAGRAM: #FollowingTonyaGibbs    |   TWITTER:  @gibbst    #FollowingTonyaGibbs   |      FACEBOOK:Tag  Tonya Gibbs   #FollowingTonyaGibbs

I Design for:

    http://www.yvonneblair.com

Guest Artist: Click icon to see post!

http://www.teresacollinsdesignteam.blogspot.com/2013/10/family-stories-layout-and-video-by.html#comment-form   http://canvascorp.com/2013/03/21/easter-treat-baskets/


Past Teams

http://www.die-namites.com/     marion