Follow Me...

       
Thanks for stopping by! Don't forget to subscribe!
Showing posts with label birthday. Show all posts

Saturday, November 29, 2014

Masculine Mixed Media Card - Time to Celebrate

1

OH MY GOODNESS - Why have I waited so long to purchase a Gelli plate?   I'm having so much fun!   I've created dozens of prints over the last few weeks.


I wanted to share an idea of how to use those prints.  If you have followed me for a while, you know that I'm just not much for "journaling".  Don't get me wrong, I have dozens of journals, and I have some that are mixed media, that I've started.  But I like to practice techniques on card stock then create projects with them, instead of hiding them away in a journal.

I created this masculine card to give to my nephew for his birthday.  These Gelli prints are PERFECT for Masculine card backgrounds.  So FUN, vibrant, and the perfect amount of grunge.

Earlier this year, I shared with you a post on how I created these wood veneers from the wood shapes you find in the craft section and stamps in your stash.  This is a perfect way to create custom embellishments with a trendy flare without breaking the wallet.  But I also encourage you to dig through your stash, and see if you can find something that would work.  Perhaps stickers of clocks, puzzle pieces, gears, washers, clocks, wood shapes, or  hexagon shaped die-cuts.


For the inside of my card, I used the Heidi Swapp Coral ink and a Fiskars Hexagon Sentiment Stamp set.  The "Time to Celebrate" perfectly mimicked the cluster of embellishments on the cover.

I have prepared a process video, showing how I put the card together:


I hope you enjoyed my share today,  Don't forget that we have a Ustream, Monday, December 1, 2014  at 8:30 p.m. Est.  We are going to create some fun Christmas cards using Gelli Prints and Die-nmaties Dies.

Thanks for stopping in today,
Tonya

Supplies:

  • Gelli Plate (any size)
  • Paint (colors of your choice)
  • Faber-Castell Design Memory Craft® Whipped Spackle.
  • Fiskars Hexagon Sentiment Stamp
  • Heidi Swapp Coral Ink
  • Heidi Swapp Honeycomb Stencil 6x6
  • Prima Wood Veneer Celebrate Flag
  • Recollections  Wood Veneer Frame
  • Cardstock
  • 7 Gypsies Gears
  • Twine

Read More »

Monday, May 12, 2014

Birthday Card and Die-Namites May Challenge

0
Happy Mother's Day -  I hope you have an amazing day today!
I've created a card using the sketch from the May Sketch & Dare Challenge.


Have you submitted your project for the Die-Namites May Sketch & Dare challenge?  
Don't let the time get away from you! 


http://www.die-namitesblog.com/2014/05/mays-sketch-challenge-dienamites-dare_5.html

Rules can be found here!  What are you waiting for?  

 You have until the last day of the month to post your creation on your blog,
with mention of the Die~Namites Die used and a link back to the Die~Namites Dies blog.
Link your blog post, using Inlinkz, to the Die~Namites Die blog.

 A random winner will be chosen from eligible participants for a
$25 Gift Certificate to the Die~Namites Dies.


Here is a glimpse at the sketch.


For today's card I used three dies from Die-Namites 


The Spring Doily is so delicate and creates the perfect background for my floral spray.  I used standard weight copy paper to cut the doily so that it would remain soft and light weight. 

Before die-cutting my Winter Bouquet flowers, I Pre-Gessoed the cardstock.  Then used my Faber-Castell Design Memory Craft pens to color them.   I love how they look variegated in yellow, orange and pink.  To smooth the colors together, I spritz them and the focal point flower with the Heidi Swapp Color Shine in Gold Lume!  (YES, I'm still on a midas kick). 


I cut the branches off the Leafy Branch and adhered them around a glue dot in multiple layers to create the flower in the focal point of my card.  To finish off all of my flower centers I added a Webster's Pages Sparkler.


I love how my focal flower mimics the same shape as the sunflowers in the Winter Bouquet Die.
I can't wait to see what you create with this sketch challenge and dare.


Thanks for stopping in today,
Tonya

Read More »

Friday, April 18, 2014

Mixed Media Masculine Card

2
 
I've been sharing a lot of pretty cards lately, and today thought it would be fun to share with you a masculine card.  Lately I've abandoned my art journal for pieces of 4.25 x 5.5 inch sheets of mixed media paper.  I try out new mediums, play with techniques, and then recycle these panels into card backgrounds.  I find that mixed media techniques make masculine cards come together much easier!  And you could always keep the card 1 layer and display your art rather than lots of layers.
 
Here are the steps I took to create the background
 
 
  1. Apply modeling paste to your card with stencil of choice (I used Heidi Swapps Honeycomb)
  2. Use A Faber-Castell Design Memory Craft Pitt Pen to apply color around the image. 
  3. Use your finger to smooth out the ink.
  4. Select a texture Stamp (I used Marion Smith Designs' Texture Stamp)  Apply ink to the stamp with a contrasting PITT Pen 
 
  1. Apply archival ink around the image to give a distressed look. NOTE: you can use distress inks, but if you add water, they will react with that water.  Archival ink is permanent when dry.) 
  2. Spray a wet medium onto a pallet.  I used Lindy's Stamp Gang Moon Shadow Mist in Gossamer Gold  
  3. Stamp a round object into the ink and apply it to your card
  4. You will see a water ring just like it were left from coffee or tea. 
To finish off the background I added pieces of tissue tape with matt medium.   I added the panel to a piece of black cardstock and created this card for my nephew's birthday.


He loves photography, so I took advantage of using up some scraps to create this photo layers.   The Camera and Polaroid Frame were a Spellbinder's Die.  I then added the Tim Holtz Film Strip Ribbon, and Marion Smith's Washi Tape from her Romance Novel Prima line.   Happy Birthday stamp was from Studio G.  My nephew was turning 13 so I added a few school aged elements like notebook paper, music tape, geometrical shapes, tag and paper clip.  
 
Don't forget about the Artsy Addicts Sketch Challenge through out the month.  You can get details here!
 
 
Thanks for stopping in today,
 
Tonya Gibbs
 
 
Read More »

Friday, April 4, 2014

Card and Sketch

0
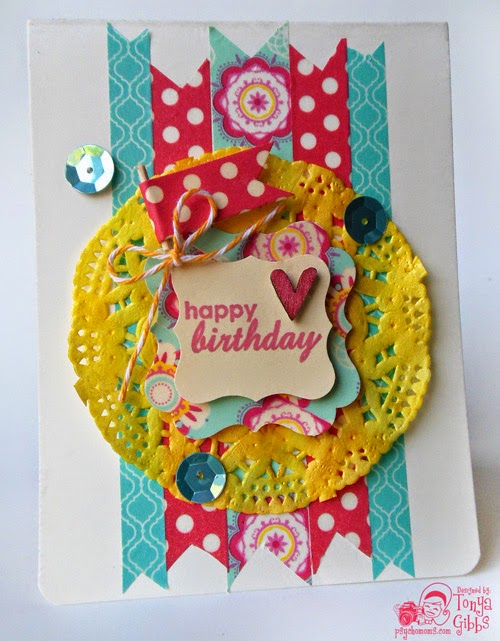
Happy Friday!   I have a super fun, cheerful card and sketch to share with you today!
 
 
This entire card was inspired by the one roll of washi tape!  (I believe it is Recollections brand!)
 
 
So I went into my stash and found these two tapes to coordinate with the dominate tape. 

TIP: When picking out tape, if you have a BOLD pattern as your dominate, select coordinating tapes in smaller widths and softer patterns to contrast your focal tape selection.

 
I then set out to create a sketch for my card!


Look at how fun my card turned out!  The bright colors of the tape are festive and fun!
 
 
I took a small doily and sprayed it with Dylusions Ink Spray in  Lemon Zest. Then Spritzed it with Heidi Swapp's Gold Lume color shine.
 
This sketch would also be great for using up some small scraps of paper.  You guys know now much I love to use up my scraps.
 
I hope you enjoyed this card. 
 
Thanks for stopping in today,
 
Tonya
Read More »

Thursday, March 13, 2014

Boy Birthday Card by Tonya Gibbs

1
Hi everyone, I hope you are having a great week.  My favorite part of Marion's designs are all the little tiny elements that you can fussy cut and cluster together.  Today's project was inspired by the layout I made for yesterday's post.  


I used a  few of the same techniques, but this time, I took elements from Marion's Nirvana collection, and the Texture stamps from Marion's latest release to create the mixed media background boy card. 


Here is how I did the background for this card. 

I started with a piece of cardstock, and spread modeling paste or gesso using your favorite stencil. Allow it to dry completely.

 
Using a Faber-Castell Design Memory Craft Pitt Artist Pen - carefully rub some of the ink onto the stenciled area. Try to avoid direct contact with the cardstock.  Do a small section then go to next step.


Using your finger rub the Pitt Pen Ink to blend, allow some of the ink to spill over the cardstock.


Archival ink was used around the edges to further distress the background.

 
I used a green Pitt Artist Pen directly on my stamps then stamped it onto my background paper.   These pens are temporary blendable ink on a prepped surface as seen on the hexagons.  However, when used on a non-prepped surface they offer a permanent ink solution. 
 
 
Pick a brown watercolor shimmer mist (I used Gossamer Gold by Lindy's Stamp Gang), and spray onto a non-porous surface. I used recycled packaging for my pallet.


 Use a circular item and stamp the bottom into the ink, then apply it to your project. 


The grungy effects give this background and instant masculine feel.   All I have to do now is build out my layers.  In addition to Marion's ephemera, I've also included a chipboard #2, sentiment, twine, and puzzle pieces.
 
 
Thanks for stopping in today,
 
Tonya Gibbs


Read More »

Friday, September 20, 2013

First Birthday Layout - Tonya Gibbs

0
I'm loving the chalk board trend in scrapbooking papers these days.  But I think my favorite one from summer CHA was the Teresa Collins Designs Memorabilia line.  I had to have it all the second that I saw it!  I love that the secondary colors are yellows, and aquas, the embellies are filled with awesome typography, and I'm totally in love with all those flags! 

Today I wanted to share with you a layout that created of my nephew Gage's first birthday party with this collection.


Layout by Tonya A. Gibbs  using Teresa Collins Designs Memorabilia Collection.  #Layout #Scrapbooking #TeresaCollins #Memorabilia #Birthday #TonyaGibbs #Psychomomscrapbooks
 
 
Here is a process video showing how I made the layout.


Thanks for stopping in today,
 
Tonya A. Gibbs
 
Resources for this layout:
  • Teresa Collins - Memorabilia Collection - 12 x 12 Double Sided Paper - Snippets
  • Teresa Collins - Memorabilia Collection - 12 x 12 Double Sided Paper - Recorded
  • Teresa Collins - Memorabilia Collection - 6 x 6 Paper Pad
  • Teresa Collins - Memorabilia Collection - 12 x 12 Die Cut Paper
  • Teresa Collins - Memorabilia Collection - Envelopes
  • Teresa Collins - Memorabilia Collection - Layered Stickers
  • Teresa Collins - Memorabilia Collection - Sequins
  • Prima - Ingvild Bolme - Chalk Fluid Edger - Pastel Blue
  • Sizzix - Tim Holtz - Sizzlits Decorative Strip Die - Alterations Collection - Die Cutting Template - Filmstrip Frames
  • Gold Glitter
  • Studio Calico - Wood Veneers - Heart & Arrows
  • Jenni Bowlin Studio - Fiskars - Squeeze Punch - Large - Blue Ribbon
  • My Favorite Things Stamps - Die-namics First Place Award Ribbon

This post was original published on WeAreArtsyAddicts.blogspot.com
Read More »
I love seeing things you create using my tutorials or project shares. Please use the following handles/tags in social media to insure that I get to see your creations:

INSTAGRAM: #FollowingTonyaGibbs    |   TWITTER:  @gibbst    #FollowingTonyaGibbs   |      FACEBOOK:Tag  Tonya Gibbs   #FollowingTonyaGibbs

I Design for:

    http://www.yvonneblair.com

Guest Artist: Click icon to see post!

http://www.teresacollinsdesignteam.blogspot.com/2013/10/family-stories-layout-and-video-by.html#comment-form   http://canvascorp.com/2013/03/21/easter-treat-baskets/


Past Teams

http://www.die-namites.com/     marion