Follow Me...

       
Thanks for stopping by! Don't forget to subscribe!
Showing posts with label handmade flower. Show all posts

Tuesday, June 17, 2014

Rosebud Tutorial on Marion's Blog

0
HI everyone, over on Marion's blog a few weeks ago I was asked to do a tutorial for  making Rosebuds.  For my blog post today, I have given a step out tutorial on creating these rosebuds.


I used Marion Smith Designs Bloom Impression Dies - Large Roses, Glue Dots®, and Tattered Angel's Sunshine Glimmer Mist for my roses.


I used these rosebuds on the canvas that I featured last week  for the blog hop.


Look at how gorgeous these buds look wrapped in this floral spray.


I hope you have fun making these rosebuds. If you do, please share your projects with us in social media by using the #MarionSmithDesigns  #BloomImpressionDies


Thanks for stopping in today.
Tonya


Read More »

Monday, May 12, 2014

Birthday Card and Die-Namites May Challenge

0
Happy Mother's Day -  I hope you have an amazing day today!
I've created a card using the sketch from the May Sketch & Dare Challenge.


Have you submitted your project for the Die-Namites May Sketch & Dare challenge?  
Don't let the time get away from you! 


http://www.die-namitesblog.com/2014/05/mays-sketch-challenge-dienamites-dare_5.html

Rules can be found here!  What are you waiting for?  

 You have until the last day of the month to post your creation on your blog,
with mention of the Die~Namites Die used and a link back to the Die~Namites Dies blog.
Link your blog post, using Inlinkz, to the Die~Namites Die blog.

 A random winner will be chosen from eligible participants for a
$25 Gift Certificate to the Die~Namites Dies.


Here is a glimpse at the sketch.


For today's card I used three dies from Die-Namites 


The Spring Doily is so delicate and creates the perfect background for my floral spray.  I used standard weight copy paper to cut the doily so that it would remain soft and light weight. 

Before die-cutting my Winter Bouquet flowers, I Pre-Gessoed the cardstock.  Then used my Faber-Castell Design Memory Craft pens to color them.   I love how they look variegated in yellow, orange and pink.  To smooth the colors together, I spritz them and the focal point flower with the Heidi Swapp Color Shine in Gold Lume!  (YES, I'm still on a midas kick). 


I cut the branches off the Leafy Branch and adhered them around a glue dot in multiple layers to create the flower in the focal point of my card.  To finish off all of my flower centers I added a Webster's Pages Sparkler.


I love how my focal flower mimics the same shape as the sunflowers in the Winter Bouquet Die.
I can't wait to see what you create with this sketch challenge and dare.


Thanks for stopping in today,
Tonya

Read More »

Saturday, November 30, 2013

Mad Tea Party Chalkboard by Tonya Gibbs

0
Hi everyone, I hope you are having a fantastic weekend.   Today I would like to share with you a Mirror that I altered with Marion's super fab Mad Tea Party Line. 


I used these patterns from the paper collection


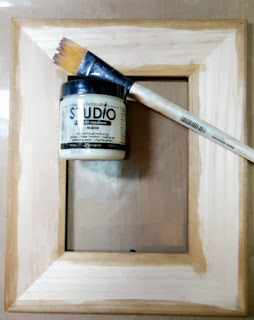
I bought an unfinished wooden mirror and frame from a craft supply story.   I removed the mirror and stained the sides and back with Tattered Angels' Cork Glimmer Mist.  This frame is 11.25 x 9.25 inches with a 5x7 opening.


After the Glimmer Mist has dried, I covered the entire frame with Claudine Hellmuth Studio Matte Medium.  I applied several coats to the top surface to insure my paper overlay would adhered to the wood.  The Matte Medium seals the wood and the Tattered Angels spray.


I then added my paper to the top of the frame.  To insure that I didn't get the hole cut incorrectly, I decided to affix the entire paper to the frame.  I used a brayer to make sure all the air bubbles were removed from the paper. I allowed the paper to completely dry. 
 
 
Then I flipped the frame over and trimmed out the hole with an x-acto knife.   I then applied another coat of Matte Medium over the paper.  Set this aside and allow it to dry.


Then I painted several coats of this Glass Chalkboard Paint by DecoArt on the Mirror. Make sure you don't leave streak marks in the paint, and allow it to dry completely between each coat. If you plan to paint a surface that is going to be used in a dishwasher, make sure you follow the directions on the bottle and bake the item to cure the paint. Since I'm not washing this project, I let it completely dry for 24 hours before I wrote on the chalkboard.  


Once the board was completely dry, I added it back to the frame.  I rubbed chalk over the board and cleaned it off with a dry paper towel.  This seasons the board so that the chalk runs smoothly over the surface.  Then I decorated the left and bottom to make the frame more interesting.  


I made the flower that is used for the focal piece.
 
Here is a Youtube video showing you how I made these flowers.


This frame will make a nice Christmas gift for one of my friends.  I love how simple it was to create. It could be hung on the wall, or propped on an end table with a decorative easel. 
 
Thanks for stopping in today,
 
Tonya Gibbs

Read More »
I love seeing things you create using my tutorials or project shares. Please use the following handles/tags in social media to insure that I get to see your creations:

INSTAGRAM: #FollowingTonyaGibbs    |   TWITTER:  @gibbst    #FollowingTonyaGibbs   |      FACEBOOK:Tag  Tonya Gibbs   #FollowingTonyaGibbs

I Design for:

    http://www.yvonneblair.com

Guest Artist: Click icon to see post!

http://www.teresacollinsdesignteam.blogspot.com/2013/10/family-stories-layout-and-video-by.html#comment-form   http://canvascorp.com/2013/03/21/easter-treat-baskets/


Past Teams

http://www.die-namites.com/     marion