Follow Me...

       
Thanks for stopping by! Don't forget to subscribe!

Tuesday, June 30, 2015

And the Winner IS...

2
First off I want to say thank you to everyone for your support of my creative journey. It has been awesome sharing my tutorials, and projects with you.  I hope I have encouraged you to explore your own creativity and hopefully convinced you to try something new along the way. My goal is always to help you find ways to use scraps creatively, and share ways to use products that you have on hand!

This month has been so much fun.  I've been overwhelmed by the response to my cute little mini journal.  It was fun week after week seeing you share and comment.  Some have sent me private messages asking for suggestions and showing me sneak peeks of their books. I LOVE seeing what you guys have created.  I have met a lot of really nice artists this month too! 


SO THANK YOU!

TODAY I'M SUPER PROUD TO ANNOUNCE THE WINNER FOR MY 6x6 Gelli Arts® Printing Plate.


Congratulations - Felicia Aaron


Please send me an email at:
TonyaAGibbs@gmail.com    with your address, and I will get this in the mail, along with some other fun Gelli® Printing goodies.


Thanks again for all your support
Tonya


Disclaimer - this contest was not sponsored by Gelli Arts® or its affiliates in any way.

Read More »

Friday, June 26, 2015

Whimsical Bird Card Using Gelli Prints

2

Hi everyone, all month I've been sharing with you ideas for using your Gelli Arts® Gelli® Plate.  I'm having so much playing with my prints.  I've made a mini album, a few father's day projects, and today I'm going to share a cute whimsical card idea using those prints we had left over from the June class. 


They were all so colorful -  I just can't leave them hiding in a drawer!   So I decided to cut a few oblong circle shapes, add a few doodles and look at how adorable these cards turned out! 


Above is the front of the card, and below is the inside.  SO fun - and who wouldn't love to receive one of these. Best part - they are super thin and light weight so you can easily mail them! 


My card measurements are:  Top Folding A2    Folded  41/4 x 5 1/2 inches. 
The white liner  and inside card panel are  cut to  4 x 5 1/4 
The Birds are  3 3/4 x  5


Here is a video tutorial showing you how I created this card.


Few Reminders


  • You still have a few more days to get your comments on the other June posts where I used the Gelli® Prints, to be entered in the drawing for the 6x6 Gelli Arts® Gelli® Plate give away. One entry per comment per post.   So make sure you are reviewing the all for as many opportunities as possible.  Also you must be a subscriber of this blog to be eligible, so if you haven't done so - go ahead and click the subscribe button in the side bar on the right.   Entries must be in by Midnight June 28, 2015.  I will draw a winner on June 29.
  • Next  - Don't forget our next Ustream is scheduled for July 6, 2015  at 8:30 p.m. EST 


Thanks so much for stopping in today,  I hope you have enjoyed these cute little birds.

Tonya


Supplies: 

  • Gelli Arts® Gelli® Plate - 3x5 & 8x10 (used on older prints)
  • Plaid Apple Barrel Paint - Kiwi, Jack-O-Lantern, Bimini Blue, White, Pink Parfait, and Yellow Flame 
  • Faber-Castell Design Memory Craft - Stamper's Big Brush Artist Pens - May Green #170
  • Faber-Castell Design Memory Craft - Stamper's Big Brush Artist Pens - Pink Madder Lake #129
  • Faber-Castell Design Memory Craft - Stamper's Big Brush Artist Pens - Orange Glaze #113
  • Faber-Castell Design Memory Craft - Stamper's Big Brush Artist Pens - Cold Grey I #230
  • Diversions Dies - Fence Background
  • My Favorite Thins Stamps - Moroccan Background 
  • Sharpie - White Paint Pen
  • Marvy - Reminisce Black Gel Pen
  • Marvy - Reminisce White Gel Pen
  • Foam Adhesive
  • Ranger - Craft Mat
  • Scotch Quick Dry Adhesive
  • Scotch ATG
  • Tim Holtz - Tonic Scissors
  • Yellow Cardstock
  • White Cardstock
  • Baby Wipes
  • Cosmetic Sponge
Disclaimer - This contest is not sponsored by Gelli Arts® or Its affiliates in any way.


Read More »

Monday, June 22, 2015

Gelli Plate Give Away

11
Ok - So I just can't tell you how excited I am to get the overwhelming likes and shares from my little Mini 4x4 Gelli Print Art Journal book.   You guys have really set my creative heart on fire!


Today I got home from work and saw that Gelli Arts®  shared my posts about my little book.  Then I had such an overwhelming response to the posts on Facebook in several groups.  I feel totally blessed by your support  of my creative journey.

Today I would like to share one more surprise...

I've decided to give away a 6x6 Gelli Plate to one of my blog subbies.

All you have to do is,

  1. SUB to this blog 
  2. Leave a comment (1 per blog post)  on the Gelli Print journal posts that I have shared through out the month.  (umm hmmm - this post counts too) 
  3. Make sure your comments are posted before Midnight EST on June 28, 2015.   

That's it!

Then on Monday June 29, 2015   I will pick a random winner.

Here are the links to the other posts.....
Read More »

Gelli Print Journal - Cover

7


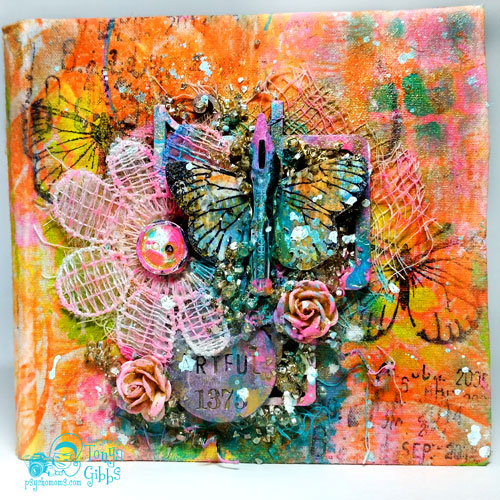
WOW - this has been a super exciting project. I've had so much fun bringing you page after page of this cute little book each week. But as we say goodbye to June, it is time for me to share with you my final entry with this project.  The Cover!


Serious bright vibrant luscious sparkly goodness here SO many rich vibrant layers of color.  Every thing you see here came from my "one hit wonder pile of scraps on my desk!"  Clusters like this are an awesome way to purge odd and ends that seem to clutter up over time.  Drizzle a little gesso and paint (even to your metal elements) and they suddenly looks as though they belong together.


We did the cover of the book in the Ustream class and pulled it on Muslin.  Muslin is a soft thin cotton material that can be found at all fabric retailers.  It comes in bleached and unbleached (a light tan color), and is usually inexpensive.   In most cases, you can find it where the bolted interfacing and canvas is located.   It is an awesome fabric for covers of your mini albums.  


Here is a glimpse at the back cover for this book. Look at all those layers of paint and stamping. YUM YUM. For an added bit of sparkle, I sprayed Heidi Swapp's Gold Lame Color Shine on the covers.  


It has been a blast sharing this project with you through out the month. Thank you for visiting week after week.   I hope you can join me on July 6, 2015 for our next Ustream at 8:30 p.m. EST.   

Here are the other  posts in the book...


Thanks,
Tonya 

Supplies:
  • 8x10 Gelli Arts® Plate
  • Plaid  Apple Barrel Acrylic Craft Paint Various Colors:
    Kiwi, Yellow Fame, Pink Parfait, Jack O'Lantern, Bimini Blue. White, Black
  • Die-Versions Whispers Background - Hexagons   
  • Die-Versions Whispers Background - Morocco
  • Die-Versions Whispers Background - Bubbles 
  • Cosmetic Sponge
  • Faber-Castell Design Memory Craft® - Gel Medium
  • Faber-Castell Design Memory Craft® - Textural Accents  - Glass Bead Glitter Gel 
  • Folk Art - Craft Paint - Jamaican Sea
  • Ranger Glossy Accents
  • Prima - Finnabair  - Art Ingredients -  Glass Glitter Sterling
  • Prima - Finnabair - Art Ingredients - Glass Beads
  • Prima Marketing - Tiny Roses
  • Dusty Attic - Geometric Border 
  • Stamper's Anonymous - Ultimate Grunge
  • Martha Stewart - Butterfly Stamp
  • Brayer
  • Tim Holtz - Idea-O-logy -  Pen Nibs
  •  Button
  • Cheese Cloth
  • Tim Holtz - Idea-O-logy Philosophy Tokens
  • Flower Applique
  • Heidi Swapp Gold Lame Colorshine

Read More »

Friday, June 19, 2015

Father's Day Card Tutorial

0

Hi everyone, today is my day over on Limor Webber Designs' DT Inspiration Blog.    I hope you get a chance to stop in and take a look at this deliciously grungy Father's Day Card that I have created using the Limor's Signature products with Lindy's Stamp Gang and IndigoBlu.   


Thanks for stopping in today! 
Tonya 


Read More »

Gelli Print Journal Page 5 - Heart On Fire

8

WOW -  I can't believe this is the last page in my Gelli® Print Journal. It has been so much fun, working on this project all month.   Each spread is dedicated to something that will help stimulate creativity .  I have linked up the other  posts below for you to reference. 


 Today's inspiration came from this quote  "Create What Sets Your Heart On Fire"  WOW - think about that for just a moment.  If we center our creativity around things that excite us, our work goes from craft to art!  Passion becomes evident in your work.  I really wanted to enforce this thought by making my "heart" look as if it is ON FIRE!  


I used the same paints as we have used all month, and stenciled the flames with the Diversions Die.   I love the effect this has over the heart.  I also created a "stamp" with a toilet tissue role to create the yellow hearts in my spread.   They look like flames lifting out of the smoke.  OH I'm SO LOVING THIS! 

Here is a quick video showing how this spread came together. 


Here are links to all the other spreads:


Our next Ustream is scheduled for July 6, 2015 at 8:30 pm.  I hope you can join us live. Stay tuned for details as we get closer.  Stay tuned in a few days I'll share with you a video of me decorating the cover. 

Thanks for stopping in today: 

Supplies:
  • 8x10 Gelli Arts® Plate
  • Plaid  Apple Barrel Acrylic Craft Paint Various Colors:
    Kiwi, Yellow Fame, Pink Parfait, Jack O'Lantern, Bimini Blue. White, Black
  • Die-Versions Whispers Background - Hexagons   
  • Die-Versions Whispers Background - Morocco
  • Die-Versions Whispers Background - Bubbles 
  • Cosmetic Sponge
  • Faber-Castell Design Memory Craft® - Gel Medium
  • Faber-Castell Design Memory Craft® - Stamper's Big Brush Artist Pen - Pink Madder Lake #129
  • Faber-Castell Design Memory Craft® - Stamper's Big Brush Artist Pen - Black #199
  • Marvy - Reminisce Gel Pen
  • Sharpie - White Fine Point Paint Pen
  • Hymnal Pages
  • Folk Art - Craft Paint - Jamaican Sea
Read More »

Tuesday, June 16, 2015

Gelli Prints Journal Page 4 - Possibilities

9

Wow - this has really been a fun project.  I have really enjoyed creating these spreads each week.  Today, I'm going to share with you page 4 in my Gelli® Print Art Journal book that I created in the June 1, 2015 Ustream.  I've linked up the previous page posts and the Ustream down below for your convenience.  


I'm really loving today's spread, the colors are so bright and vibrant. It screams Florida Sunshine, and summer fun.    This spread has inspired me to create a summer layout using these colors and techniques.  I guess this is why art journaling is so fun - it helps to kick start the brain.  Look at all those yummy colors and textures in the background.  


I started by cutting strips from different patterns of prints that we pulled in the class.   This eclectic patterns work well together because they share the same stamps, stencils and colors. Whenever you are working with a completely flat layout,  adding shadows to your elements, created depth, and helps things to pop.  To pull everything together, I created my shadows with the Faber-Castell Design Memory Craft® Stamper's Big Brush Artist Pen in Crimson #134.  The purple/pink pigment in this marker helps to keep my layout bright and sunny. 


PSSSS -  Guess what?   A little birdie told me that the Stamper's Big Brush pens are on sale for a limited time for $3.09 at DickBlick.com.  I'm not being paid to advertise this sale, just like to pass the savings on to you guys when I can ;) 

My go to pen for doodling after trying out all the ones I have, is the Marvy Reminisce. Once the ink is dry it is permanent and really does stand up against the gel mediums.  They make this pen in other colors so I may just need to invest in them.  I bought these at JoAnns and it was very reasonably priced. I couldn't find it online  at Joann.com  so I'm going to link it to Amazon.com.


Here is the video showing you how I created this spread. 


As stated in the video.  The IndigoBlu - Rugged Edges Stamp designed by Limor Webber Designs, is my favorite stamp set. I think this is going to be one of those stamps that stands the test of time.


Here are links to the previous posts showing the other pages...


I hope you are enjoying this series. Remember if you are following along, please #FollowingTonyaGibbs  in your social media outlets. I would love to see what you are creating. 

Our next Ustream is Scheduled for July 6, 2015 at 8:30 p.m. EST 

Thanks for stopping in today, 

Tonya

Supplies:
  • 8x10 Gelli Arts® Plate
  • Plaid  Apple Barrel Acrylic Craft Paint Various Colors:
    Kiwi, Yellow Fame, Pink Parfait, Jack O'Lantern, Bimini Blue. White, Black
  • Die-Versions Whispers Background - Hexagons   
  • Die-Versions Whispers Background - Morocco
  • Die-Versions Whispers Background - Bubbles 
  • Cosmetic Sponge
  • Faber-Castell Design Memory Craft® - Gel Medium
  • Faber-Castell Design Memory Craft® - Stamper's Big Brush Artist Pen - Crimson #134
  • Marvy - Reminisce Gel Pen
  • Sharpie - White Fine Point Paint Pen
  • Hymnal Pages
  • Martha Stewart - Butterfly Stamp
  • Ranger Ink, Archival Ink - Jet Black
  • Tim Holtz - Stamper's Anonymous - Stuff To Say Stamp Set
Read More »

Monday, June 15, 2015

Father's Day Card for Die-namites June Sketch and Dare Challenge

5
Hi everyone,  I had a great time this weekend playing with my little nephew Cooper.  He spent all day Saturday with me, and I shared with him the Gelli Plate. My entire dining room table was covered in gorgeous prints.  I saved back a few of his prints, to create Father's day cards.  Here is little Cooper pulling what he called his favorite print - which he promptly took home to keep. LOL - I love this so much!


I decided to participate in this Month's Sketch & Dare Challenge over on the Die-namite's blog.  Here is the sketch.


http://www.die-namitesblog.com/2015/06/junes-sketchchallenge-and-winner.html
 
 
I used the Leafy Flowers die in my blog post today.

http://www.die-namites.com/Leafy-Flowers_p_104.html

On this print, Cooper used Plaid's Kiwi and English Navy Apple Barrel craft paints with the Crafter's Workshop Gear stencil.  It made a really interesting looking print.  Very Masculine!   So I decided to cut my die from navy blue, and use the same cardstock for my card base.  The card is an A2 top folding card.  


Lately, I've been practicing hand lettering for card sentiments.  So this seemed like a perfect opportunity to doodle the sentiment for the front and inside of the card.


Here is a process video of me creating the card from start to finish.  I think I might give this card to Coop to share with his Dad. 


TO ENTER the Die-Namites June Sketch Challenge please visit the blog post. Don't forget to link up your card before the last day of the month. 
 
Thanks for stopping by today,
 
Tonya
 
 
Supplies:
  • Die-namites Dies Leafy Flowers
  • Navy Blue cardstock
  • Kraft cardstock
  • Ranger Ink - Tim Holtz - Distress Ink - Vintage Photo
  • Ranger Ink - Archival Ink - Coffee
  • Tim Holtz - Idea-ology  Tiny Attacher
  • Gelli Plate
  • Plaid - Apple Barrel Craft Paint - Kiwi
  • Plaid - Apple Barrel Craft Paint - English Navy
  • The Crafter's Workshop  - Mini Gears
  • IndigoBlu - Limor Webber Designs - Rugged Edges Stamps
  • Speed Ball - Brayer
  • Foray - Gelio Gel Ink Pen .7mm
  • Liquitex - Irridescent Bright Gold Ink


Read More »

Friday, June 12, 2015

Watercolor Card Using Stampers Big Brush Artist Pens

0

Hi everyone, I'm excited today to share with you a watercolor technique using Faber-Castell Design Memory Craft's® Stamper's Big Brush Artist Pens.  It is super simple to do.  

 I'm going to use these supplies from Faber-Castell Design Memory Craft®


In addition you will need 

a small round paintbrush 
a small flat paintbrush
cold press watercolor paper
clean water


Here is a video showing how I created this beautiful card. 


Wasn't that fun and simple? 


In the photo above photo, you can see how the sharp lines of the Aquarella black pencil really helped to define the texture in the wood grain. 


And here you can see how just adding a little dark turquoise pen helps the shadows really pop under the flower petals!  Also the touches of the darker grey marker helps to separate the flower blossoms and show some depth in the arrangement.  Remember a little of this dark grey goes a long way! 

Here is a photo of my final card.


Who wouldn't want to receive this work of art in the mail?  I  decided to write a sentiment that would work if the recipient wanted to frame the card. 

I hope I have given you inspiration on using your Stamper's Big Brush Artist Pens for more than just stamping, shading and blending.  They make great watercolors when used properly.   Remember if you are inspired to create a project using this technique.  Tag me in your social media post using #FollowingTonyaGibbs  so I can admire your work! 

Thanks for stopping in today, 

Tonya 

SUPPLIES:

a small round paintbrush 
a small flat paintbrush
cold press watercolor paper
clean water
Twine
Cardstock - Purple
Cardstock - off white


Read More »
I love seeing things you create using my tutorials or project shares. Please use the following handles/tags in social media to insure that I get to see your creations:

INSTAGRAM: #FollowingTonyaGibbs    |   TWITTER:  @gibbst    #FollowingTonyaGibbs   |      FACEBOOK:Tag  Tonya Gibbs   #FollowingTonyaGibbs

I Design for:

    http://www.yvonneblair.com

Guest Artist: Click icon to see post!

http://www.teresacollinsdesignteam.blogspot.com/2013/10/family-stories-layout-and-video-by.html#comment-form   http://canvascorp.com/2013/03/21/easter-treat-baskets/


Past Teams

http://www.die-namites.com/     marion