Follow Me...

       
Thanks for stopping by! Don't forget to subscribe!
Showing posts with label Wood. Show all posts

Tuesday, December 13, 2016

Wooden Ornaments for Yvonne Blair Designs

0

 
Oh I love home crafted Christmas ornaments. Every year I try and make a few new ornaments for my tree. This has become a tradition that my family looks forward to each year. Today, I would like to share with you one of  this year's new designs using Yvonne's Compass stamp from Impression Obsession. 


http://www.iostamps.com/mm5/merchant.mvc?Screen=PROD&Product_Code=C17123&Store_Code=IOSTAMPS&search=Compass&searchoffset=&filter_cat=&PowerSearch_Begin_Only=&sort=&range_low=&range_high=

You can also use several of Yvonne's other stamps, I give you some ideas in the video link below.
 
For the base of the ornament I'm using these wooden shapes I grabbed at a local craft shop. This bag was under $5 and as you can see we will be able to make lot of ornaments.


I filled in the knots on the wood with Modeling paste so that I can get a smooth surface  for stamping.  You can leave these natural with  a white wash of gesso or you can paint them if you like.
In the video below, I will share with you two versions that I created, so that you can decide which technique you like best.   But both are gorgeous.


It was easier to add the foiling  on the chalkboard version because the paint helped to make the surface smooth.  But if natural look is what you like, I think it turned it nice as well. It is just harder to see the foiling.  If you decided to go with this technique, I suggest bold and heavy designs for your stamping. Thick and large fonts will show up better.


Here is the video sharing how I did the technique.


Watch on YouTube
Wasn't that fun?   I want to make a bunch these. They would be great to add to packages, and share with your friends and family.  Or create a set and give them as a gift.  Thank you so much for hanging out with me today. 
Read More »

Wednesday, July 2, 2014

Ustream - June 28 - Follow up post

0
WOW - this has been a crazy busy week. Today I want to follow up the Special Broadcast last Saturday. It was a lot of fun spending the morning / afternoon with you guys.


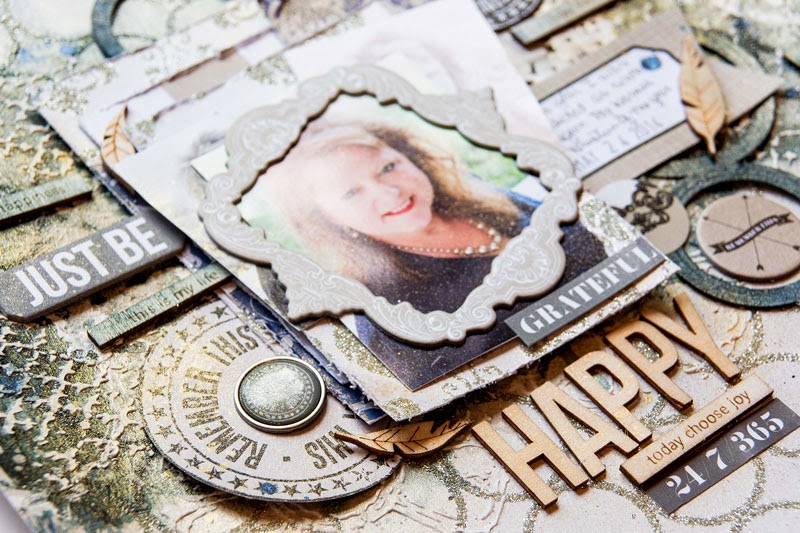
I used the Teresa Collins Designs Urban Market kit that we featured in June to create a self portrait layout!   Along with a few other items from Stampendous, Spellbinders, The Crafter's Workshop, Heidi Swapp, Cosmo Cricket, and Faber-Castell Design Memory Craft®


Our base was the glitter paper in the collection, and I shared that if you pre-treat the paper with Gel Medium the glitter will not come off.  I used the Faber-Castell Design Memory Craft® Gel medium. Someone asked in the show if it will dull the Glitter effect -  The Answer is NO this is still super shiny. 


Look at all of this yummy texture created with the Whipped Spackle and Colorshines! 


Chipboard shapes are super popular right now, and I showed you how to use your chipboard  and Spellbinder's basic circle shapes to create these navy blue circles. 


If you missed the show never fear it was recorded! 


Thank you again to Scrapbooking With Me Boutique for sponsoring this event, and providing kits!   Don't forget that our next Ustream is scheduled for July 7th at 8:30 p.m. EST.

Remember that August Ustream kit has gone on sale. Head over to the boutique to get yours while supplies last.  We will be creating mixed media cards.

Thanks for stopping in today.

Tonya

Layout Supplies:


  • Teresa Collins Designs - Urban Market Collection - 12 x 12 Double Sided Paper with Glitter Accents - Circles
  • Teresa Collins Designs - Urban Market Collection - 12 x 12 Double Sided Paper - Cards
  • Teresa Collins Designs - Urban Market Collection - 12 x 12 Double Sided Paper - Floral
  • Teresa Collins Designs - Urban Market Collection - Decorative Brads
  • Teresa Collins Designs - Urban Market Collection - Chipboard Stickers
  • Teresa Collins Designs - Urban Market Collection - Ephemera Pack
  • Teresa Collins Designs - Urban Market Collection - Laser‑Cut Wooden Shapes
  • Teresa Collins Designs - Urban Market Collection - Cardstock Stickers - Alphabet and Label
  • Faber-Castell Design Memory Craft® Gelatos® - Boysenberry 
  • Faber-Castell Design Memory Craft® Whipped Spackle
  • Faber-Castell Design Memory Craft®  Gel Medium
  • Faber-Castell Design Memory Craft®  Gesso
  • Heidi Swapp - Colorshine - Navy
  • Heidi Swapp - Colorshine - Gold Lume
  • Stampendous - Stamp & Stencil  - Grunge
  • The Crafter's Workshop - Mini Romantic Circles
  • Tim Holtz - Ideo-ology - Tiny Attacher
  • Cosmo Cricket - Wood Charms - Feathers
  • Cosmo Cricket - Wood Charms - Tiny Words
  • Spellbinders Nestabilities - Basic Shape Large Circles
  • Doily
  • Foam Adhesive


Read More »

Friday, August 30, 2013

Digital Printing - Lesson 4 Phone Photos

0
One of the most common tools for taking photos these days is the "smart phone".  Phone manufacturers have started placing the camera feature as one of the highest selling features.  There is one on the market now that has a 41 megapixel capture. OH MY! Translation - that is better than most cameras on the market today!

So how does this make your scrapbooking digital?  Well, with the introduction of the smart phone, came apps.  I know I spend a lot of time in apps like Instagram, Pixlr, PicsArt, PSTouch, and now for the iPhone users you have Rhonna Farrer's new photo editing app.  All of these apps give you the ability to add cool filters like lighting effects, boken lights, sun rays, text, and frames right to the photo. I spend hours sometimes playing with those filters. It's like video games for adults!  Well, before the phone apps were popular we used to do those same things in photo editors and call the photos "hybrid".  These things make your photos more interesting, or at least help cover up really bad photos!

Today,  I want to share a layout that uses some of these photos, right from my Instagram account.


This layout is dedicated to the awesome friends I've made through YouTube and Facebook.  These women have really captured my heart over the past few years, and it felt so awesome to meet them face to face.

Layout created by Tonya A. Gibbs at Psychomomscrapbooks.blogspot.com using #Instagram photos  #layout, #12x12, #Silhouette, #scrapbooking, #watercolor
 
My photos are printed 2 inches by 2 inches, and when I cropped them, I made them look like little Polaroid shots.  They are ADORABLE.  Each photo is sporting a different photo effect  courtesy of the above mentioned apps.  Oh best part - you don't have to be a professional photographer for swanky photos anymore - the apps do it for you!


In the past year, I've found that my phone really captures my day to day activities more than my camera. Why? Probably because it is always in my hand, and the ability to share is easier.
Printing my Instagrams for my scrapbooking projects is easy. My printer has a wireless feature, and I think there is an app for that too! A lot of online photo processing places now have apps for loading your instagrams and printing them as well. Project life and 365 Photo projects are common ways these have found their way into the paper crafting world. I'm not only taking more photos, but I'm sharing way more photos than I did two years ago thanks to Instagram, Facebook, Twitter, Vine, Path, and Pinterest.

How are you using your phone in your scrapbooking work flow?  I would love to hear about it, please share a project with me in the Artsy Addicts group on Facebook. Make sure you Tag me in the photo!

Thanks,
Tonya Gibbs
http://www.psychomomscrapbooks.blogspot.com

Resources:

  • Recollections - Decorative Tape - Yellow flowers, Blue Flowers
  • Bella Blvd - Decorative Tape - Cotton Candy Chevron
  • Canvas Corp - Pink and Ivory Collection - 12 x 12 Paper - Ribbon Stripe
  • Canvas Corp - White & Kraft Collection - 12 x 12 Paper - Chevron
  • Canvas Corp - Black & Kraft Collection    12 x 12 Paper - Stamped Alpha
  • Canvas Corp - Green and Ivory Collection - 12 x 12 Paper - Dot Reverse
  • Canvas Corp - Brights Collection - 12 x 12 Paper - Yellow and White Big Stripe
  • Canvas Corp - Mini Clothespins - Raspberry
  • Copic - Sketch Marker - B00
  • Staedtler - 102 Stencil
  • Prima  - Chalk - Old Rose
  • Advantus - Tim Holtz - Idea-ology - Tiny Attacher with 100 Tiny Staples
  • EK Success  - Border Punch - Notebook
  • FabScraps - Pearls - Bling - White
  • My Mind's Eye - Sky's the Limit Collection - Decorative Tape
  • Faber-Castell - Mix and Match Collection - Color Gelatos - Yellow, Blue, Pink
  • Silhouette Cameo - Electronic Cutting System
  • American Crafts - Studio Calico - Wood Veneer Pieces - Speech Bubbles
  • American Crafts - Studio Calico -  Wood Veneer Pieces - Cameras
  • Sizzix - Tim Holtz - Alterations Collection - Bigz Die - Die Cutting Template - Picture Wheel
  • Tattered Angels - Glimmer Mist Spray - Maya Blue
  • Tattered Angels - Glimmer Mist Spray - Cherub Pink

Read More »

Friday, March 29, 2013

Butterfly Paper Clip - Tattered Angels tutorial

3
I thought I would bring you a touch of spring today with this tutorial on how I created these cute butterfly paper clips.  They are perfect pocket buddies in your mini albums, add a magnet to trap notes on your fridge, or remove the clip and add a pin as a charm holder.  
 
 
Wood pieces are so popular in scrapbooking and paper crafting right now. You can really find all shapes and styles and they are so fun to docorate.  Mine were created with the following supplies, but please experiment with different products when making your own.
  • Recollections - Wood Butterfly
  • Tattered Angels: 
    • Glimmer Mist  - Jack O'Lantern
    • Glimmer Mist  - Taffy
    • Plain Jane - Rosey
    • Glimmer Glam - Stiletto
    • Glimmer Glam - Twinkle Toes
  • Ranger:
    • Glossy Accents
    • Distress Crackle Paint - Rock Candy
    • Adirondack Alcohol Ink - Caramel
    • Archival Ink - Coffee
  • Office Supplies:
    • Large Metal Paper Clip
    • Sharpie - Gold & Black
  • Stampabilities - Faded Text Background Stamp
  •  
Here is a step by step video tutorial on how these were made. 


If you make these cute butterflies, please be sure to tag me on facebook, or youtube. I would love to see them.
 
Thanks for stoppig in today,
 
Tonya Gibbs
Read More »
I love seeing things you create using my tutorials or project shares. Please use the following handles/tags in social media to insure that I get to see your creations:

INSTAGRAM: #FollowingTonyaGibbs    |   TWITTER:  @gibbst    #FollowingTonyaGibbs   |      FACEBOOK:Tag  Tonya Gibbs   #FollowingTonyaGibbs

I Design for:

    http://www.yvonneblair.com

Guest Artist: Click icon to see post!

http://www.teresacollinsdesignteam.blogspot.com/2013/10/family-stories-layout-and-video-by.html#comment-form   http://canvascorp.com/2013/03/21/easter-treat-baskets/


Past Teams

http://www.die-namites.com/     marion