Follow Me...

       
Thanks for stopping by! Don't forget to subscribe!
Showing posts with label Cards. Show all posts

Monday, March 27, 2017

Four Cards One Stamp Set - For Yvonne Blair Designs

0


Watercolor Card Tutorial by Tonya Gibbs for Yvonne Blair Designs

Hi everyone happy Spring!  I hope my friends in the North are ready to thaw out and start thinking of  warmer days.  Today I want to share with you another idea for busting up that scrap pile, and creating a few wonderful cards in the process. 
 
I stumbled upon this wonderful watercolor artist on YouTube Jay Lee and followed a beginner tutorial for creating tulips.  Here is the tutorial.   
 
Reaching into my scrap bin, I pulled out a few scraps of watercolor paper that are left over when I trim down my large pad to create card panels.  These smaller pieces are great to practice techniques such as brush strokes. I followed Jay Lee's tutorial and created some of my own tulips.  I have to admit that mine are not as wonderful as Jay Lee's, but I will keep practicing. The practice panels that I decided to keep, I wanted to create cards to showcase them.

Watercolor Card Tutorial by Tonya Gibbs for Yvonne Blair Designs

I used the Card Sentiment stamp set by Yvonne Blair and Impression Obsession. As always I have linked it to the IO store, but check with your local retailers first.


After these beauties had a chance to dry, I reached into my stash and found an old paper collection from Webster's Pages.  This was a set of 6x6 papers from 2004 called Perfect Motifs.  I recommend going through your own collection of papers and finding something similar. I chose a floral pattern,  and coordinating solid that matched one of the colors in my flowers.  Then paired it with a soft blue cardstock that has been in my stash for a long time.


Since each floral pattern has a different look, switching up the sentiment and patterned papers helps make the cards look unique while maintaining consistency as a group. 

Watercolor Card Tutorial by Tonya Gibbs for Yvonne Blair Designs


To keep the card making part simple and fast, I chose one card layout for all my cards. I wanted my cards to stay somewhat simple and flat so that they could easily be mailed.  I spent all that time watercoloring so my flowers needed to be the main focus of the card. 

Here is a process video of me walking you through the process of me painting the panels and making one of the cards.


These would make a great gift set, or awesome cards for the spring.  You could also substitute out the sentiment for a Mother's Day sentiment if you would like to get a jump start on Mother's Day. 

Thanks for hanging out with me today, I hope I have inspired you to pull out your watercolors and practice a few brush strokes.  Jay Lee has inspired me, and I encourage you to check out this awesome channel for great watercolor tutorials. Then burn through a stash of scrapbook paper, and make a few cards to share with your friends and family.  Share what you make with me in social me using the #YBArtGirlFun so that we can see what you have made.
Read More »

Tuesday, January 31, 2017

Love Like Crazy Cards

0


Hi crafty friends, I hope you have lots of inspiring ideas after the sneak peeks from Creativation 2017. I know my head is SPINNING AROUND!   Yvonne has released some fancy new word stamps along with a few cute little sketch stamps. Here are a few of my favorites from this release I picked to feature in today's post. I have linked them up for you to purchase from  Impression Obsessions Website,  but I also encourage you to support your local retailers if they carry Yvonne's stamps.


http://www.iostamps.com/1NEW/D17166.html

http://www.iostamps.com/1NEW/E17162.html


http://www.iostamps.com/1NEW/C17153.html


It is sometimes difficult to create masculine cards.  With Valentine's Day around the corner, I thought I would use these stamps to create a few cards that could be used for multiple purposes. Either simple "I love you cards", "Happy Birthday", "Thinking of  You" or you could even add "Happy Father's Day" to the inside of these cards to use all year long. The concept for both cards are the same; however, one card is flat for mailing, and the other is dimensional in case you are sharing face to face. 

 This is the flat design:

Both cards are top folding A2 sized cards.  The background cardstock is measured at:
4.25 in. wide  x  11 in. long (scored at 5.5 in.) 

Then I used a pieces of Canson 140lb white  watercolor paper as my base (Smooth side)
cut to 3.75 in. x 5 in.  (this leaves a 1/4 inch border)
Using watercolor paper insures that it will hold up
to the wet mediums and won't buckle or peel.

For my background I used:
Prima's Finnebar White Crackle Texture Paste
with a Tim Holtz Burlap stencil
allow this to dry

To apply color to my background I used
Lindy's Stamp Gang Starburst Stains:
Tibetan Poppy Teal
Edelweiss Moss Green
Rudolph's Nose Red

 
This is the dimensional card:

Here is a quick video showing the process of how these cards came together:


I love the dragonflies, and now I have lots more to use in different posts, and other mixed media projects.  It is hard to see in the photos, but they are super shiny. While they are primarily the same cards, they do have distinctly different looks.  


Stay tuned in the coming weeks as my fellow Art Girls share more from the Winter 2017 Collection.  You are going to want them all!  Thanks for hanging out with me today.
Read More »

Tuesday, May 5, 2015

May Ustream Re-Cap

0
Oh my goodness we had a blast last night.  We played around with some super simple watercolor and doodling techniques, and made these beautiful cards.


We discussed super simple methods for creating roses, rosebuds, and daisies.  Then we combined these into a floral swag.   Everyone was simply amazed at how easy it was to create these designs.

My best advice is don't over think it, and practice practice practice!

Also Note:   The products listed here, are products that I love and use often.  I have not been compensated by these companies to promote these items. 

For the show I used these supplies:

PAINTS


I have linked to Amazon, but I got mine from Michael's. 


PEN SUGGESTIONS:

Of course there are lots of pens on the market that are amazing, and perfect.  I am only going to talk about the ones that demoed last night.   I have the Microns and love them as well, so if you have them, use them!  Also remember that everyone writes different, and their hands are shaped differently. Left handed vs. Right handed makes a big difference too.  I am suggesting what works for me, but you need to experiment to find your perfect pen!


Here are the pens that I used last night:

I'm linking to Amazon for these, but I got this one at Office Depot


OMG - I LOVE THESE!   I used these after I turned the recording off. I wrote the Thank You then Water colored the blue in the background (see pic above).  They are water proof and smear proof almost the second you write.  I would set them with a heat gun just to make sure the fibers of the papers are dry before applying water.   


I'm linking to Amazon for these, but I got this one at JoAnns

This one is one of my favorite outline pens.  It writes the best over the water colors.   The line is kind of thick, but for this technique I'm good with it.  It has a great flow, and I found that I wanted to write with it when I tried it out.  This pen is truly the inspiration for tonight's show.  When I busted it out of the package, I couldn't stop scribbling with it.  I found that it is water proof, but only after I set it with the heat tool.   It takes a bit to dry before it is smear proof. 


I'm linking to Amazon for these, but I got this one at Office Depot

Sorry Sharpie - but I wasn't a fan.  It is water proof, and maybe if I were drawing before applying watercolor it would work better.  But I found it wanted to skip a lot on top of the watercolor.  To be fair though - I was rushing the process and maybe the surface of my paper appeared dry but really wasn't.  I'll test this theory out on some doodles that were made in advance before I pass judgement.  I did use this pen for the first 30 mins or so in the show, so you can see for yourself. 

CARDSTOCK:
In addition to these supplies, I also used 110lb Standard Cardstock.   I would avoid watercolor paper if you plan to doodle.  The texture in the paper may cause issues with sketches. The GP brand paper at Wal-Mart is PERFECT!

We also discussed using a template to practice your hand lettering techniques.  

HAND LETTERING TIP:

I recommend opening your word processor (Word) and type the word you would like to appear on your card, then write the several times down the page, in the font you would like to duplicate.  I chose a soft grey color for the font color.  Place as many of these on the page as will fit.   Do different sizes if you wish.  Then print them out.  This will be your practice sheet.  Trace over the letter shapes until you develop a muscle memory and the lettering techniques become second nature.  

I have created a sample using the word Happy Birthday.  In this example I have used several different fonts for you to practice your handwriting skills. 

Here are a sample with multiple font styles
click on the image to open, then print.


 Here is a sample with one font style.
click on the image to open, then print.


Just print these out and write them, until your brain can tell your hand how to do it!   Practice Practice Practice  is the best advice I have.  Try making your own for sentiments you use a lot.


Here is the recording if you missed the show live: 


Here are a few other cards that I created when prepping for the show:


Thanks again for coming to the show live last night, and hanging out for the post - show!   I had a great time with our "Creative Play Time"  and I hope you guys did too!   Best of all I got to meet a few new friends.  


If you try these out, please please please share them with me!   I would love to see what you create.   Tag me on Facebook, Instagram or Twitter, and don't forget to #FollowingTonyaGibbs

Our next class will be June 2 at 8:30 p.m. EST. 


Read More »

Friday, October 18, 2013

Two Cards - Same Design by Tonya Gibbs

0
I've shared many times that I love to make cards from my scraps.  To make this process move quicker, I find it best to design the first card so that it is easily duplicated.  As you work through your scraps, you will find the cards take on a unique look by using different patterns, and sentiments. Many times I wait until I need the card to add the sentiment.

These two cards are great examples.  The hard part was coming up with the design, after that the workflow becomes easier.


I've prepared video for making the second card.


I hope I have inspired you to use up those scraps.  As I stated in the video, I find it helpful to use them immediately.  You can never have too many cards laying around.
 
Thanks for stopping in today,
 
Tonya
 

Read More »

Monday, May 6, 2013

NSM - Sale at Flamingo Scraps

0
In honor of National Scrapbook Month, Flamingo Scraps is hosting a month long coupon sale! 

Visit Flamingo Scraps' National Scrapbook Month Sales at FlamingoScraps.com! Take 30% off selected manufacturers and categories by watching for our Design Team's special coupons!  You can check the members' blogs and their and our Facebook Pages for the code for the day!
 
Sale items Coupon code Beginning Date End Date
10% off cart total cindy10off 2013-05-05 2013-05-31
30% off all Prima and trims & laces tonyaprimatrims 2013-05-26 2013-05-31
30% off Maya Road kathleenmaya30 2013-05-22 2013-05-29
30% off Webster's & Tim Holtz ramonawebsterstim30 2013-05-19 2013-05-26
30% off Pink Paislee melissapinkpaislee30 2013-05-15 2013-05-22
30% off all flowers erinflowers30 2013-05-12 2013-05-19
30% off Heidi Swapp aliciaheidi30 2013-05-08 2013-05-15
30% off all metal abigailmetal30 2013-05-05 2013-05-12
See Flamingo Scraps for coupon restrictions. 

Please make sure you are subscribed to the Flamingo Scraps Newsletter and Like them on Facebook for up to date information
Read More »

Friday, April 12, 2013

Washi Cards

0
Have you ever had one of those weeks where you just can't think creatively no matter what you do?  This week has been that way for me.  I've been really sick and NOT motivated to do anything.  My studio is A MESS.  So instead of creating I decided to clean.  I was putting away some new Washi tapes and the inspiration hit me square in the face.  Make some cards and use washi tapes as your backgrounds.  Why not?  I own lots of tapes, they are so beautiful, colorful, cheery and fun. It makes me happy to collect them, so perhaps it will make me happy to use them.


So my mission was to make five cards using only washi tape, scraps, or ephemera pieces (as I have tons of these too).  I'm a total scrap collector - I buy ephemera packs even when I don't buy the entire collection, then I never use them!  Those days are over!
 
I pulled out my punches, Spellbinder's dies, MFT dies, scraps, tapes, and card stamps  and started trimming, sorting, and stamping.


My first card was inspired by a school days theme.  I have several nieces and nephews who are elementary aged children and I thought this collection of scraps would make a cute birthday card.  I used the ruler washi tape on this card as a border, and the dictionary tissue tape as tape on the notebook page. 


Keeping with the monochromatic theme, gave a degree of sophistication to this card. I cut the washi into arrows for a soft simple background. The hints of silver and pearls gave it life.  I just love this the simple elegance of this card.


I loved the look of the grey card so much, I decided to use it with teal and blue washi tape. This time I kept the edges of the tape torn to give a more masculine feel to the card.  I love how simple, yet whimsical this card is designed. 


A few of my nephews will be graduating to middle school this year, and I thought this card was a fun end of year graduation card.  The Tissue tape was used as a background here, and pieces of ephemera and wooden clocks border a metallic embossed tag.  I also embossed the card with  gears to give it a little texture.  
 
 
For my final card today.  I covered a piece of scrap paper with green and blue washi tapes and cut it into a giant banner.  I continued my banner theme, my sewing together scallop ovals that I cut in half and a MFT tiny banner die with some scraps of coordinating card stock.  I sprinkled the giant cupcake with Rock Candy Stickles and used it for my birthday focal point.  This card screams birthday party, and I love all the celebration layers.  
 
I encourage you to spend an afternoon thinking about your scrap pile and "overstock" and make some cards.  This is a great way to breathe new life into your scrap, and eliminate them from your room.  Most of the time, I lose my inspiration because my room becomes messy and over crowded.  Simply spend the day die cutting your scraps into small pieces and you will be amazed at how fast you find your inspiration again.
 
Thanks for stopping in today,
 
Tonya Gibbs
Read More »

Thursday, February 7, 2013

Tattered Angels' - White Washed Pine

0
I have totally fallen in love with the new Tattered Angels' Naturally Aged Paint System Kits.  I have been using them on EVERYTHING lately, as you can tell from my last few posts.  I'm totally in LOVE!  I haven't been this excited about a medium in ages!
 
Today's project is using these two kits:


You guys know I love to make cards from my scraps. I had a couple of inches of the grey Maya Road trim, the perfect amount to make a dress.  So I pulled out my Tattered Angels Naturally Aged Fine Wood Paint System Kits-White Washed Pine  to paint the cardstock used with Tim Holtz Sewing Room dress form.  I love how the grey in the trim pulls out the grey in the paint kit.
 
Prima's Tea Thyme paper offered the perfect shabby chic background for this dress form. I also had small pieces of flowers that were remnants from previous projects and clustered them around the dress form to offer the look of a garden view. 
 
The butterfly was cut from a scrap tag that had the Tattered Angles' Naturally Aged Precious Stone Paint System Kits-Turquoise. The rich colors and variegated effects from the glazes and sprays offer the perfect texture for the butterfly.
 
Finally a Martha Stewart frame was used to capture the sentiment on this card. 
 
I'm having so much fun playing with these paint systems. 
 
Thanks for stopping in today,
 
Tonya Gibbs
 
Resources:
  • Tattered Angels Naturally Aged Fine Wood Paint System Kits-White Washed Pine
  • Tattered Angels Naturally Aged Fine  Precious Stone Paint System Kits-Turquoise
  • Maya Road - Grey Trim
  • Martha Stewart Crafts - Craft Punch - Classic Butterfly
  • Martha Stewart Crafts - Crafter's Clay Collection - White Clay
  • Martha Stewart Crafts - Crafter's Clay Collection - Silicone Mold - Frame and Flourishes
  • Prima - Valentine Vine Collection - Heart and Flower Embellishments - White
  • Prima - Melisse Collection - Flower Embellishments - Nature Garden
  • Prima - Tea-Thyme Collection - 6 x 6 Paper Pad
  • Sizzix - Tim Holtz - Bigz Die - Alterations Collection - Die Cutting Template - Sewing Room
  • Cardstock
  • Trim
  • Inkadinkadoo - Happy Birthday Stamp
  • Ranger - Archival Ink - Sepia
Read More »

Monday, January 28, 2013

From Scraps to Cards

2
Scraps are one of those things that can overwhelm a lot of people. You don't want to toss a perfectly good sheet of paper, but overtime they become unruly. Every few months I try to create projects that will help me tame these piles and reduce the clutter in my scrapbooking room.I get asked all the time to share my scrap workflow. Today I would like to try and explain it.

On my desk there is a container with a lid, a recycled nut jar. When I finish with a project, the remnant flowers, ribbon, unused embellishments, stickers and bling go into the jar. Then on my cutting station, I have a small file box, where all the scraps of paper get tucked away.   When the containers overflow - it is time to start working.

Here is my typical work flow
  • I always go to these piles first for projects.  If I need to die cut something - I look for a paper in the scrap pile before I grab a fresh sheet.  Part of my self challenge with every project I create is incorporate something old - it can come from this pile!
  • Collage work - I look at these two buckets to see if there is something that I can either use, or die cut to make my project more interesting.  
  • The day of sorting....When the pile is just unmanageable.   I sort the scrapbook paper as follows: 
    • Solids in one pile, patterns in another, then by size and colors.  
    • I start with my largest pieces first and ask "are there any large pieces that would make great cards, or could they be trimmed to 5.5 x 4.25 for card backgrounds?" I always do these large sheets first.  The scraps from these trimmings go back to the pile.
    • Sort the remaining papers by theme or color.  This gives me an idea of what matches in the pile.
    • Evaluate the patterened papers and see there are elementss that could be cut for layers.
    • Die cut shapes for future use - like tags, doilies, letters, flowers, butterflies, birds, labels etc....

Once everything has been organized, folded, punched or died (this could take the better part of an afternoon depending on the pile),  I begin organizing them.   I use Ziploc baggies (all sizes from small jewelry to quart sized bags.  I put all the same shapes into their own bags organized by color.
I have invested in a few other containers to help me manage these die cuts.


Both of these containers are made by IRIS and can be found at your local craft box stores.  I use my coupons on these as they can be pricey.  The container on the left is  "Card" organizer, and it has dividers so I use it to store my pieces that I made into cards and pieces that are trimmed for card backgrounds, also I have some of my larger dies that won't fit in the container on the right.  The container on the right is called a double photo organizer.  I have 4 of these AND LOVE THEM!   It is a box that has 12 - 4x6 smaller boxes that lock on the inside.   The smaller die shapes get placed in a compartment and then the tops are labeled. I LOVE THIS SYSTEM so much that I have one for Metal, buttons, flat back pearls, brads, etc., one for organizing small scraps of colored paper, one for dies, and one for small flat dies like MFT, PTI, and Spellbinders.
 
The next day I sit down and start making cards.  Because all the labor has been done the day before, my card making time is productive.   I don't put sentimenets on these cards (YET), many of them can be all occassion. I wait until I'm ready to use it unless the card theme clearly defines the purpose.
 
Here is a video where I share 10 cards that were created in an afternoon. 


People are always amazed that I create as often as I do and have NO scraps.   The funny thing is - I never throw anything away including packaging.  This may seem like a lot of effort, but trust me the time spent is an investment. I look at these cards as "found money".  When I'm in a hurry to go to a birthday party - the card is made and waiting to be used - I'm not at the local drugstore spending $4 on a card. 
 
How do you use your scraps? 
 
Thanks for stopping in today,
 
Tonya


Read More »

Wednesday, August 1, 2012

Cards - Scraps

0
I've been making cards with scraps again, and I know a few weeks back I shared a few projects I've made lately with the Fairy Belle and the Sunkiss papers from Prima.  Today I thought I would share with you the cards I made from the scraps.


I find that making cards with my scraps is so rewarding.  Since I participate in a lot of swaps I usually stuff one of these in the box before I mail it.    What do you do to control the scrap population?
Thanks for stopping in today,

Tonya
Read More »

Thursday, April 19, 2012

Distress Pens

0
So I finally got a chance to play with my Distress Markers from Tim Holtz that I purchased from Flamingo Scraps as a pre-order.

These markers are so much fun, they have a watercolor quality - but react a little different than water colors since the colors replace each other rather than contaminate.


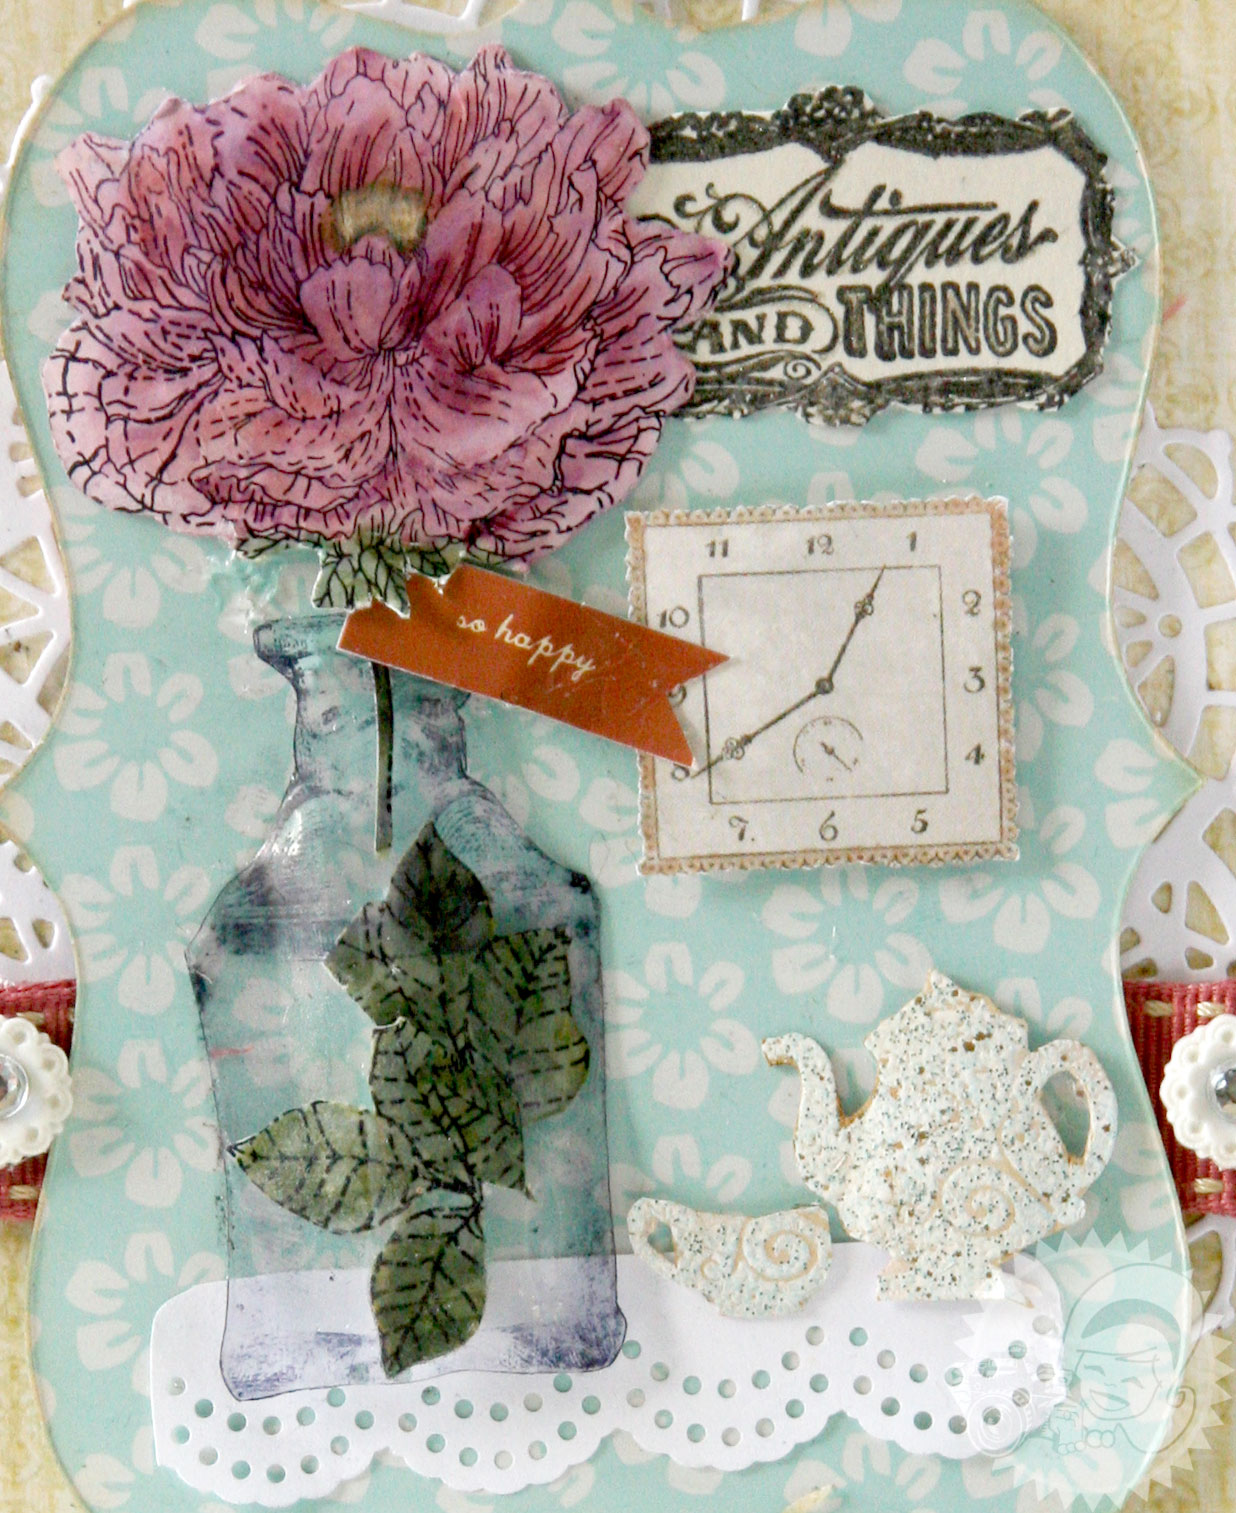
The flower on this card is a Prima stamp that I colored with the TH markers on the Ranger stamping paper. Coloring took some getting used to, but I like how the design looks like I colored it with my Copic markers.

I decided to use the image on a card.

From Flamingo Scraps: Ranger: Tim Holtz Distress Markers, Ornamental Die, Distress inks: Tea Dye; Prima: Rose Stamp, Antques Stamp, packaging (So Happy banner); Graphic 45: Bottle Stamps; Webster's Pages: Trims, Misc. Laces; Pink Paislee Packaging, Frame stamp - Soree, Stampendous: Frantage - Shabby Blue.
Other: Tonic Punch: dotted scallop, Cherry Lynn Designs: Doily Die, Studio G: Stamp "Delight in the Little Things", Spellbinders: Label 5, My Mind's Eye: Tea Pot stamp.


I used the packaging from a Pink Paislee stamp set as the background, I also used packaging from the Rose Prima stamp set for the banner that says "So happy". I love upcycling the packaging when I can.

The bottle is from Graphic 45's new stamp Curosity Shoppe Perfume Bottles. I stamped it with Archival Ink on transparency, then warped it with my heat gun to make it look dimensional.

The tea pot was a My Mind's Eye stamp that was embossed with the new Frantage Embossing Enamel, and the cup was actually another stamped image from the tea pot, but I cut it down to make it into a cup.

To create the sign behind the vase I layered a Prima Printery stamp for the words and the Frame from a Pink Paislee - Soree stamp set.

The clock was cut from a piece of scrap paper on my desk. The table cloth was a punch scrap.

Then I added Lace and Trims to the bottom, and stamp that says "Delight in the little things" as the sentiment.

I hope you enjoy this card share today,

Thanks for stopping in,

Read More »

Wednesday, April 4, 2012

Sew Cute Card

0

Wednesday, I received the new Maya Road Sew Cute and Still Sew Cute chipboard pieces from Flamingo Scraps, and I couldn't wait to use them.


Aren't these the cutes little shape? I needed to make a birthday card for a friend and she LOVES dress forms and sewing themed items. Her favorite colors are pink, lavender, and black so I reached into my stash and pulled out the Hollywood Vogue paper from Webster's pages, and whipped out this card. I'm so addicted to making these easel cards. They are super easy and I love how they are easily displayed.


From Flamingo Scraps: Maya Road: Sew Cute Chipboard Pieces, Still Sew Cute Chipboard Pieces, Webster's Pages: Hollywood Vogue - Shine A Light Paper, Tim Holtz: Baroque Die. Other: Trims, Recollections: Roses, Stampendous: Fran-tage, Lace, MFT Doily Die, Sewing Pattern


So, you may be wondering what I did to achieve that awesome rustic look on the sewing machine and the dress form. Well it is embossing enamel called "Fran-tage" from Stampendous and after seeing this demo - "The Big Pink Bird" has decided to carry it. So look for it in the store in the next few days.


Fran-tage Enamel is a unique blend of chunky embossing enamal, glitter and mica. Each color has a multi-colored effect and when melted mimics marble, and granite.


The dress form was embossed with "Shabby Pink" and it is a combo of Pink and White Enamel with gold glitter. I love how the glitter is fused into the embossing enamel and doesn't rub off. The sew machine was embossed with Aged Silver which is a mix of Pewter, Gold and Flat Black.


I can't wait to play with these, and share more awesome techniques. I know I will never run out of this in my stash - EVER!


Thanks for stopping in today,


Read More »

Thursday, March 29, 2012

Boy Happy Birthday Card

0
My sweet Nephew Trey resently celebrated his 11th birthday and of course the gift of choice at that age is money. So I really wanted to create a special card for him. You don't see many masculine cards, so I thouoght I would share it with you today.

From Flamingo Scraps: Prima: Youth Collection, Tim Holtz: Lost & Found Salvage Tickets, Regal Crest Die, Ticket Die, Baroque Die, Walnut Stain, Music embossing folder. Other: Twine, Greeting Farm - Autumn Ian, Unity Stamp: Ticket, Ribbon, and Copic Markers.


The base of my card was black cardstock, and I embosed a music pattern onto kraft paper. I have a 6x6 paper pad for the Prima Youth Collection paper that made a perfect background for this card.

Then I colored Mr. Ian to look like my nephew, and layered several of Tim Holtz's die cuts around the image to give it some interest. The Bingo Card is actually a sticker from the Tim's Salvage stickers that I placed onto a piece of cardstock and distressed the edges.

When Trey openned the card and the money fell out - he yelled "BINGO".

Thanks for stopping in today,


Read More »

Friday, March 23, 2012

Cards & Journal Pages

0
While working on January & February's digi kit I had printed out some extra pages by mistake. So I wanted to share a few projects on how to use these pages for something other than the monthly journal.

Last year I was bitten BIG TIME by the "Smash" bug. I think I have bought all the accessories and all of the books created by K&Co. This is the Red Smash book and its theme is "all about me", so I decided to fill it with things that make me happy.

Journal Page

This man started making me happy in 1985. I love that we can be silly together after being together for 27 years. On Valentine's day my husband and I spotted a photo booth when we came out of a movie. I think they are perfect photos for "smashing". I used the beautiful rose motif lined notebook paper that was February Day 29's insert as my background paper. The side was punched with a border punch from Martha Stewart. For the photo mat, I used Day 14's insert.

Another challenge I have for this journal is to use one of my favorite stamps on every page in the journal. On this page I used the new Prima Songbird collection. The tickets are so small and perfect since one says "best friends" - and he truly is my best friend. The same stamp set has the birds (love them!). The bird's nest and Love stamp are both Inkadinkadoo.

Card

When gathering up my supplies, I spoted a torn hymnal page on my desk that said "sowing the precious seeds" which made it a perfect match for this extra sheet of the January Day 23 paper. I wanted this to have a rugged/distressed look so I used some paint on corrugated board for the background paper. I also dry brushed some of the paint onto the music paper and patterned journal pages. I dipped butterflies from 2 different Martha Stewart punches in melted UTEE to give them a glass finished.

Are you using Marion's downloads for something other than the Journal pages? If so share some of your projects on the Artsy Addicts Facebook page. Be sure to tag me in the post so that I don't miss it.

Thanks for stopping in today.

Tonya Gibbs
http://www.psychomoms.com

Read More »
I love seeing things you create using my tutorials or project shares. Please use the following handles/tags in social media to insure that I get to see your creations:

INSTAGRAM: #FollowingTonyaGibbs    |   TWITTER:  @gibbst    #FollowingTonyaGibbs   |      FACEBOOK:Tag  Tonya Gibbs   #FollowingTonyaGibbs

I Design for:

    http://www.yvonneblair.com

Guest Artist: Click icon to see post!

http://www.teresacollinsdesignteam.blogspot.com/2013/10/family-stories-layout-and-video-by.html#comment-form   http://canvascorp.com/2013/03/21/easter-treat-baskets/


Past Teams

http://www.die-namites.com/     marion