Follow Me...

       
Thanks for stopping by! Don't forget to subscribe!
Showing posts with label Card. Show all posts

Monday, November 21, 2016

Imagine the Possibilities for Yvonne Blair Designs

0

 
Oh imagine the possibilities when you say I'll try instead of I can't.  Well today I have a fun little project for you to try.  A little doodle art.  I'm using these great stamps from Yvonne Blair, to finish off my project, to create the perfect card!


Everyday Holds
 
 
These little doodle projects are easy to do and I find them very therapeutic.  You can easily complete one in a matter of minutes, and look at how fabulous they look on cards. 


You can keep them black and white or watercolor them like I did here to give them more interest.  The possibilities are endless.  I think these little guys would be fabulous on Christmas cards, Birthday cards, and even Holiday Tags.    If you only filled in part of the circle they would even be interesting. 
 
Here is the inside of the card:


Here is a quick video to show you how it is done.


Wasn't that easy as pie?   Ok I want to start seeing the internet filled with doodle wreaths.  If you decide to do one, make sure you #YBArtGirlFun  in social media so I can see what you did! 
 
Thanks for stopping in today.


Read More »

Saturday, December 5, 2015

Simple Poinsettia Watercolor turotorial

0


Merry Christmas everyone!   I just love this time of year!  I've been getting my Christmas cards ready to be mailed.  Today I wanted to share with you a simple way to watercolor that takes very little time, but looks like you spent hours. The best part - these cards are flat, and can easily be mailed!

For today's focal point, I stamped this gorgeous stamp by Stampendous!   It comes with a mask/stencil which comes in handy for layering larger projects or painting negative spaces.   As you can see the stamp fills an A2 card nicely!  There is a coordinating die for this stamp set that is sold separately.
 
I recommend a heavy card stock if you plan to emboss your stamping like I did.  I would use a stock that is 80 - 110lb if possible.   Watercolor paper could be used, but the stamping may not be crisp.
 
Card dimensions:
The cardstock is cut at 4 1/4 inches  x 11 inches  then scored at 5 1/2 inches  so it is a top folding card
Interior Panels:   4inches x 5 inches
 
Here is a glimpse at my finished card:

For a super simple watercolor method where you don't have to be too persnickety about colors mixing, try heat embossing your stamped image. The enameled raised edges give boundaries for the water to pool and help keep your pigment trapped.  While you may experience a little wicking it will be minimal, and you won't have to be too fussy.  I really love the richness the gold embossing offers to the overall look of the card.
 
To watercolor my card I created a palette with an ice tray using this watercolor set. You can see how I did this in my September  Ustream!
  
 
Here is the video where I created the card:


Who wouldn't enjoy receiving a hand painted card.  These are just gorgeous!   Thank you so much for hanging out with me today!
 
Tonya
 
Supplies:
Stampendous Cling Create A Poinsettia CRS5081 Stamp
Inkadinkado 97342MM
Cardstock - 81/2 x 11  Red Cardstock
Solid white/ivory cardstock  80 - 110lb
Versa Ink
Ranger Ink - Queen's Gold Embossing Powder
Daler Rowney Watercolor Tubes
White Paint
Round 0 Watercolor Brush
Round 10 Watercolor Brush
Scotch ATG tape
 
 
Read More »

Friday, November 13, 2015

Christmas Card - Money or Gift Card Holder

1
 
 
Hi everyone!  I hope you are getting into the Holiday spirit over here this week.  Today I would like to share with you a card tutorial for sharing a gift card, or money with that extra special someone. 
 
Today's card concept is intended for the mail.  I wanted a little more space than offered by the traditional A2 card size, so I decided on a standard #10.   The back panel of the card measures 7in x 8.5 in   scored and folded at 3.5 in x 8.5 in.   The front panels are then cut a quarter inch smaller to leave a bit of a border. The card will fit in a standard #10 (letter/business size)  envelope. As you can see from the photo above the card's design is still relatively flat, so you could easily mail this card.  However because of its weight, you may be required to add additional postage.
 
 
For today's project I chose the new Christmas Collection from Blue Fern Studios - Vintage Christmas - Noel 12x12 paper.  I trimmed the design from the front of the paper, and used the b-side as a background for the front and inside panels of my card.  Before cutting down your panels, be sure to fussy cut the pattern for the cover.
 
 
I also used the Merry Christmas title from the Greeting Cards Cut apart paper.


To add depth to the front, I chose the Coordinated Chipboard Frolic Mesh.  As you can see in the photo below. It made the perfect trellis for my flower cluster.   I wanted to keep it natural colored, so I added a bit of clear Holographic embossing powder from Ranger to it. This gives it a wet shimmer but maintains the look of wood.  I also added a bit of "fake" snow to some of the centers of the designs.  


This time of year, there are all kinds of things you can find to add shimmer and fun to your holiday paper crafting projects.   I found this cluster of wired beads that also made the perfect "holly berries"  They look really great mixed in with my flowers.  For the Holly, I used some scrap pieces of Gelli Prints® that I had made over the summer and a Martha Stewart Holly Punch. 


I thought adding a sentiment to the card would take away from the word Noel that was already printed.  However, the printed Noel seemed lost among all the other elements.  So I decided to use a small Melissa Frances frame to call attention to the word.  I colored the frame with a gold Wink of Stella Glitter Pen and finished it off with Glossy Accents in the center.  Now my sentiment takes center stage!  


For the Inside pocket of the card, I needed to keep the design flat.  So I simply created a banner with a Marvy Pennant Punch and Jenny Bowlin Blue Ribbon Punch using scraps from the paper.   I also took a sentiment from the Greeting Cards paper from Blue Fern Studios to add the sentiment. 


Here is a quick process video showing how I created the card. 


You can see why I have fallen in love with these papers from Blue Fern Studios. The designs are so delish!  I just love vintage traditional Christmas patterns.   I hope I have inspired you to spend a little extra time on that special person in your life whom you plan to gift money or a gift card this Christmas.

Thanks for stopping in today.

Tonya

Supplies

  • Blue Fern Studios - Vintage Christmas - Noel 12 x12 Paper
  • Blue Fern Studios - Vintage Christmas - Greet Cards  12x12 Paper
  • Blue Fern Studios - Coordinating Chipboard - Frolic Mesh
  • Ranger Ink - Glossy Accents
  • Melissa Francis - Resin Frames
  • Martha Stewart - Holly Punch
  • Fiskars - Jenni Bowlin - Blue Ribbon Punch
  • Marvy - Pennant Punch
  • Scotch - ATG adhesive
  • Tombo Mono Adhesive
  • My Favorite things - Doily Die
  • Cheese Cloth
  • Zig - Gold Wink of Stella Glitter Pen
  • Home Accents - Red Glass Bead Spray
  • Flowers
  • Chipboard
  • Red Cardstock
  • Home Accents - Christmas Fake Snow
Read More »

Tuesday, September 8, 2015

Ustream Recap from Sept 7 2015 - Watercolor Cards

0
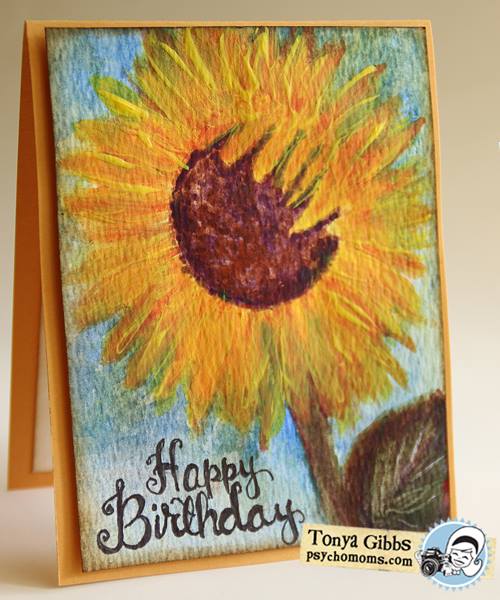
Hi everyone what a fun show last night. Thank you to everyone who came out to watch the show live. It was fun hanging out with you, and getting to know the newbies. Here is the beautiful card I created.


In this show I demonstrated some simple watercolor techniques for creating a beautiful Sunflower card (seen above).  I painted this card with a simple palette of 4 colors, and demonstrated how mixing them, you can create secondary colors for accents and shadows. I also shared some easy brush techniques to create shadows and highlights. 

If you are a newbie to watercolor and you simply want to experiment without a huge expense.  I recommend purchasing an inexpensive watercolor set. These student grade paints are great for practicing paint brush techniques and familiarizing yourself with how watercolor works.  The set I used during the show retails for under $8 at a local box store.


However, if have the budget for expensive paints and want to jump in feet first, by all means go ahead.  I recommend that you start your collection with four simple colors:  Ultramarine Blue, Cadmium Red, Cadmium Yellow, and a Burnt Sienna.  You can always expand from there as your budget allows.

Here is the recorded video: 

Watch On YouTube


I've really had a great time painting these cards, and shared at the end of the video how a set would make a great gift for someone during the holiday season, maybe a teacher, friend from church, or neighbor.  Who doesn't need a card every now then? Here are a few others that I have created using the techniques taught in this class. 


I hope you enjoyed the show.  Our next broadcast is scheduled for October 5, 2015. 

Thanks for stopping in today, don't forget if you try these techniques #FollowingTonyaGibbs in your social media or tag me on Facebook so that I can see what you have done. 


Products that I used:
  • Canson Watercolor Cold Press 140lb Paper
  • Daler-Rowney Simply Watercolor Paint Set, 12pk
  • Faber-Castell Design Memory Craft® - Watercolor Brush #3 Round
  • Artist Loft - Watercolor Brush #8 Round
  • Ice Cube Tray
  • Cardstock (card backing)
  • White foam adhesive
  • Scotch ATG Tape
  • Tim Holtz - Ranger Ink Vintage Photo Distress Ink
  • Tim Holtz - Ranger Ink - Distress Tool
  • Ranger Ink - Craft Mat
  • Uni-ball Signo Impact 207 Gel Pen (black) 1.0mm


Read More »

Thursday, September 3, 2015

Sunflower Water Color Card Tutorial

0


WOW it seems like forever since I was here on my sweet blog.  I'm sorry for my absence.  I have been taking a much needed vacation/road trip and taking my Son to college.   While doing all this traveling, I decided to pack a little kit for doing a little watercoloring in the card. 


I pre-cut some card panels to 3 3/4" x 5"  this will allow for a double mat. 


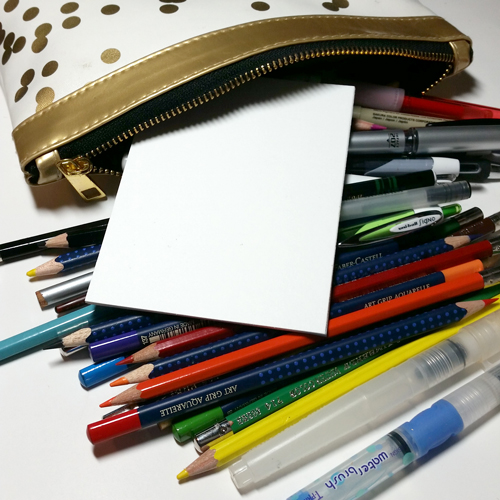
Then I took along a few watercolor pencils, a hard surface to write on (a book works great), some doodle pens, 6 inch ruler and a few waterbrushes.  Doodling really does help the time pass on these long trips, and when you are done, you have a beautiful card front! 


Here is the front and inside of the card.  


Here is a process video showing how I created them, and sharing with you this simple technique for doodling out a beautiful card.


Doesn't that look super simple?  I know you can do it.  If you try it out, please be sure to share it with me.  #FollowingTonyaGibbs in Twitter and Instagram so that I can find them, or tag me in Facebook.  I love seeing what you create! 

DON'T FORGET -  Our next Ustream is set for Monday, September 7, at 8:30 p.m. EST 

Thanks for stopping in today, 

Tonya


General Supplies
  • Watercolor Pencils  - I used Artist General Kimberly Pencils  and Faber-Castell Design Memory Craft®
  • Georgia Pacific 110lb white cardstock
  • Waterbrush
  • Uniball 207 Impact Pen
  • Yellow Cardstock
  • Liquitex Bright Gold Iridescent Ink
  • Scotch ATG Tape
  • Foam Adhesive.  

Read More »

Thursday, July 30, 2015

On Trend - Card Tutorial

4


Hi everyone,  I have a cute card share for you today.  I had a comment on one of my YouTube videos from Anna, AsianTiger513.   She asked me to do a card tutorial, in real time.  YIKES I haven't done that in a really long time!   I quit doing them, because I felt they were too long, and I could cover more ground by speeding up the process.  Some of my projects take hours! 

So for you Ms. Anna - I have  accepted your challenge.  

For my card, I chose to use the My Mind's Eye On Trend 6x6 Collection.  I have seriously been hording this collection for a while.  I used it a little in a Ustream a few months ago, but the paper is so beautiful, I wanted to keep it forever!  AHHHH but I can't.   


These are truly my all time favorite colors,  mint and coral.  I mean seriously so delish, then add the gold foil - my heart literally stopped for second when I saw it! 


Ok - back to the tutorial!     It is no secret that I love to use my scraps when creating cards.  Since the paper collection was fairly new, that meant I must spend some time, looking for items that have been around for a while to help the card come together.   

Deep into the bucket of scraps and one hit wonders I went.  I pulled out  a tube of Prima Flowers - they have been here since early 2009, and a scrap of gold rick-rack.  Look at how simple and beautiful, things came together. 

\


I know everyone who has paper-crafted for a while, has a stash of Alpha bet stickers/chipboard pieces that are still lingering around, and may not match.  The H and I were from two different sets 1 was lavender the other pink.   Never fear -  I made them play nicely together with my card, by heat embossing them with Gold.  Now they are trendy, and match! 


The Inside of my card was simple,  I created a border with the paper from the collection, then added a piece of white card stock in the center for my hand written message.   The final card is an A2  4.25 x 5.5  top folding card. 


I added a little Lindy's Stamp Gang in Cocklebells Coral in the negative areas. This spray is also among my favs as it has this nice peach pigment with a gold shimmer (perfect right!). 

Here is the video tutorial (warning it is long - because I ramble -LOL) 


Thank you Ms. Anna for the challenge,  I really appreciate it.  I love that you left comments, so that I could get to know you better.   It was delightful speaking with you, and I look forward to seeing you around!


Thanks, 
Tonya 


SUPPLIES:

  • My Mind's Eye - On Trend 6x6 Paper by Jen Allyson
  • Lindy's Stamp Gang - Cocklebells Coral
  • My Favorite Things Stamps & Dies - Die-namics Dizzy Doily Duo
  • Prima - tube flowers
  • The Paper Studio - Gem Stones  Gold
  • Chipboard letters
  • Versa Embossing Ink
  • Ranger Ink, Queen's Gold Embossing Powder
  • GP 110lb White Card stock
  • Unibal - Signo - Micro 207 Gel Pen - Black


Read More »

Sunday, July 19, 2015

Love Summer Art - Flip Flop Card

0

Hey bloggers - welcome to day 3 of the #LoveSummerArt collaborative project with YouTube Artists around the WORLD!  The event runs from July 17 - 20th.  To find these artist,  just type #LoveSummerArt  in your YouTube search bar. 


This is a super fun way for you to discover new artists on YouTube, and be inspired by their work. All genres of art are participating - Exciting Right!     

Today I would like to share with you a mixed media card. This design is super simple, and could easily be duplicated to create a colorful set of cards for a gift.  


Doesn't this ocean remind you of summer and walking the beach in Flip Flops?  I used mediums from Faber-Castell Design Memory Craft® to achieve this look.  I'll show you how in the video tutorial below.


This is also a great way to use those Gelli Arts®  Gelli Prints® that we have been doing the last few months in our Ustream classes.  I used one for die-cutting out the Fancy Flip Flops Die from Die-Versions.Isn't it just adorable as the center piece for my card?

 
 I typed the sentiment in a word processor and cut it into a fish tail banner.  The fonts that were used were:  KG Only Human Reg  (Life is better in ) & SA Cinta Normal (Flip Flops).   

Here is a quick process video showing how I created the card.


Don't forget to head over to YouTube and see what other artists are doing with #LoveSummerArt.    Check back tomorrow I will have a Mixed Media Canvas to share.

Thanks,
Tonya Gibbs

Save The Date:  Our next Ustream is scheduled for August 3, 2015 at 8:30 p.m. EST 

Supplies:
  • Faber-Castell Design Memory Craft®  -  Glass Bead Glitter Gel
  • Faber-Castell Design Memory Craft®  - Whipped Spackle
  • Faber-Castell Design Memory Craft®  - Gelatos® - Snow Cone
  • Faber-Castell Design Memory Craft®  - Gelatos® - Aqua Dolce
  • Faber-Castell Design Memory Craft®  - Gelatos® - Butterscotch
  • Scrap of Background Paper from Mono Printing
  • Lindy's Stamp Gang - Glitz Spritz - Blazing Sun
  • Sequins
  • Prima - Daisy flowers
  • Rhinestones
  • Manila Cardstock
  • Bazzill Canvas Texture Cardstock - Peacock
  • Die-Versions Dies - Flowering Flip Flops
  • We R Memory Keepers - Crop-A-Dile Corner Chomper
  • Fonts: KG Only Human Reg & SA Cinta Normal
  • Silhouette Pick Me Up Tool


Read More »

Tuesday, July 7, 2015

July 2015 Ustream Re-Cap

3


WOW - what a fun class. I know I keep saying that, but we had a full house with lots of new faces tonight.  So it was fun meeting you, and I hope you had a great time. Look at all these fantastic prints that we pulled tonight.  We had enough time to create 2 cards, but we pulled a dozen or so prints.


I also showed you guys how  simple it was to give some interesting color patterns to your die-cuts, while making interesting patterns for your backgrounds. 


I think this was one of my favorite prints.  I didn't have time in tonight's show to make anything with this, but check back each week this month, and I will create cards from all of these prints and the colored die-cuts from tonight's show.  


Here is the recording in case you didn't make it to the show live. 


Thank you to everyone who came to watch the show live. I had a great time tonight. I can't wait to start making cards for you this month. Don't forget to check back!  Our next Ustream will be August 3, 2015 at 8:30 p.m. EST. 

Tonya 

Supplies:

  • Gelli Arts® Gelli® Plate - 8x10
  • Gelli Arts® Gelli® Plate - 3x5
  • Cardstock - 110lb  White
  • Cardstock - 80lb Black
  • Hymnal page
  • Plaid - Apple Barrel - Bimini Blue
  • Plaid - Apple Barrel - Pink Parfait
  • Plaid - Apple Barrel - Kiwi
  • Plaid - Apple Barrel - Yellow Flame
  • Sizzix - Tim Holtz - Alterations thinlets Scribble and Splat Die
  • Die-versions - Pretty Paisley Whispers Die
  • Die-versions - Hexagons Background - Whispers Die
  • IndigoBlu - Limor Webber Designs - Rugged Edge Stamp
  • Marvy - Reminisce Black Gel Pen
  • Marvy - Reminisce White Gel Pen
  • Faber-Castell Design Memory Craft® - Textural Cards
  • Faber-Castell Design Memory Craft® - Stamper's Big Brush Artist Pens Purple Violet #136
  • Faber-Castell Design Memory Craft® - Stamper's Big Brush Artist Pens Cold Grey I #230
  • Faber-Castell Design Memory Craft® - Stamper's Big Brush Artist Pens Scarlet Red #219
  • Speed Ball Brayer
  • Glitz - Doodle Roller - Curved Chevron
  • Ranger Inc. Holographic Embossing Powder 
  • Versa Mark Embossing Pen
  • Versa Mark Embossing Pad
  • Zig - Wink of Stella Clear
  • Foam Adhesive
  • Tim Holtz - Tonic Scissors


Read More »

Friday, July 3, 2015

Watercolor Card Stacked Pots

1

Hi everyone, today is my day over on Limor Webber's DT blog today, and I have an awesome treat for you.   I am going to share a watercolor tutorial from start to finish of this beautiful card with the Stamper's Big Brush Artist Pens by Faber-Castell Design Memory Craft®.


I just love this card!   It is so cheerful and bright.  Who wouldn't love to get a card like this in the mail?   Here are a few close ups of the flower pots.   You guys know that a few months ago,  I fell in Love with hand lettering.  Today's card share shows how I did the inside sentiment for the card. 


Head on over to Limor's DT blog
to see the process video that goes with today's post.
 

There is also a list of markers used, and other detailed photos there.   

Thanks for stopping in today, 
Tonya 

Read More »
Friday, June 26, 2015

Whimsical Bird Card Using Gelli Prints

2

Hi everyone, all month I've been sharing with you ideas for using your Gelli Arts® Gelli® Plate.  I'm having so much playing with my prints.  I've made a mini album, a few father's day projects, and today I'm going to share a cute whimsical card idea using those prints we had left over from the June class. 


They were all so colorful -  I just can't leave them hiding in a drawer!   So I decided to cut a few oblong circle shapes, add a few doodles and look at how adorable these cards turned out! 


Above is the front of the card, and below is the inside.  SO fun - and who wouldn't love to receive one of these. Best part - they are super thin and light weight so you can easily mail them! 


My card measurements are:  Top Folding A2    Folded  41/4 x 5 1/2 inches. 
The white liner  and inside card panel are  cut to  4 x 5 1/4 
The Birds are  3 3/4 x  5


Here is a video tutorial showing you how I created this card.


Few Reminders


  • You still have a few more days to get your comments on the other June posts where I used the Gelli® Prints, to be entered in the drawing for the 6x6 Gelli Arts® Gelli® Plate give away. One entry per comment per post.   So make sure you are reviewing the all for as many opportunities as possible.  Also you must be a subscriber of this blog to be eligible, so if you haven't done so - go ahead and click the subscribe button in the side bar on the right.   Entries must be in by Midnight June 28, 2015.  I will draw a winner on June 29.
  • Next  - Don't forget our next Ustream is scheduled for July 6, 2015  at 8:30 p.m. EST 


Thanks so much for stopping in today,  I hope you have enjoyed these cute little birds.

Tonya


Supplies: 

  • Gelli Arts® Gelli® Plate - 3x5 & 8x10 (used on older prints)
  • Plaid Apple Barrel Paint - Kiwi, Jack-O-Lantern, Bimini Blue, White, Pink Parfait, and Yellow Flame 
  • Faber-Castell Design Memory Craft - Stamper's Big Brush Artist Pens - May Green #170
  • Faber-Castell Design Memory Craft - Stamper's Big Brush Artist Pens - Pink Madder Lake #129
  • Faber-Castell Design Memory Craft - Stamper's Big Brush Artist Pens - Orange Glaze #113
  • Faber-Castell Design Memory Craft - Stamper's Big Brush Artist Pens - Cold Grey I #230
  • Diversions Dies - Fence Background
  • My Favorite Thins Stamps - Moroccan Background 
  • Sharpie - White Paint Pen
  • Marvy - Reminisce Black Gel Pen
  • Marvy - Reminisce White Gel Pen
  • Foam Adhesive
  • Ranger - Craft Mat
  • Scotch Quick Dry Adhesive
  • Scotch ATG
  • Tim Holtz - Tonic Scissors
  • Yellow Cardstock
  • White Cardstock
  • Baby Wipes
  • Cosmetic Sponge
Disclaimer - This contest is not sponsored by Gelli Arts® or Its affiliates in any way.


Read More »

Friday, June 19, 2015

Father's Day Card Tutorial

0

Hi everyone, today is my day over on Limor Webber Designs' DT Inspiration Blog.    I hope you get a chance to stop in and take a look at this deliciously grungy Father's Day Card that I have created using the Limor's Signature products with Lindy's Stamp Gang and IndigoBlu.   


Thanks for stopping in today! 
Tonya 


Read More »
I love seeing things you create using my tutorials or project shares. Please use the following handles/tags in social media to insure that I get to see your creations:

INSTAGRAM: #FollowingTonyaGibbs    |   TWITTER:  @gibbst    #FollowingTonyaGibbs   |      FACEBOOK:Tag  Tonya Gibbs   #FollowingTonyaGibbs

I Design for:

    http://www.yvonneblair.com

Guest Artist: Click icon to see post!

http://www.teresacollinsdesignteam.blogspot.com/2013/10/family-stories-layout-and-video-by.html#comment-form   http://canvascorp.com/2013/03/21/easter-treat-baskets/


Past Teams

http://www.die-namites.com/     marion