Follow Me...

       
Thanks for stopping by! Don't forget to subscribe!
Showing posts with label Psychomoms. Show all posts

Wednesday, December 31, 2014

Ustream Reminder January 5

0
 

Happy New Year!  
As we say goodbye to 2014 and Hello to 2015  I hope you can join me on
 
Monday, January 5, 2015 
at 8:30 pm on Ustream
 
http://www.ustream.tv/channel/gibbst


We are going to make a layout quick and simple.
Grab out your mixed media supplies, and get ready for some fun! 
 
Thanks for your continued support!  I can't wait to see what 2015 has in store for me!  
 
 
Read More »

Saturday, November 29, 2014

Masculine Mixed Media Card - Time to Celebrate

1

OH MY GOODNESS - Why have I waited so long to purchase a Gelli plate?   I'm having so much fun!   I've created dozens of prints over the last few weeks.


I wanted to share an idea of how to use those prints.  If you have followed me for a while, you know that I'm just not much for "journaling".  Don't get me wrong, I have dozens of journals, and I have some that are mixed media, that I've started.  But I like to practice techniques on card stock then create projects with them, instead of hiding them away in a journal.

I created this masculine card to give to my nephew for his birthday.  These Gelli prints are PERFECT for Masculine card backgrounds.  So FUN, vibrant, and the perfect amount of grunge.

Earlier this year, I shared with you a post on how I created these wood veneers from the wood shapes you find in the craft section and stamps in your stash.  This is a perfect way to create custom embellishments with a trendy flare without breaking the wallet.  But I also encourage you to dig through your stash, and see if you can find something that would work.  Perhaps stickers of clocks, puzzle pieces, gears, washers, clocks, wood shapes, or  hexagon shaped die-cuts.


For the inside of my card, I used the Heidi Swapp Coral ink and a Fiskars Hexagon Sentiment Stamp set.  The "Time to Celebrate" perfectly mimicked the cluster of embellishments on the cover.

I have prepared a process video, showing how I put the card together:


I hope you enjoyed my share today,  Don't forget that we have a Ustream, Monday, December 1, 2014  at 8:30 p.m. Est.  We are going to create some fun Christmas cards using Gelli Prints and Die-nmaties Dies.

Thanks for stopping in today,
Tonya

Supplies:

  • Gelli Plate (any size)
  • Paint (colors of your choice)
  • Faber-Castell Design Memory Craft® Whipped Spackle.
  • Fiskars Hexagon Sentiment Stamp
  • Heidi Swapp Coral Ink
  • Heidi Swapp Honeycomb Stencil 6x6
  • Prima Wood Veneer Celebrate Flag
  • Recollections  Wood Veneer Frame
  • Cardstock
  • 7 Gypsies Gears
  • Twine

Read More »

Wednesday, July 2, 2014

Ustream - June 28 - Follow up post

0
WOW - this has been a crazy busy week. Today I want to follow up the Special Broadcast last Saturday. It was a lot of fun spending the morning / afternoon with you guys.


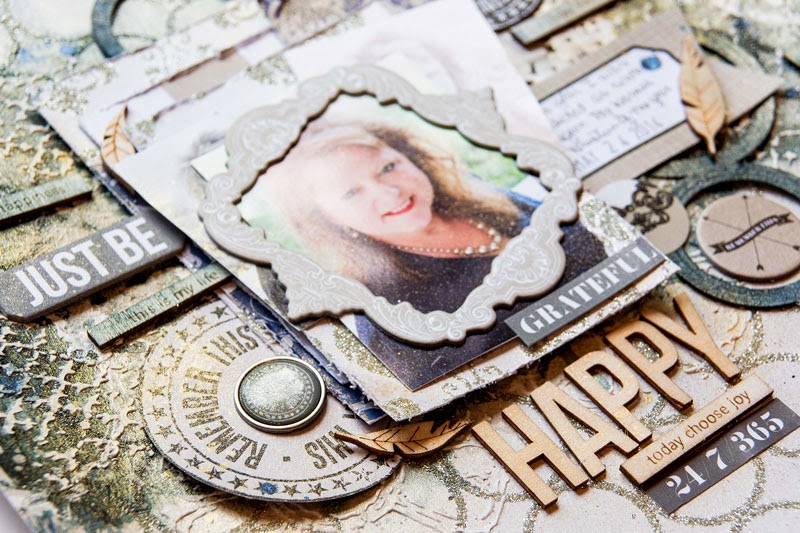
I used the Teresa Collins Designs Urban Market kit that we featured in June to create a self portrait layout!   Along with a few other items from Stampendous, Spellbinders, The Crafter's Workshop, Heidi Swapp, Cosmo Cricket, and Faber-Castell Design Memory Craft®


Our base was the glitter paper in the collection, and I shared that if you pre-treat the paper with Gel Medium the glitter will not come off.  I used the Faber-Castell Design Memory Craft® Gel medium. Someone asked in the show if it will dull the Glitter effect -  The Answer is NO this is still super shiny. 


Look at all of this yummy texture created with the Whipped Spackle and Colorshines! 


Chipboard shapes are super popular right now, and I showed you how to use your chipboard  and Spellbinder's basic circle shapes to create these navy blue circles. 


If you missed the show never fear it was recorded! 


Thank you again to Scrapbooking With Me Boutique for sponsoring this event, and providing kits!   Don't forget that our next Ustream is scheduled for July 7th at 8:30 p.m. EST.

Remember that August Ustream kit has gone on sale. Head over to the boutique to get yours while supplies last.  We will be creating mixed media cards.

Thanks for stopping in today.

Tonya

Layout Supplies:


  • Teresa Collins Designs - Urban Market Collection - 12 x 12 Double Sided Paper with Glitter Accents - Circles
  • Teresa Collins Designs - Urban Market Collection - 12 x 12 Double Sided Paper - Cards
  • Teresa Collins Designs - Urban Market Collection - 12 x 12 Double Sided Paper - Floral
  • Teresa Collins Designs - Urban Market Collection - Decorative Brads
  • Teresa Collins Designs - Urban Market Collection - Chipboard Stickers
  • Teresa Collins Designs - Urban Market Collection - Ephemera Pack
  • Teresa Collins Designs - Urban Market Collection - Laser‑Cut Wooden Shapes
  • Teresa Collins Designs - Urban Market Collection - Cardstock Stickers - Alphabet and Label
  • Faber-Castell Design Memory Craft® Gelatos® - Boysenberry 
  • Faber-Castell Design Memory Craft® Whipped Spackle
  • Faber-Castell Design Memory Craft®  Gel Medium
  • Faber-Castell Design Memory Craft®  Gesso
  • Heidi Swapp - Colorshine - Navy
  • Heidi Swapp - Colorshine - Gold Lume
  • Stampendous - Stamp & Stencil  - Grunge
  • The Crafter's Workshop - Mini Romantic Circles
  • Tim Holtz - Ideo-ology - Tiny Attacher
  • Cosmo Cricket - Wood Charms - Feathers
  • Cosmo Cricket - Wood Charms - Tiny Words
  • Spellbinders Nestabilities - Basic Shape Large Circles
  • Doily
  • Foam Adhesive


Read More »

Friday, June 6, 2014

Glue Dots Marion Smith Designs Blog Hop

14

Hi everyone - I'm excited to be hopping along with you today with Glue Dots® & Marion Smith Designs. Make sure to visit both Brand's blogs from June 6 - June 8! There are so many amazing projects being shared!

Make sure you comment and subscribe to each blog, as we will be picking some lucky winners to win some awesome new products from both Marion Smith Designs and Glue Dots®!

Links to each blog can be found on the following sites Marion Smith Designs and Glue Dots®


Today, I'm sharing with you a tutorial on how I created these lovely yellow flowers using Marion Smith's new Bloom Impression Tool, Rose Die and Glue Dots® in 1 inch and 2 inches.


Tutorial....


 I used Marion's Peony Petal die for the purple roses and the rose die for the Yellow Roses.  The more petals you use the fuller your flower will appear! 


Start by using Marion's Rose Petal Die to cut out about 20 cuts of the Large and Small die.  Color them all with your favorite mist.  I used Tattered Angel's Sunshine.  For this flower, I also used Georgia Pacific 110lb Cardstock.


Wad each petal into a ball and allow to dry for about 15 - 30 mins. You want your flowers to be damp, but not WET.  A good judge is if you lay it on a surface and the surface is damp then wait a bit longer.  If the paper is too wet, it will rip.  Too dry - and it doesn't want to shape!  It may take some practice getting the right feel for the amount of dampness. 


Place the petal onto the tool so that the edge of the die, is laid on top of the rim of the tool, and allow the remaining portions to spill into the center cavity. 


Place the cover over the top of the bottom piece.  Twist the tool from side to side.  Remove the blossom.


This is how your petals should appear!  I repeated this process for all the petals.  


This is a photo of the finished petals.  You will need about 20 petals/flower 


I used a 2" glue dot and adhered a 2" circle to the top of the dot.


Remove the packaging from the back of the glue dot, and begin to layer your petals around the circle with the Glue Dot surface up.  The Glue Dot has a Super Strong bond.


 I recommend  4 large petals on the bottom layer. Overlapping them slightly


Next, attach a 1 inch Glue Dot to the center of the cluster, and begin to add your second layer of petals offsetting them so that your second layer is in-between the gaps of the bottom layer's petals.  


Repeat this step until your flower is your desired thickness.   Use the smaller petals as you get to the top of the flower.


Remove a 2 inch glue dot from it's packaging.


Roll the dot in your hand to form a ball as you remove it from the package. Don't "over" handle the dot or it will lose its stickiness.  Place the rolled Dot into the center of the flower cluster.


Pour Micro beads into the center of your flower over the Glue Dot.


Use your finger to firmly press the beads into the Glue Dot.


Shake off excess Micro beads.  They stick by static cling sometimes, so a paintbrush can be used to remove them from unwanted areas.

 Here is your finished flower.
  
I created this lovely canvas to showcase my beautiful flowers.   The purple flowers were made the same way, however, I used the Peony die in place of the Rose petal.


I used Marion's new Motley collection and Junque and Gems to create this mixed media canvas. 


Thank you for hopping along with Marion Smith Designs & Glue Dots. Don't forget to leave a comment and Subscribe while your here. 


Be sure to check out the Design Team blogs for more inspiration.


Happy Hopping Scrappers. 

Glue Dots® are double-sided adhesives that bond instantly to virtually any surface. They are mess-free, acid-free, non-toxic, and require no dry time; making them great for paper crafts, scrapbooking, decorating, home décor projects and more! 

Products from Marion Smith Designs are available at Scrapbook.com and BlueMoonScrapbooking.com for online ordering.  You can also find Glue Dots® products, including the new Desktop Dispenser, online at Jo-Ann.com or at your local Jo-Ann Fabric and Craft Stores.


Read More »

Thursday, June 5, 2014

July Ustream Kit Available

0

Authentique's Harmony Collection for the July Ustream kit. It is available for purchase at the Scrapbooking With M.E. Boutique store, and is ready to ship!  


July Kit - Authentique Harmony Collection $46.84
 (includes USA shipping, international shipping will be adjusted and billed on separate inv)

It will be aired on July 7th at 8:30pm EST. Here is the link to my Ustream Channel: http://www.ustream.tv/channel/gibbst


Kit includes one of each ~ 
  • Authentique Collection Kit ~ Harmony 12"X12" Collection Kit Includes: 12 double-sided patterned papers, Details stickers, Petite Type alpha stickers, Petite Diction stickers and Components die-cuts. 
  • Texture Clear Stamp 36
  • Fabscraps Wire Border, 6.25"X7" 
  • Fabscraps Flying Bird 3/Pkg (1) 3.25" & (2) 2" 
  • Laser-Cut Wood Veneer Shapes 35/Pkg - Hearts, Leaves, Lemons, Butterflies 
  • Textured Elements Burlap Blossoms Flowers/Butterflies 10/Pkg 
  • 2 yrds Light Pink seam binding 

Click Here to Order Your Kit!


Read More »

Tuesday, June 3, 2014

Urban Market - Mini Album June 2 Ustream Re-cap

6

Thank you to everyone who came to the show last night.  I thought I would share with you guys still photos of the pages we completed in the book.  Each Friday this month I will share an updated post until this little mini is finished! 


Here is how the cover of the book looks at the moment.  Keep in mind everything you see here is subject to change until I feel like the book is finished.  With each week's post if I change something, I will let you know.  


After the show I added this little Remember This piece from the Ephemera Pack to the back of our paper clip.


After the show I decided to add the giant feather that was in the Teresa Collins wooden embellishments pack. I painted it with the Wink of Stella Pen.  I love how you can see the feather peeking out of the pages before it! 


After the show ended I found this "The Story" sticker on the sticker sheet and thought it would be perfect for the center of that little frame.  This page will most likely get a little more love before the book is finished.  


Don't you just love how you can see all the other pages, behind these short pieces? 


Here is a close up of the camera paper clip that is stuck to the side of the transparency in front of the pocket page.  Above is the front and below the back.  The camera on the front was from the collage paper that we cut apart, and the camera below was from the ephemera pack. 


I added this Recorded sign from the collage page to the top edge of the pocket page.  And the Documented from the Wooden pieces on the waterfall page.  


Don't forget if you haven't started the book, to review Yesterday's post with the Cutting guide, and the video walk through.   Here are the links to the Videos from last night's show.

Part 1 -  Prep Video and Cutting Guide
Part 1 - POST with Cutting guide pdf link 
Part 2 - Ustream - Part 1 of the show before Ustream kicked me out. 
Part 3 - Ustream - Part 2 of the show


If you are playing along with us, please make sure you post pictures to the Scrapbooking With M.E. Boutique Members Facebook group so we can see your version of the album.  #TonyaGibbsJuneUstream in other social media outlets so I will be able to find it!

Check back on Friday for a follow up post with additional page embellishments.

Thanks for stopping in today,

Tonya


Read More »
I love seeing things you create using my tutorials or project shares. Please use the following handles/tags in social media to insure that I get to see your creations:

INSTAGRAM: #FollowingTonyaGibbs    |   TWITTER:  @gibbst    #FollowingTonyaGibbs   |      FACEBOOK:Tag  Tonya Gibbs   #FollowingTonyaGibbs

I Design for:

    http://www.yvonneblair.com

Guest Artist: Click icon to see post!

http://www.teresacollinsdesignteam.blogspot.com/2013/10/family-stories-layout-and-video-by.html#comment-form   http://canvascorp.com/2013/03/21/easter-treat-baskets/


Past Teams

http://www.die-namites.com/     marion