Follow Me...

       
Thanks for stopping by! Don't forget to subscribe!
Showing posts with label 7Gypsies. Show all posts

Friday, May 30, 2014

Masculine Layout Tips

0
 
 
Well this is my last post of the month, and I issued everyone a challenge to create masculine  projects. The scrapbooking industry is full of products for feminine designs and it is sometimes a challenge to create for the men in your life. All month Peggy and I have been sharing some great projects over on the Artsy Addicts blog, that I hope have inspired you. Today I thought I would recap some tips on how I set out to create Masculine layouts.


1)  Dig around in your stash for items that have a neutral theme and color.   I like to select colors that are blue, red, neutrals (grey, tan, brown, black, white) and green.  Not that there is any kind of rule to sticking to a color, I just find that these colors help my focus stay masculine.
 
2)  Look for embellishments in your stash that are not gender specific, like the Dictionary Tissue Tape from Tim Holtz, Star Sequins, and chevron designs, notebook paper, cameras, arrows, tickets, labels, wood veneers and tags. Metal accents are awesome for Masculine projects.
 
 
3) Select papers that lean more on the masculine side.  Like the Heidi Swapp No Limits papers - which were actually travel papers, but you can't tell after it was used and the Echo Park Note to Self (which has a lot of things you can fussy cut to add interest to your layout).


 Here is a process video of me making the layout!
 
 
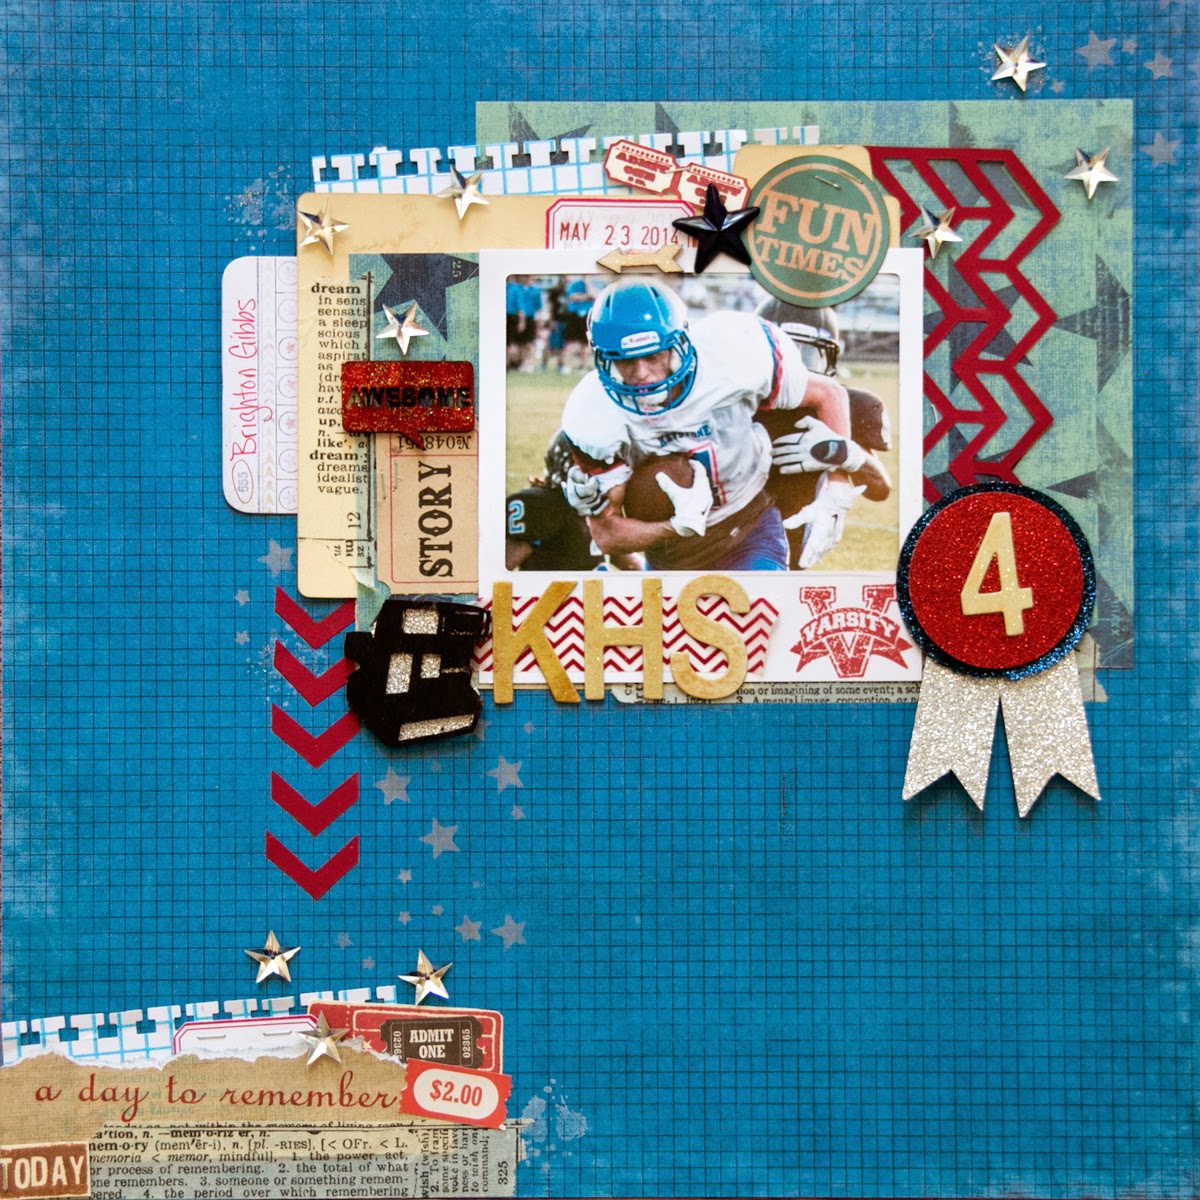
Here is the finished layout. 


My son's girlfriend said to me yesterday "I like that this layout is very masculine, but still has a lot of sparkle!"   Don't be afraid to use sparkle elements or even flowers on a masculine layout - just don't over do it!  
 
 
I hope this post has helped you with ideas on creating masculine projects.
 
Thanks for stopping in today,
 
Tonya Gibbs


Resources: 

Heidi Swapp  - No Limits Paper collection
Heidi Swapp - Confetti Stencil 6x6
7 Gypsies Paddington clear stamp
7 Gypsies - Postale Index Cards7 Gypsies - Naked Index Cards
7 Gypsies - Library Drawer - Tabbed Dividers - Naked Tabs
My Mind's Eye - Everyday Funday kraft - Everyday Fun stamps
My Mind's Eye - Find Your Wings & Fly - Stamps
Tim Holtz - Idea-ology - dictionary tissue tape
Tim Holtz - Idea-ology - Tiny Attacher
Sizzix - Tim Holtz - Alterations Frameworks Border Die Chevron
Studio Calico - Wood Veneer Hearts & Arrows
Studio Calico - Wood Veneer School Days Speech Bubbles
Ranger Ink - Archival Ink Vermillion
Cosmo Cricket - Glitter Adhesive Sheets  Red, Blue, Silver
Fiskars Circle Punch - 1.75 Inches
Marvy Circle Punch - 2 Inches
Washi - Red Chevron
Prima Wood Veneer Camera
Black Sharpie
EK-Success-Notebook-Border-Punch
EK Success Zig Writer
Clear Glitter Nail Polish
Star Sequins
Grid Line Index Cards
Labels
Color Box Pigment Stamp Ink Silver
Color Smart Pigment Stamp Ink White
Hampton Art - 7 Gypsies - Clear Acrylic Stamps - Varsity
Hampton Art Rubber Stamp A Day To Remember Numbers
Echo Park  Note to Self

Read More »

Friday, May 9, 2014

Varsity Layout by Tonya Gibbs - May Challenge

0

Hi everyone, wow can you believe that school is almost out?  Where did the time go? Seriously It was just fall in my mind.   My son, Brighton, is a Jr. this year and I'm going to spend some time in the next year crying - no seriously - documenting his high school story!   I know it is hard to sometimes create Masculine Layouts so I have a few tips to kick start your creative process.

 
First of all GRUNGE makes masculine layouts come together so easily.  And what better way to get grunge then Mixed Media.  Just like little boys - the messier the better! Texture is my next hint!  I think you can't have too much texture on a boy layout!  


Second - stick to masculine colors.  Like Blues, Greens, black, browns.  Since my son's high school colors are Blue, White & Red, I decided to use them for my focal color pallet.


I typically avoid flower clusters and stick to masculine paper elements.  7Gypsies Vintage Varsity line was perfect for this layout - since it offered so many 'sports' themed elements that could be fussy cut and used for layers. 
 
Here is a process video of me making this layout.


I challenge you to post some masculine projects this month in the AA Facebook page.  From little boys, to grown me, it is a challenge sometimes to work with their photos, but they deserve to be documented too!    With Father's Day in a few short weeks, this will kick start your brain into thinking masculine!  
 
 
Thanks for stopping in today,
 
Tonya Gibbs
 
 
Layout Supplies:  
  • Canvas Corp - White smooth Cardstock
  • 7Gypsies - Vintage Varsity 8x8 pad
  • Stamper's Anonymous & Tim Holtz - The Ultimate Grunge
  • Tattered Angels - Silver Glimmer Mist
  • Faber Castell - Design Memory Craft   PITT Big Brush Artist Pens in the following Colors:
    • Black,
    • White,
    • Cold Grey I 230,
    • Cold Grey IV 233,
    • Phthalo Blue 110,
    • Dark Sepia 175,
    • Deep Scarlet Red 219
  • Faber - Castell Design Memory Craft Gelatos in the following colors:
    • Dark Blue
    • Silver
  • Faber-Castell Design Memory Craft Glaze
  • The Crafter's Workshop 6x6 stencils in the following Patterns:
    • Mini Numbers
    • Mini Well Rounded (this is the grunge stencil)
    • Mini Wonky Circles
  • Liquitex - Full Body Gesso
  • Prima - Distress Tool
  • Pearl Ex -  Interference Red
  • Score Tape
  • Scotch - ATG
  • Scotch - Mounting Foam
  • Idea-ology - Tim Holtz - Grunge Board Numbers
  • Idea-ology - Tim Holtz - Sanding Block
  • Ranger Ink - Dyan Reavely Dylusions Sprays White Linen
  • Cosmo Cricket  - Silver Glitter Adhesive Sheets
  • Studio Calico - Wood Veneer Speech Bubbles
  • Studio Calico - Wood Veneer Abroad Cameras
  • Clear Glitter Nail Polish
  • EK Success - Square Binding Edge Punch
  • EK Success - ZIG Wink of Stella Clear
  • Silhouette Cameo - Primitive  Stars
  • Stars - Rhinestone buttons
  • Index Card
Read More »

Friday, February 21, 2014

7GYPSIES Disney Travel Mini

0
Last year I  took a trip to Walt Disney's Epcot & Animal Kingdom in Orlando, Fl., and I wanted to create a journal style mini album that could capture not only the pictures of the "aha" inspiring landscape, but my thoughts and notes.  I wanted to make it like a travelogue that had gone along the journey with me - eclectic and worn - gypsy style.
 
7Gypsies Travel line was perfect for my base papers and a bit "non - traditional" for Disney style books. I gathered up several lines of 7Gypsies ephemera, tapes, charms, and stamps, threw in some Canvas Corp tags, recipe cards, and clothes pins. Grabbed some essential Tattered Angels Glimmer Mists and the book was born.  The finished book size is 4.5 x 6 which is great for standard sized photos.


As an added accent, I also created circle and tab tags in Photoshop to accent the folders. I love how things stick out from the margin, and entice you to turn the page. I also did a lot of hand written journaling in this book. My handwriting may not be perfect to me, but I think it really adds character to the book.
 
 
I often spell Gorgeous "Gorjuss" when I text or type it on Facebook, so I wanted my accent in the upper left to reflect the "Tonya" spelling. This adds a little bit of my character to the details. In the bottom right hand corner of the page above there is a clay piece that says "Air Mail". This was created with air dry clay and a 7Gypsies stamp! 


In the photos above and below, I used scraps from 7Gypsies papers to create interesting flags and banners. I love how these pop, and add a feminine accent to the pages.


Doodling with a white gel pen, adds a even more interest. Some of my doodles are loops and some faux stitching. Love how it helps to soften the dark background.


In this spread above - I use recycled clear plastic packaging to create a signature divider.  I used Tim Holtz's distress paint in Firebrick to create a design on the plastic.  I love how you can see the garden photo below, and it gives a degree of depth to the spread.


When traveling don't forget to take photographs of signs.  They are everywhere, and when printed on card stock, they turn into cute ephemera pieces.  Like the sign that is in the bottom right of the photo above was in a flower garden and says "Epcot Springs into life."  The sign below that says "Thanks for Noticing Me" was on a sidewalk path.  When traveling to national parks, the signs often give historical facts, directions, and wildlife details. A photograph is a great way to remember these details for your journals, mini albums and scrapbook pages.


Nowhere but Disney could you wake up in America and visit 9 different countries before sundown. I literally traveled the entire world in 2 days!     This was such an inspiring journey!  I love all the elements poking out of the margins, giving a "Gypsy" feel to my finished book.


Thanks for stopping in today,
 
Tonya Gibbs


Read More »

Friday, May 31, 2013

Tattered Angels - Red Brick

0
It is no secret that I'm in LOVE with these new Tattered Angels Naturally Aged Paint Systems. The minute I saw them, I had to have them all!  Today I would like to feature the Red Brick from the Architecture line. 
 
When I finished my samples, I thought they would perfect for book covers. So I created this cute little notebook from pieces of scrap manila card stock. The final book size is 2 1/4 inches x 3 7/8 inches.   I used Tim Holtz' grunge board hinges and a 7 Gypsies drawer pull for the handle.  Perfect size to jot down quotes or little notes. 


In the kits you will get a 4 - 1oz bottles of mediums from the Tattered Angel's family, and a full color step by step guide on how to complete the project.  As always, if you like the look and want to do it on a larger project, you can certainly buy larger bottles of the mediums.


Here is a step by step video on how this kits works.


If you use these paint systems, please tag me in your poject and let me see what you create. They are so much fun!
 
Thanks for stopping in today.
Tonya Gibbs
http://www.psychomomscrapbooks.blogspot.com
 

Read More »

Friday, May 24, 2013

Embellishments from Scraps

5
Last weekend I was in my studio and really not feeling like starting a new project. Can you say brain dead?  Well, when I get like that I always clean.  I just made a mini album, that I will share with you in a future post, and I had a lot of little pieces left on my desk, floor, and scrap box.  I set out to make cards (as I usually do with these little pieces), but I really wasn't in a 'card' making mood. I recently made a large stack of them so I didn't need any at the moment.  Well,  I was hanging out with a friend and piddling around  (pid·dling  To spend time aimlessly; diddle.).   Yes not giving much thought into what I was doing.  The next thing I knew I had stapled a few scraps to a tag, stamped a few images and fussy cut them out, and first scrap embellishment was born.   By the end of the day, I had made 8 of these from various scraps, stamped images, die cuts, and extra ephemera pieces. 


I have a bucket on my desk that includes what I call One Hit Wonders.  These are small pieces that were left overs from recent projects (not worth keeping the packaging) so I toss them in the bucket.  A single flower, a stamped image that wasn't used, an inch of ribbon/lace, a button, a die cut etc... they seem like pieces that you would just toss, but clustered together, they are cute!  


On YouTube a few weeks back I shared a video on making small banners that were sewed together.  One of them is being used in the tag that says fun times above.  Clustered together these itty bitty pieces of nothing form a cute layered embellishment to be included on your scrapbook pages, cards, or in your mini albums.
 
 
I had a variety pack of small papers from 7Gypsies laying on my desk.  I clustered those around this 5x7 photograph on my desk,  placed a few photo reels that I cut from a 6x6 paper pad from Echo Park, a few paper doilies die cut from an MFT doily die out of scrap paper and this layout was born.  Since the photograph had so much negative space in the upper left hand corner, I decided to use one of my embellishment pieces for the journaling to hide the wall.  Then I sprinkled a few sequences to mimic a flash.  I love how this  "Scrap" layout turned out. 
 
Oh btw those are my beautiful children all grown up!
 
I would love to see your scrap embellies - please post them on the Facebook page and make sure you tag me in them.
 
Thanks for stopping in today,
 
Tonya Gibbs

Read More »

Friday, May 3, 2013

Tarnished Silver Tag

0
Last week I shared with you a card I created using the Tattered Angels' Naturally Aged Paint System Bare Metal Tarnished Silver.  Today I would like to share a second project that I created using the other pieces created in my sample video.


The background of the tag was embossed with a Cuttlebug - Clockworks embossing jacket after the card stock was dry. As you can see the card stock looks like embossed metal. Below is a sample of the dry paper before it was embossed and die cut into a tag. I really wanted you to see how much texture and shine these mediums give your projects.  Bonus - it is just card stock, not metal. This means it is light weight enough to be mailed, making it perfect for cards.  Also, it can be easily die cut, punched, embossed, or cut with your electronic cutters.

 
 I used the 7Gypsies Paddington Stamp with Ranger Archival Jet Black Ink to give the appearance of dripping oil.  Then I covered over those splotches with Glimmer Mist, Almost Black, to give a little shine to the oil.  The sentiment was created in Photoshop CS6 using the Bookman Old Style Font, and attached to the tag with a 7 Gypsies Mini Paper Clip - SIDE NOTE:  LOVE THESE NEED CASES OF THEM - they come in several different colors, and are so tiny and cute. 
I also cut a Sizzix Primitive Heart from chipboard after covering it with 7 Gypsies Paper tape from the Lille Collection. I love the contrast of the red against the sea of metallic colors. The heart was edged with a silver pigment ink pad from Color Box to make it looked finished. The 7 Gypsies Hardware - Industrial Gears were the perfect touch to bring my clockworks background to the foreground. I found a scrap of DCWV Tattered Time paper and was able to cut the clock face to add to the bottom.

As a reference here is the video I shared last week on how I created the background effect with the Tattered Angels Paint System.


I love how the finished tag came out. It would be perfect on the face of a masculine card, or as an embellishment on a scrapbook page.  Have you tried any of the Paint Systems yet?  If so, please post them on Facebook and be sure to tag me in the post.   I would love to see your creations.
 
Thanks for stopping in today,
 
Tonya Gibbs
 
 
Resources: 
  •  Tattered Angels:
    • Naturally Aged Paint System Bare Metal Tarnished Silver
    • Almost Black Glimmer Mist
  • 7 Gypsies:
    • Hardware - Industrial Gears
    • Mini Paper Clip - Antique Brass
    • Paper Tape - Lille Collection
    • Paddington Stamp
  • Ranger/Tim Holtz:
    • Pumice Stone Distress Ink
    • Archival Ink Jet Black
    • Tiny Attacher
  • Sizzix
    • Primitive Heart Dies
    • Alterations - Tag & Tie  Die
  • Provo Craft: Clockworks  Embossing Jacket
  • DCWV: Tattered Time 4x6
  • Seam binding
  • Font:  Bookman Old Style Font
  • Photoshop CS6
  • Manila Card stock - Recycled File Folders


Read More »

Friday, April 26, 2013

Tarnished Silver - Tattered Angels

0

This week has been so fun, I've been trying out some new products and getting my fingers stained with inks.  Today I wanted to share with you one of the cards that I made using the Tattered Angels' Naturally Aged Paint System Bare Metal Tarnished Silver.   This paint system adds so much texture and shine to your dull card stock, that you have to touch it to see if it is metal.


Canvas Corp Mini Red Clothes Pins, 7 Gypsies Washi Tapes, Tattered Angels Naturally Aged Paint System Bare Metal Tarnished Silver. Other: Nesting Labels Punches EK Success and Stamping Up, Studio G Make A Wish Stamp,
Ranger: Archival Ink Jet Black, Tim Holtz Sizzix Alterations Texture Fade Patchwork, Distress Ink Pumice Stone.


For my card base I used a Tim Holtz Alterations Texture Fade Patchwork on the bare card stock, then added my paint mediums.   I love how the paints bring out the texture from the embossing and make this look like embossed metal. 


I have a few videos demonstrating how this card was made. 

The first is a step by step for the paint system


This video shows how I made the card


Thanks for stopping in today, I hope you have a great weekend.  If you are using these paint systems, I would love to see your creations, please share them with me on Facebook. 
 
 
Tonya Gibbs

Read More »

Thursday, February 28, 2013

7 Gypsies Easter Mini Album

1
With Easter just a few weeks away, I thought I would share with you a little Easter Mini Album I created using pictures from our Family's Easter Gathering last year. 

In this project I used all 7Gypsies Papers, Canvas Corp burlap and canvas products.  Since our Family gathering is always an outdoor picnic, I wanted the mini to reflect a natural organic theme. 

 
On the cover, I used the Canvas Corp burlap 12x12 page as the background.  I painted over it, to give texture and depth.  Then I sprayed a Canvas Corp flower with Glimmer Mist.  I love how the flower looks like denim. 
 
The papers were all taken from various 7Gypsies lines. Most were pieces I got from a variety pack, and then I filled in with the Conservatory ATC and Ephemera packs.  I love how most of these papers came from different collections, but they still work well together since I kept my selections in the same color family.


Here is a close up of the back of the album.  After painting the burlap, I stamped it with a script stamp from Hero Arts.  The stamping offers another degree of depth to the cover.


Here is a video walk through if you would like a little more detail on each page.


I can't wait to see your Easter projects.
 
Thanks for stopping in today.
Tonya A. Gibbs
 
Read More »
I love seeing things you create using my tutorials or project shares. Please use the following handles/tags in social media to insure that I get to see your creations:

INSTAGRAM: #FollowingTonyaGibbs    |   TWITTER:  @gibbst    #FollowingTonyaGibbs   |      FACEBOOK:Tag  Tonya Gibbs   #FollowingTonyaGibbs

I Design for:

    http://www.yvonneblair.com

Guest Artist: Click icon to see post!

http://www.teresacollinsdesignteam.blogspot.com/2013/10/family-stories-layout-and-video-by.html#comment-form   http://canvascorp.com/2013/03/21/easter-treat-baskets/


Past Teams

http://www.die-namites.com/     marion