Hi everyone It is my day over on Yvonne Blair's blog today, and I'm sharing with you a project that I've created using her fabulous products designed with Impression Obsession and Paplin.
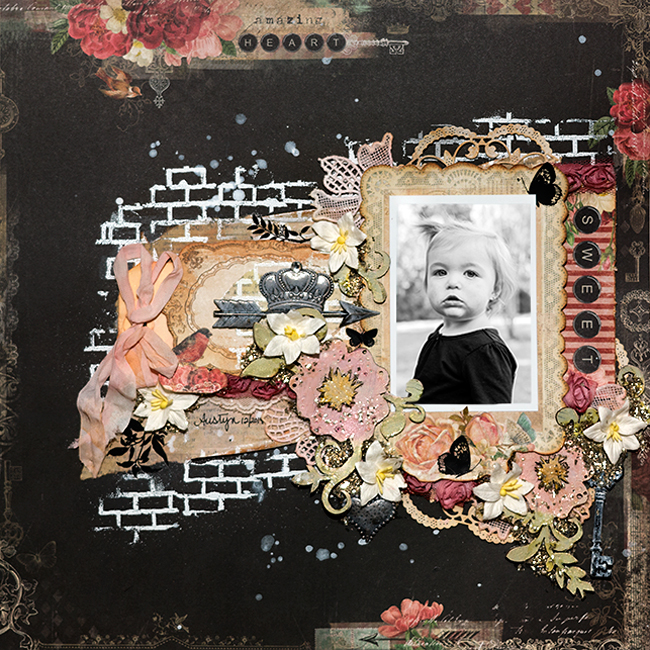
Hi everyone, I hope you are having a great day! I have a super cute mixed media layout to share with you today using lots of YUMMY Blue Fern Studios' products. For today's layout I selected these beautiful papers from the new Love Story Collection.
Amazing Heart
Calling Cards
I don't think beautiful begins to describe these papers. They are a really nice heavy stock and hold up well to wet mediums, and heavy embellishments. The patterns are so romantic. I used the papers today to scrapbook a photo of my sweet niece Austyn.
I selected these lovely Paisley & Vine Coordinating Chipboard pieces from Blue Fern Studios to play center stage in my embellishment cluster.
As you can see from the photo below they work fantastic in your embellishment clusters to add texture, and weight without adding a lot of bulk.
I covered them in Crackle Texture Paste. Then painted them with Lindy's Stamp Gang Rudolph's Nose Red, and Edelweiss Moss Green. Since the paste has a bit of silicone it did resist the pigment. If you do this technique, remember to choose dark colors. The center of the flowers were removed and the holes were filled with hot glue to keep it elevated. This gives my flowers more depth. Then I used a Wink of Stella Gold Glitter pen to give them more pop and a hint of sparkle. The entire piece was also distress with Tim Holtz' Tea Die Distress Ink to make them ore vintage looking, and bring out the crackle.
For added texture around the layout, I used white embossing powder and the brick patterned stamp from Blue Fern Studios' Autumn Anthology Line - Essentials Texture. The stamping offers a great foundation for my embellishment cluster and framing.
For the embellishment clusters, I tucked in pieces of lace, lace applique flowers, organza roses, and mulberry lilies. I also used a few Tim Holtz remnant rubs to add a few butterflies. These black elements help to bring the black from the background up into the foreground, and help ground the elements. Every good embellishment cluster needs a little metal. So I mimicked the patterned paper and added an arrow, crown, heart and key. The arrow helps to draw your eye back to the photo. Since all these pieces were different finishes, I added gesso to them to help them look cohesive. To finish off the layout I created a mixture of Glossy Accents, silver German glass glitter, and clear beads then tucked it into the shadows, and odd transitional areas around the base of the layout. This offers a sophisticated sparkle.
Here is a video showing you the step by step process
I think this is one of my all time favorite layouts. I absolutely adore this paper collection. You will probably see me use it quite a bit! I love how my photo just pops against the softer colors. The Layout has lots of details, but is not over done!
Thank you for stopping in today. I hope you have a learned a few new techniques.
Tonya
Supplies:
Blue Fern Studios - Love Story - 12 x 12 paper Amazing Heart
Blue Fern Studios - Love Story - 12 x 12 paper Calling Cards
Blue Fern Studios - Coordinating Chipboard - Paisley & Vine
Blue Fern Studios - Autumn Anthology - Essentials Texture Stamps
Ranger Ink - White Embossing Powder
Ranger Ink - Tim Holtz - Distress Ink - Tea Dye
Ranger Ink - Tim Holtz - Glossy Accents
Ranger Ink - #10 Manila Tag
Tim Holtz - Idea-ology - Adornments - Arrows
Tim Holtz - Idea-ology - Adornments - Heart & Crown
Tim Holtz - Idea-ology - Remnant Rubs - Botanical
Lindy's Stamp Gang - Starburst Spray - Rudolph's Nose Red
Lindy's Stamp Gang - Starburst Spray - Edelweiss Moss Green
Lindy's Stamp Gang - Limor Webber Designs - Tres Chic - Chateau Rose
Lindy's Stamp Gang - Limor Webber Designs - Tres Chic - Café au Lait
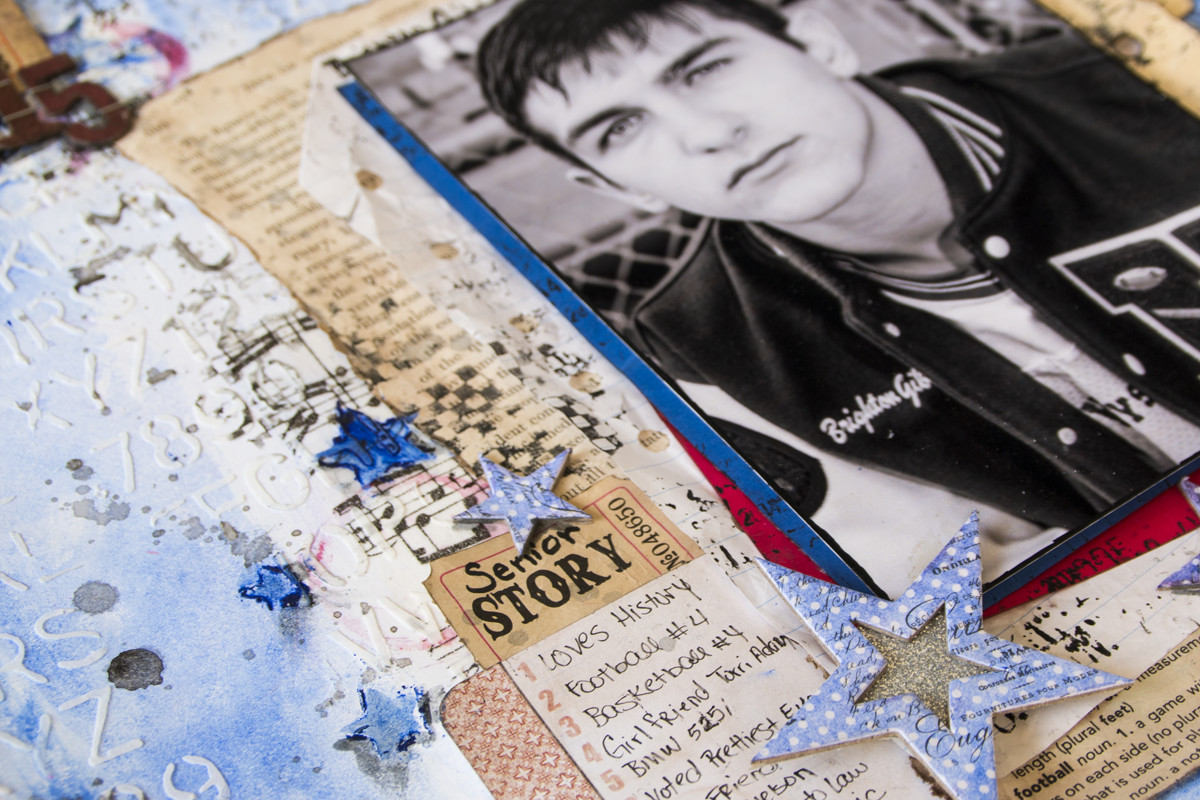
Happy fall everyone! I've been away for a while - have you missed me? This time of year is a MESS in my world. Just busy busy with lots going on in my personal life. Today, with the kids back in a school, and lots of "sports" photos being taken, I thought I would share with you a masculine layout to inspire you to scrap those teen school photos. My Son graduated last year, and the photo taken here, was one we used in his senior announcement.
I gathered up lots of Faber-Castell Design Memory Craft® to create a colorful background for my black and white photo. I just love all the texture and grunge.
What teen doesn't have music blaring 24/7? So I used Gel Medium to add music tissue paper to the background. The Boysenberry Gelatos® was the perfect blue to add color to my white card stock and represent his school colors of red and blue. Once it was dry, I applied Whipped Spackle through the School House Stencil from Tim Holtz. This gave me some subtle texture. For my journal area, I add a list of Brighton's top 10 details from his Senior year.
I also used the Boysenberry Gelatos® and the Tim Holtz Stars Stencil to add a few grungy stars to my background. I created a wash with the Double Scoops® Red Cherry® and used a bottle to add a few circles in areas around the background. For more texture, I used my Stamper's Big Brush Pen in Black as a stamping ink with some grungy texture stamps from Tim Holtz.
I also gathered a few items that I thought would set the tone for a "school" themed layout. Since my Son is a HUGE lover of all things historical, I figured a page from the Life of Abraham Lincoln would make the perfect photo mat. I also pulled a few mini file folders, notebook paper, grid paper, dictionary paper with the football definition visible to add to my photo mat layers. If your son is anything like mine, his homework always looked like it had been stuffed in the bottom of a back pack for weeks. To achieve this look, a crumpled up the papers and used the Nougat Stamper's Big Brush Artist pen to distress the edges. I also wanted the entire piece to have a messy handwritten look, so I hand wrote my journaling and titles. To finish off the embellishment clusters, I used tickets and charms for my ephemera. Heidi Swapp's chipboard stars added depth, and show he is my "All-Star".
Here is a quick video showing how I created the layout.
Thanks for stopping in today, I hope you have a great weekend.
WOW it seems like forever since I was here on my sweet blog. I'm sorry for my absence. I have been taking a much needed vacation/road trip and taking my Son to college. While doing all this traveling, I decided to pack a little kit for doing a little watercoloring in the card.
I pre-cut some card panels to 3 3/4" x 5" this will allow for a double mat.
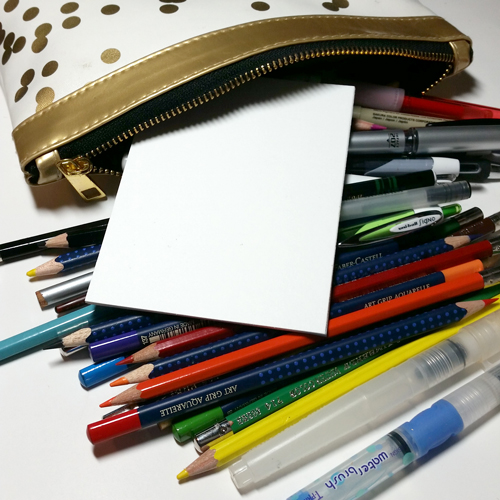
Then I took along a few watercolor pencils, a hard surface to write on (a book works great), some doodle pens, 6 inch ruler and a few waterbrushes. Doodling really does help the time pass on these long trips, and when you are done, you have a beautiful card front!
Here is the front and inside of the card.
Here is a process video showing how I created them, and sharing with you this simple technique for doodling out a beautiful card.
Doesn't that look super simple? I know you can do it. If you try it out, please be sure to share it with me. #FollowingTonyaGibbs in Twitter and Instagram so that I can find them, or tag me in Facebook. I love seeing what you create!
DON'T FORGET - Our next Ustream is set for Monday, September 7, at 8:30 p.m. EST
Thanks for stopping in today,
Tonya
General Supplies
Watercolor Pencils - I used Artist General Kimberly Pencils and Faber-Castell Design Memory Craft®
Thank you to everyone who came out to watch the Ustream live last night. We had a lot of fun creating this beautiful tag.
In this show, I shared with you the technique that I used to create the roses seen in the background of the tag. Isn't this just scrumptious all by itself?
Here you can really see the details in the painted flowers. I decided to decorate the tag with a scene using Prima's Parlor Resin pieces. you can see here how the flowers in the scene match the ones in the background, offering a beautiful 3D effect.
Don't forget to use those scraps when creating floral clusters. This tag project has a few remnants that I found in my stash. A small piece of lace is used as the screen in the window, a small stem from a floral spray, half a piece of metal filigree is just enough to tuck into the edge of my spray, and the butterfly was actually punched from the branding strip of apiece of wood paper packaging.
Adding a little glass glitter mixed with glossy accents, really helps to add sparkle to the shadows, and bridges the gaps between the embellishment cluster elements.
Want to see how I created this beautiful tag from start to finish. Here is the video recordings from last night's show. I was interrupted briefly by a lighting storm, so the show is broken up into two videos.
I really love all the details on this tag. This painting technique would make an amazing background on all of your projects. See if you can create one similar and share it with me in your social media outlets by adding #FollowingTonyaGibbs, or tag me on Facebook. I love to see what you create!
Thanks for stopping in today,
Tonya Gibbs
Supplies List:
Vintage text paper in a variety of styles
Faber-Castell Design Memory Craft® - Gesso
Faber-Castell Design Memory Craft® - Gel Medium
Faber-Castell Design Memory Craft® - Stamper's Big Brush Artist Pens - May Green #170
Faber-Castell Design Memory Craft® - Stamper's Big Brush Artist Pens - Scarlet Red #118
Faber-Castell Design Memory Craft® - Stamper's Big Brush Artist Pens - Caput Mortuum #169
Lindy's Stamp Gang - Glitz Spritz - Blazing Sun
Lindy's Stamp Gang - Starburst Spray - Cocklebells Coral
Ranger Ink - Glossy Accents
Ranger Ink - Archival Ink - Jet Black
Liquitex Iridescent Bright Gold Ink
Glitz Roller Stamp - Wavy Chevron
German Glass Glitter - Green
Plaid - Apple Barrel Paint - Jack-O-Lantern
Plaid - Apple Barrel Paint - Kiwi
Plaid - Apple Barrel Paint - Bimini Blue
Plaid - Apple Barrel Paint - Yellow Flame
Plaid - Apple Barrel Paint - Pink Parfait
Prima - Resin - Parlor
Prima - Mini Roses
Prima - Lace
Floral Lace Applique
Metal Filigree
Martha Stewart - Butterfly Punch
Sprig of Vine Floral Stem
Gold Button
Tim Holtz- Idea-o-logy - Philosphy token
Tim Holtz - Idea-o-logy - Loop Pin
We Are Memory Keepers - Large Eyelet - White
We Are Memory Keepers - Crop-a-dile
Sizzix - Tim Holtz - Alterations Bookplate and Tag Die
Welcome back for the last day of #LoveSummerArt. What a fun weekend, with TONS of inspiration. I have had so much fun getting to know so many new artists! The event runs from July 17 - 20th. But the content will forever be there on YouTube. To access it all you have to do is type #LoveSummerArt in your YouTube search bar.
This is a super fun way for you to discover new artists on YouTube, and be inspired by their work. All genres of art are participating - Exciting Right!
Today, I have a process video showing you how I created this amazing Ocean scene in my art journal.
Here is a glimpse at the background before I added all the layers.
To create this look I started by adding Gesso to the background. Then with a baby wipe, I added a dark blue acrylic paint at the bottom, then filled in with the lighter blue. The background was very blotchy, but that was the look I needed. When you look through the turquoise colors of the ocean, the landscape of the ocean floor is always looks blotchy. To give a bit of a green tone to the entire thing, I lightly spritzed it with Lindy's Stamp Gang Shabby Tuxline Teal, and Tiffany's Blue. The shimmer in the sprays give the background sparkle like wet water, and the greens in the sprays offer the perfect underwater effect.
For the background areas of my coral, I used a dry sea sponge to pick up various colors of warm toned acrylic paint rotating the sponge to give different effects. You can see the technique in the video tutorial.
Look at my adorable "Doodle Fish". Isn't he just divine? I started by sketching a fish outline shape on a piece of cardstock. Then doodled some lines and dots until he looked like a fish. I used Elmer's Paint Pens in Red, Blue, White, and black to create the doodles on the fish.
For the coral, I used black cardstock as my base. This offers the depth and shadows of my coral. Then using the same sponge techniques, I added various colors to give the scene interest.
I also included the Die-namites Leafy Branch die to create a different texture in my coral. I used my Pink Paislee Nantucket Stamp Set to stamp out the starfish and shells. Then for added sparkle I scattered some Gold Mica Flakes around the bottom.
I think this is one of my favorite pieces I've ever done. This could easily be redone on a canvas. Now that I know "how" to make it look right. On a canvas I could add real shells and coral pieces too. Stay tuned - that just might happen (LOL).
Thank you so much for hanging out with me this past weekend. This venture was super fun!
Don't forget August 3 at 8:30 p.m. is our next Ustream class.
Tonya
Supplies:
Daler Rowney Acrylic Paints - Scarlet, Deep Yellow, Medium Yellow, Violet, Light Blue, Dark Blue, Light Green
Lindy's Stamp Gang - Starburst Sprays - Shabby Tuxline Teal
Lindy's Stamp Gang - starburst Sprays - Tiffany's Blue
Lindy's Stamp Gang - Starburst Sprays - Cocklebells Coral
Lindy's Stamp Gang - Starburst Sprays - Glory Of The Seas Gold
Faber-Castell Design Memory Craft® - Stamper's Big Brush Artist Pens - Green Gold #268 (starfish stamp)
Faber-Castell Design Memory Craft® - Stamper's Big Brush Artist Pens - Medium Flesh #131 (shell stamp)
Faber-Castell Design Memory Craft® - Gesso
Faber-Castell Design Memory Craft® - Gel Medium
Elmer's - Opaque Paint Pens - White, Red, Black, and Blue
EK Success - Zig Writer - Pure Blue
Prima Marketing - Finnabair Art Ingredients - Mica Flakes - Gold Leaf
Hey bloggers - welcome to day 3 of the #LoveSummerArt collaborative project with YouTube Artists around the WORLD! The event runs from July 17 - 20th. To find these artist, just type #LoveSummerArt in your YouTube search bar.
This is a super fun way for you to discover new artists on YouTube, and be inspired by their work. All genres of art are participating - Exciting Right!
Today I would like to share with you a mixed media card. This design is super simple, and could easily be duplicated to create a colorful set of cards for a gift.
Doesn't this ocean remind you of summer and walking the beach in Flip Flops? I used mediums from Faber-Castell Design Memory Craft® to achieve this look. I'll show you how in the video tutorial below.
This is also a great way to use those Gelli Arts® Gelli Prints® that we have been doing the last few months in our Ustream classes. I used one for die-cutting out the Fancy Flip Flops Die from Die-Versions.Isn't it just adorable as the center piece for my card?
I typed the sentiment in a word processor and cut it into a fish tail banner. The fonts that were used were: KG Only Human Reg (Life is better in ) & SA Cinta Normal (Flip Flops).
Here is a quick process video showing how I created the card.
Don't forget to head over to YouTube and see what other artists are doing with #LoveSummerArt. Check back tomorrow I will have a Mixed Media Canvas to share.
Thanks,
Tonya Gibbs
Save The Date: Our next Ustream is scheduled for August 3, 2015 at 8:30 p.m. EST
Supplies:
Faber-Castell Design Memory Craft® - Glass Bead Glitter Gel
WOW - what a fun class. I know I keep saying that, but we had a full house with lots of new faces tonight. So it was fun meeting you, and I hope you had a great time. Look at all these fantastic prints that we pulled tonight. We had enough time to create 2 cards, but we pulled a dozen or so prints.
I also showed you guys how simple it was to give some interesting color patterns to your die-cuts, while making interesting patterns for your backgrounds.
I think this was one of my favorite prints. I didn't have time in tonight's show to make anything with this, but check back each week this month, and I will create cards from all of these prints and the colored die-cuts from tonight's show.
Here is the recording in case you didn't make it to the show live.
Thank you to everyone who came to watch the show live. I had a great time tonight. I can't wait to start making cards for you this month. Don't forget to check back! Our next Ustream will be August 3, 2015 at 8:30 p.m. EST.
Tonya
Supplies:
Gelli Arts® Gelli® Plate - 8x10
Gelli Arts® Gelli® Plate - 3x5
Cardstock - 110lb White
Cardstock - 80lb Black
Hymnal page
Plaid - Apple Barrel - Bimini Blue
Plaid - Apple Barrel - Pink Parfait
Plaid - Apple Barrel - Kiwi
Plaid - Apple Barrel - Yellow Flame
Sizzix - Tim Holtz - Alterations thinlets Scribble and Splat Die
Hi everyone, today is my day over on Limor Webber's DT blog today, and I have an awesome treat for you. I am going to share a watercolor tutorial from start to finish of this beautiful card with the Stamper's Big Brush Artist Pens by Faber-Castell Design Memory Craft®.
I just love this card! It is so cheerful and bright. Who wouldn't love to get a card like this in the mail? Here are a few close ups of the flower pots. You guys know that a few months ago, I fell in Love with hand lettering. Today's card share shows how I did the inside sentiment for the card.
Hi everyone, all month I've been sharing with you ideas for using your Gelli Arts® Gelli® Plate. I'm having so much playing with my prints. I've made a mini album, a few father's day projects, and today I'm going to share a cute whimsical card idea using those prints we had left over from the June class.
They were all so colorful - I just can't leave them hiding in a drawer! So I decided to cut a few oblong circle shapes, add a few doodles and look at how adorable these cards turned out!
Above is the front of the card, and below is the inside. SO fun - and who wouldn't love to receive one of these. Best part - they are super thin and light weight so you can easily mail them!
My card measurements are: Top Folding A2 Folded 41/4 x 5 1/2 inches.
The white liner and inside card panel are cut to 4 x 5 1/4
The Birds are 3 3/4 x 5
Here is a video tutorial showing you how I created this card.
Few Reminders -
You still have a few more days to get your comments on the other June posts where I used the Gelli® Prints, to be entered in the drawing for the 6x6 Gelli Arts® Gelli® Plate give away. One entry per comment per post. So make sure you are reviewing the all for as many opportunities as possible. Also you must be a subscriber of this blog to be eligible, so if you haven't done so - go ahead and click the subscribe button in the side bar on the right. Entries must be in by Midnight June 28, 2015. I will draw a winner on June 29.
Next - Don't forget our next Ustream is scheduled for July 6, 2015 at 8:30 p.m. EST
Thanks so much for stopping in today, I hope you have enjoyed these cute little birds.
I love seeing things you create using my tutorials or project shares. Please use the following handles/tags in social media to insure that I get to see your creations: