Follow Me...

       
Thanks for stopping by! Don't forget to subscribe!

Sunday, January 26, 2014

Wooden Ticket Tutorial

1
Hi everyone, I hope you are having a wonderful weekend.  Today I want to share these cute wooden embellishments that I created with the Marion Smith Designs stamps and scraps of her paper collections.  They are super simple to make, and very addicting.


Start with the rectangular shape from these Woodsies balsa wood shapes.


Paint all sides of the shape with Gesso.  This coat is to prime the wood.


Glue your scrap paper to the wood with any wet glue.
I used craft glue. Once it is dry, trim around the wooden shape.


Using the largest hole on your Crop-A-Dile cut half the eyelet shape
out of each corner to form the rounded edges of the ticket.


Your ticket should now look like the one below.


Select your favorite stamp from Marion's stamp collections.


Using a permanent ink, stamp the image onto the ticket.


Heat emboss the ticket with Utee, Ultra Thick Embossing Enamel by Ranger, Inc.


You may have to repeat the step a few times to achieve a smooth finish like the image below.


I used a Gold Sharpie to gild the edges of the ticket.


And here is your finished ticket embellishment.  


  Here are some of the others I've made. 


These are light weight, and match your Marion Smith projects perfectly!


This card was created using the Garment District 6x6 paper pad.


Thanks for stopping in today,

Tonya
Read More »

Friday, January 24, 2014

Secret Crush Card by Tonya Gibbs

0
Today I wanted to share with you a card from the Pink Paislee's Secret Crush collection. This collection was so hot last year.  I made several projects with it last year, and just have a few pieces left over.  My goal this year is to purge some of these odds and ends pieces. 
 
The card size is 3.5 inches by 8.5 inches so it fits nicely in a standard #10 envelope.  For my card background I used the Endless Love paper as my background. The layered doilies printed on this paper are "hoard vault" quality, but they must be used!  Then I trimmed a piece of scrap from the Polka Dance paper to make a fish tail banner for the base of my layers.
 
 
I used the hearts from the ephemera pack, tissue tape, and flat back pearls to create a banner at the top.  I think the banner offers a romantic feel to the card. Another Doily, and a few tickets from the ephemera pack were used for my layers, and the cluster was finished off with the Harlow Prima Rose.  I used left over chipboard letters to form the XO that is synonymous Valentine's Day. 
 
 
On the inside, I layered scraps from the papers for my signature area. The list of love words from the paper and the Tim Holtz Typewriter at the bottom finished off the right side of the card.   I love when things stick outside of the margins, and the "be mine" tab from the collection added a bit of interest and is seen when the card is closed.  The sticker at the bottom is from the sticker pack, and offered the perfect final touch.


My goal this year is to share with you ways to "destash" your older collections before they are so dated that you don't want to use them.  A lot of scraps and left overs from this collection were used in this card design.  Even though the collection was released last year, it's color pallet and iconic images make it timeless.
 
Thanks for stopping in today,
 
Tonya


Resources:
Advantus - Tim Holtz - Idea-ology - Tiny Attacher with 100 Tiny Staples
Advantus - Tim Holtz - Idea-ology Collection - Tissue Tape - Sketchbook
Bazzill Basics - Celebrations - 8.5 x 11 Cardstock - Tiny Diamonds Texture - Frosted Silver
FabScraps - Pearls - Bling - Cream
Pink Paislee - Secret Crush Collection - Photo Tabs
Pink Paislee - Secret Crush Collection - Paper Goods
Pink Paislee - Secret Crush Collection - 12 x 12 Double Sided paper - Polka Dance
Pink Paislee - Secret Crush Collection - 12 x 12 Double Sided paper - Endless Love
Pink Paislee - Secret Crush Collection - Photo Tabs
Pink Paislee - Secret Crush Collection - Cardstock Stickers - Elements
Prima - Harlow Collection - Pleated Fabric Flower Embellishments - Eve
Sizzix - Tim Holtz - Alterations Collection - Movers and Shapers Die - Vintage Telephone and Typewriter Set
We R Memory Keepers - Notable Collection - 12 x 12 Textured Cardstock - Gray

Read More »

Friday, January 17, 2014

Love Notes - by Tonya Gibbs

5
Hi everyone, Valentine's day is right around the corner. Today I wanted to share with you a simple technique that will make your cards unique.
 
 
Bubble art -  I saw this technique last year in a Martha Stewart Magazine and wanted to try it immediately, in the magazine article they used paint, but I thought the effect would be better with Glimmer Mists.
 
Here are the steps to create the background
 
Pour bubbles (the kind your kids play with) into a large bowl. 
Fill until the bottom surface is covered. No need to add a lot.

Blow bubbles using a drinking straw
 

Spray your favorite color over the top of the bubbles. I used Tutti Fruity

Gently Lay your card stock over top (water color paper works best).
Don't allow the card to sink to the bottom.

 
Use the paper for your background.  You can dip and re-dip until the desired effect is achieved.

All that is left is to put the background onto your card base, and decorate!

 
Thanks for stopping in today,
 
Tonya Gibbs
Read More »

Tuesday, January 14, 2014

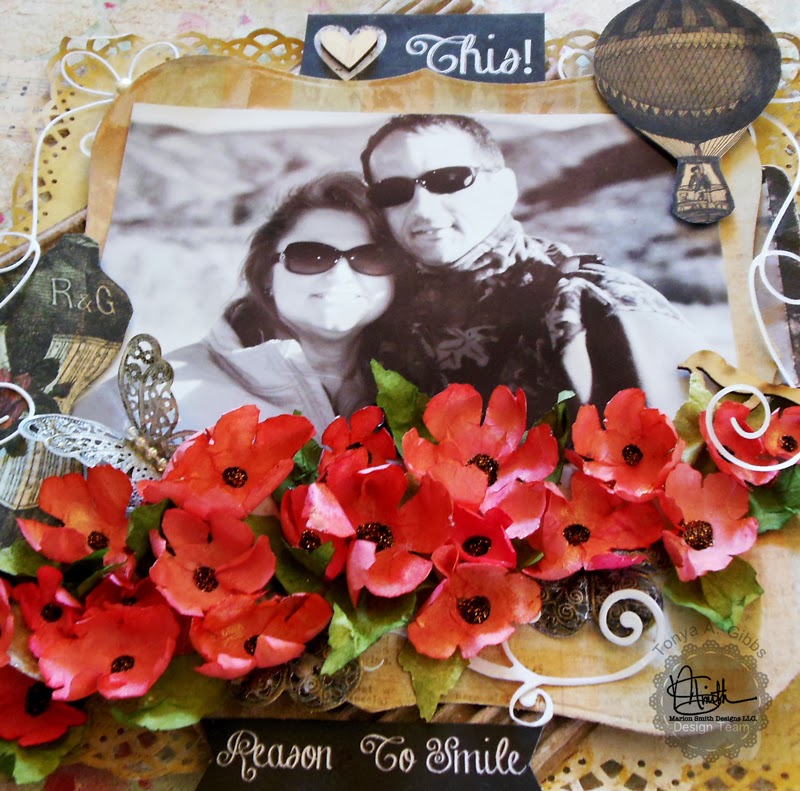
Reasons To Smile Layout by Tonya Gibbs

1
Hi every, today I want to share a post that I created for Marion Smith Designs Creative Team Blog.  The design team will be doing tutorials all month, so please make sure to visit each day for some great new techniques and projects.
 
My project today is a mixed media layout that I created of my husband and I.  
 
 
 I used Marion's Garment District, Nirvana, and Junque & Gems line to create this project.


Here are a few close ups of the background,


Here is a step by step process video with all the details on how this layout came together.


Thanks for stopping in today,

Tonya


Resources for the layout:

Marion Smith Designs - Garment District Fitting Room
Marion Smith Designs - Nirvana Documents
Marion Smith Designs - Nirvana Typograph
Marion Smith Designs - Junque & Gems Filigree flowers
Marion Smith Designs - Junque & Gems  Filigree Butterflies
Bazzill Card stock - Light blue, and caramel
Lindy's Stamp Gang - Moon Shadow Mist - Gossamer Gold
Lindy's Stamp Gang - Starburst Spray -  Edelweiss Moss Green
Lindy's Stamp Gang - Starburst Spray -  Ponderosa Pines Olive
Lindy's Stamp Gang - Starburst Spray -  Glory Of the Seas Gold
Tattered Angels - Glimmer Mist - Tutti Fruity
Tattered Angels - Glimmer Mist - Dried Hydrangea
Tattered Angels - Base Board - Grass
Ranger Ink - Stickles Glitter Glue - Cinnamon
Liquitex - Gesso
Liquitex - Matt Medium
Zutter - Donna Salazar - Corrugated Board - 7 x 7
Prima - Ingvild Bolme - Distressing Tool
Prima - Poppies and Peonies Collection - Donna Downey - Stencils Mask Set - 12 x 12 - Turkish Grunge
Tim Holtz Distress Ink Pads - Antique Linen
Sizzix - Tim Holtz - Alterations Collection - Sizzlits Decorative Strip Die - Tattered Flower Garland
Memory Box - Corner Bow
My Favorite Things Stamp - Flourish wafer die
Mead - Sketch Pad (flower paper)
Studio Calico - Wood Veneer - Hearts and Arrows
Studio Calico - Wood Veneer - Birds
 

Read More »

Monday, January 13, 2014

Introducing the new Junque and Gems by Marion Smith Designs

0
Hi everyone, today I am sharing another sneak peek from CHA 2014 by Marion Smith Designs. Marion's New Junque & Gems line.

 
These are going to be perfect as layers, and on your mixed media, and jewelry projects.  I just love them.  Make sure you ask your local retailers to carry these jewels. 
 
Thanks for stopping in today,
 
Tonya
Read More »

Sunday, January 12, 2014

Introducing Never Grow Up - New Collection from Marion Smith Designs

0
Introducing Never Grow Up by Marion Smith Designs.  This line has playful patterns perfect for spring. 
 
These designs are printed on 12x12 heavy weight cardstock.


This collection is also available in 6x6. You get three sheets of each paper double sided printing.
 
Make sure you ask your local retailers to order these lines for you. 
 
I will have more to share tomorrow, so make sure to stop on in.
 
 
Thanks,
Tonya
Read More »

Saturday, January 11, 2014

Introducing Motley - New Collection from Marion Smith Designs

1
Introducing Motley by Marion Smith Designs.  This line is so romantic and bright, perfect for spring layouts, minis, and cards.  
 
These designs are printed on 12x12 heavy weight cardstock.
 
Marion Smith Designs Motley Collection Released 2014 Winter CHA
 
 
These designs are also available in 6x6. You get three sheets of each paper double sided printing.


Make sure you ask your local retailers to order these lines for you. 
 
I will have more to share tomorrow, so make sure to stop on in.
 
 
Thanks,
Tonya

Read More »

Friday, January 10, 2014

2014 Stamps by Marion Smith Designs

1
Hi everyone I'm here today with another exciting share from Marion Smith Designs.   Here is a sneak peek at her  2014 Stamp collection she is releasing at Art Venture/CHA.  

First up Garden Rose:   This is an add on to the rose in her Curious & Nirvana lines she released last fall.  You guys know how much I love those, so these is definitely going into the must have!


For all you mixed media people, you are going to love these next few texture sets.  These are going to be so much fun to play with. 


 I will have additional peeks tomorrow.  So be sure to stop by.


Thanks so much for stopping in,
Tonya 

 
Read More »

Play Time Layout by Tonya Gibbs

0
Hi everyone.  Over the holidays I was able to spend some time with my dies, punches, and Silhouette and clean out a lot of my scrap piles.
 

I cut everything down to what I call "layering pieces".  I love to use my stamps on these little pieces too.  So while I'm at it, I start stamping as well.    I find that when I do this I use the supplies I've invested in more. When I'm busy with a project, I don't want to drag out the dies, and stamps.  This way I'm sitting in front of the TV and completing a mindless task with no agenda and no deadline!

I store all these individual pieces in a container by Iris.  Ephemera from used up collections are also stored here.


I have found that when I leave scraps un-managed they seem to take over my space.  I try to use them the minute I'm done with a project, but sometimes this just doesn't work out.  So I have a small container next to my cutting station.  When the container starts over flowing it is time to start cutting.

Today I want to share with you a layout I decided to make last night, only pulling out the dies and pieces that I have created.  


When you take random objects and sort them by "color"  they all seem to work together.  I love the eclectic feel of this layout.  I love the grungy ADHD randomness of the entire thing. Because the day that I am capturing was just that type of day.   A little coloring, A little punching, A little stamping. 

 
My favorite part of projects, is that I'm not enslaved by a particular collection or set of supplies.  I have used my scraps and stamps to make something unique.    
 
I encourage you this year, to free yourself from all the left over collections and scraps around your studio, and see what you can make!  

Thanks for stopping in today,

Tonya
Read More »

Thursday, January 9, 2014

Bloom Impressions Tool by Marion Smith Designs

5

I'm super excited today to share with you this new tool releasing at CHA from Marion Smith Designs.  As you know I love making my own flowers, and this tool is on the "Must Have List for 2014".    You can make beautiful flowers like below in just a few seconds.  No more tedious work with a stylus.  This tool does everything in just a few seconds.


Marion didn't just stop with the tool.  She is also introducing some new thin metal dies compatible with all die cutting machines.   These dies are designed to work perfectly with her new tool.


She is also introducing pearlized and glittered stamens for flower centers.  They can easily be colored with inks, markers, and paint.


Here is a video with Marion demoing the tool.  


Making flowers with your scraps is going to be so easy with these new tools.   I can't wait to get my hands on one and play! 
 
Stay tuned I will have more Sneak Peeks from Marion Smith Designs tomorrow.
Read More »
I love seeing things you create using my tutorials or project shares. Please use the following handles/tags in social media to insure that I get to see your creations:

INSTAGRAM: #FollowingTonyaGibbs    |   TWITTER:  @gibbst    #FollowingTonyaGibbs   |      FACEBOOK:Tag  Tonya Gibbs   #FollowingTonyaGibbs

I Design for:

    http://www.yvonneblair.com

Guest Artist: Click icon to see post!

http://www.teresacollinsdesignteam.blogspot.com/2013/10/family-stories-layout-and-video-by.html#comment-form   http://canvascorp.com/2013/03/21/easter-treat-baskets/


Past Teams

http://www.die-namites.com/     marion