Follow Me...

       
Thanks for stopping by! Don't forget to subscribe!

Wednesday, October 30, 2013

Teresa Collin's Guest Designer

0

I'm so excited to announce that I was asked to be a guest designer for the Teresa Collins' Design team blog. Man has it been difficult to keep this news under my hat for the past month. 

Please go over to the blog to get more information about this layout I created. There is also a process video available... here is the link to the post:

http://www.teresacollinsdesignteam.blogspot.com/2013/10/family-stories-layout-and-video-by.html

If you are visiting my blog from Teresa'  WELCOME to my house!  You can find a fun little story in the right bar on how I got the nick name PsychoMom. 


Here are a few other layouts that I've done in the past few months using Teresa's new releases.  Each of these layouts have process videos on the blog post associated with them. Links to their respective pages are in the photo caption. 

Thank you so much for this honor to be a guest designer for the day.  I hope you have enjoyed this post, and look forward to your comments.  Don't forget to subscribe if you are visiting for the first time!

Thanks for stopping in today,
Tonya

Read More »

Saturday, October 26, 2013

Halloween Treat Bags by Tonya Gibbs

0
Halloween will be here in just a few days.  I know a lot of people love to make "special" treats for some of their friends and loved ones.

Today I wanted to share with you a little treat bag I created using the scraps from my last Ustream class.   I chose the papers from Marion Smith Designs Nirvana  "Up and Away" paper.  Almost everything used to make the bag and the decorations were from the scrap pile!


The bag was cut from the Tim Holtz "In the Bag" Die.  Then I used a spellbinders square die to cut a window from one of the panels.   By using scraps each bag will be unique.  Here is a process video on how I made them.


Thanks for stopping in today, and happy haunting!
 
Tonya A. Gibbs
Read More »

Friday, October 25, 2013

Halloween Home Decor

0
Marion issued us a challenge this month to create a Halloween home décor item using paper from her collections. 
 
I decided to use her Mad Tea Party Line for my project, and a cut file from the Silhouette Store.  The original cut file was designed for a candy/treat container.  I decided to add a battery operated tea light inside the hat to make it a luminary. 

Halloween Altered Spool Home Decor  by Tonya A. Gibbs for Marion Smith Designs.  #MarionSmithDesigns #MadTeaParty #TimHoltz #AlteredArt #Halloween #HomeDecor #TonyaGibbs #Psychomomscrapbooks
 
I recycled a plastic lace spool for the stand, and covered it with black lace.  Scraps of paper from Marion's other papers were used to make rolled roses. I sprayed them with Perfect Peach and Pink Taffy Glimmer Mists. Once they were dry, I added glitter nail polish to make them sparkle.   Since the clock in the patterned paper was set to almost midnight,  I decided to make a banner and title it "The Witching Hour". The font used on the banner was Dilana Experiment.  Clear glitter nail polish offered an iridescent effect to the little black crows.


The grass is actually white yarn that I stained with Forest Moss Distress Stains, then I added the clear glitter nail polish in small areas for added texture and shine.   I poured clear and pink glitter nail polish inside a small bottle  to create a sparkly potion.  I love that the nail polish didn't mix. 
 
It was fun creating this luminary, and thought it would be great to fill up a small shelf.
 
Thanks for stopping in today, if you haven't already subbed - please do so!
 
Tonya Gibbs
Read More »

Friday, October 18, 2013

Two Cards - Same Design by Tonya Gibbs

0
I've shared many times that I love to make cards from my scraps.  To make this process move quicker, I find it best to design the first card so that it is easily duplicated.  As you work through your scraps, you will find the cards take on a unique look by using different patterns, and sentiments. Many times I wait until I need the card to add the sentiment.

These two cards are great examples.  The hard part was coming up with the design, after that the workflow becomes easier.


I've prepared video for making the second card.


I hope I have inspired you to use up those scraps.  As I stated in the video, I find it helpful to use them immediately.  You can never have too many cards laying around.
 
Thanks for stopping in today,
 
Tonya
 

Read More »

Friday, October 11, 2013

Football Layout by Tonya Gibbs

0
From the first of August until sometime mid December my feet are planted in the grass of one football field after antoher 3 - 4 times a week.  I walk the field taking photos of children between the ages of 6 - 18, and I LOVE IT! This year my Nephew, Cooper, played his first down of tackle football the age of six, and you bet, Aunt Tonya was right there walking the field. 

Photos of my Nephew, Cooper, during his first football game.  Photos by Tonya A. Gibbs.

Today,  I want to give you five prompts for creating a layout. Hopefully these prompts will give you a place to start next time Mojo goes on vacation.  For today's layout, I'm going to use the photos from the above mentioned photo shoot.

Prompt 1 - Select papers that do not fit the theme or color pallet of your photos. 

My photos are clearly football themed, and predominately red, white, and blue. Themed papers are obvious selections, and I'm looking for unexpected. I don't need a football sticker to know this is a football layout. Also, if I chose the colors in the photo then my photos would compete with my background. Since I want the photos to pop, I've selected a neutral color palett of black, taupe, and gold. These colors are neutral which means they go with ANYTHING ANYWHERE!


Teresa Collins Memorabilia Line released summer 2013


Teresa Collins' Memorabilia line was perfect. The colors are neutral and the theme is centered around a family story, rather than a specific event.  The black chalkboard papers give great contrast against my bright sunny day photos.  If your photos are dark - you may want to consider lighter colors for your background.

Prompt 2  - Place Embellishment clusters directly on your photos. 


This technique will help to anchor the photo to the page, and also give it depth and interest.   This is  a great technique for photos that have a lot of negative space or distracting elements in the background.  

Prompt 3 -  Layer Sequins 


Sequins have become a super trendy embellishment.  I'm noticing that some are metallic and some are flat, they come in different shapes, sizes, and colors.  The sequins in this collection are rather large, and I simply added a wood veneer star from Studio Calico to the centers. Love how these made a cute embellishment, without taking away from my photos.
Technique Tip: Hot glue will melt most sequins.  This is how I placed mine...I placed the glue on the layout in a dot formation. Let it cool for a second until it is more than 50% solid, then add gently place the sequin ontop of the glue without pressing it too hard.  This makes the hot glue more like a pop dot and elevates the sequin off the page. 
Prompt 4 - Use Clear Glitter Nail Polish 


My wood veneers needed a little pop, but I wanted them to stay neutral.  So I reached for clear  gold glitter nail polish and painted them.  When selecting my nail polish - I go for the cheapest with the chunky glitter pieces.  This will give you a nice bokeh look when applied.  You may need several coats to achieve the look you're after, but I love the effect! 

Prompt 5 - Use Ribbon in an unusual way


The ribbon on my page is the only thing that has color found in the photos.  I did this so that your eye finds a base, or weight to the bottom of the photos.  I love how it is just waving across the layout.  You expect to see ribbon as banners, or tied neatly across an element, but squishing it up gives it a fresh look and provides movement and depth. 


and ...drum roll please ...  this brings me to my completed layout.


Masculine Sports layout by Tonya A. Gibbs using Teresa Collins Memorabilia line.  #12x12 #Scrapbooking #TonyaGibbs #Psychomoms #Layout


I know masculine layouts can be challenging.  So, I hope you have been inspired next time Mojo goes away on vacation. 


Thanks for stopping in today,

Tonya A. Gibbs
http://www.psychomomscrapbooks.blogspot.com


Resources:
Teresa Collins - Memorabilia Collection - 6x6 Paper Pad
Teresa Collins - Memorabilia Collection - 12x12 Double Sided Paper - Chalkboard
Teresa Collins - Memorabilia Collection - 12x12 Die Cut Paper
Teresa Collins - Memorabilia Collection - 12x12 Cardstock Stickers
Teresa Collins - Memorabilia Collection - Border Strips with Glitter Accents
Teresa Collins - Memorabilia Collection - Chipboard Buttons
Teresa Collins - Memorabilia Collection - Decorative Brads
Teresa Collins - Memorabilia Collection - Envelopes
Teresa Collins - Memorabilia Collection - Sequins
Studio Calico - Classic Calico Vol. 2 - Wood Veneer Shapes - Tiny Stars
Studio Calico - Yearbook Collection - Wood Veneer Pieces - Speech Bubbles


Read More »

Monday, October 7, 2013

Ustream Tonight - Oct. 7, 8:30 p.m. EST

0
Join me and Flamingo Scraps Live Tonight at 8:30 p.m. EST.

I will be creating this mixed media canvas that was featured on Marion Smith Designs' blog last Saturday. Class begins at 8:30 p.m. est at http://www.ustream.tv/channel/gibbst. Join the crowd early!

We will do our best to record the class, but we are at the mercy of Ustream.


Supplies needed to follow along are these are all optional:
  • *Tim Holtz - Tattered Leaves Die, Tattered Floral Die, Mini Tattered Floral Die (These Prima Daisies in the store are a perfect substitution if you don't want to make your own flowers.
  • Pumpkin shape (I found this one on Silhouette) but you could find a shape on the Internet and trace it  onto you patterned paper. The Grand Caliber Ovals would work too.
  • 20mm Rhinestones clear
  • Copic E29 (or dark brown permanent marker or alcohol ink)
  • *Ranger:  Matt Medium, Distress Stain Forest Green, Distress Stain Spiced Marmalade, Distress Paint Antique Bronze,  Distress Ink Vintage Photo.
  • Burlap
  • Lindy's Stamp Gang - Tibation Poppy Seed Starburst spray, Edelweiss Moss Green Starburst Spary, Creme Brulee Starburst Spray
  • Vine
  • Miscellaneous Metal Filigree
  • Skeleton Leaves
  • Stick Pin
  • Floral Stamp
  • Clear Glitter Nail Polish
  • Book Page/Music Page
  • Twine
  • 10x10 canvas
  • Perminant Brown Ink Pad
 *Can be special ordered by Flamingo Scraps. 

Hope to see you there!

Thanks,
Tonya


Read More »

Saturday, October 5, 2013

Nirvana Pumpkin Canvas by Tonya Gibbs

4
Hi everyone, today on Marion's Create Team blog I shared a 10x10 mixed media canvas that I created using Marion's Nirvana line.


I used the b-side of Up And Away to cut out my pumpkins and sunflowers. The paper had a Gothic feel with the typography and lace accent, making it perfect for a Halloween decor.
 
 
For the pumpkin I cut a simple pumpkin shape out 3 times and used an oval die to separate the sections of the pumpkin.  I used really thick fun foam as my pop up dots to keep them dimensional.   To color the pumpkin, I used Tim Holtz' Orange Marmalade Distress Stain, combined with the Metallic Bronze Distress paint.  Then  I used Vintage Photo Distress ink to darken the shadowed edges to accent the 3D curves. 
 
I wanted the drama to be in the pumpkin and the spray, so I kept my background super simple.  I used the Lindy's Stamp Gang Starburst sprays in Tibetan Poppy Teal for the sky and Edelweiss Moss Green for the ground.  I used water to smooth out the ombre effect and help the mediums blend.  I then used a floral stamp in the background with brown archival ink to give a little interest to the empty space.  I splattered some of the metallic bronze paint around in spots.  Then splattered clear glitter nail polish in spots to give the look of stars, and finished it off with some torn book pages.  


For the spray at the bottom,  I used scraps of Nirvana paper I had left over from the pumpkins to cut out the daisy shapes with the Tim Holtz Tattered Florals Die. For contrast against the pumpkin, I decided to leave them their natural color adding a small amount of vintage photo distress ink for depth.  For the daisy centers I used a clear rhinestone that I painted with my Copic E29. To finish it off, I added some metal pieces for sparkle, burlap for texture, and a few sprays of berries for depth.
 
I love that this canvas fits the Halloween / Harvest theme and can hang in my home during the entire fall season.
 
The Creative Team will be creating posts daily that will inspire you to be creative throughout the fall.  Please go over and check it out and don't forget to subscribe.
 
Thanks for stopping in today,
 
Tonya Gibbs
 

Read More »

Friday, October 4, 2013

Elvis Canvas by Tonya Gibbs

0
My sister's birthday was this past weekend, and I decided to make her a canvas featuring her cute little Elvis basset hound for her birthday (OK - truthfully there has been some shamelessly begging for a canvas for a while! Lots of hints dropped on Facebook, bantering and teasing.) So that means it was the perfect gift, right? 

Elvis loves to ride around in his little wagon. My sister decorated it all up for the 4th of July parade, and he looks like a king sitting on his thrown. (Fitting for his name ::WINK::) 


Her home is decorated Americana, so I thought Canvas Corp's denim, and 4th of July product lines were perfect for this project! I used Canvas Corp's Denim 12x12 canvas for my base, and the 4th of July Words On White for the rosettes. The Flag and US Constitution were taken from the Freedom Sampler paper.  I accented the sides with the Red Jute Twine from Canvas Corp. 


The hearts were cut from the Sizzix Primitive Heart die, and then Tiny wooden tags that spell out his name were added as the title. 

I know the 4th has come and gone, but it is never too late to scrap those memories.

Thanks for stopping in today, I hope you guys have an awesome weekend.

Tonya


Read More »

Friday, September 27, 2013

Take Flight Layout - Happy Birthday Brittany!

1
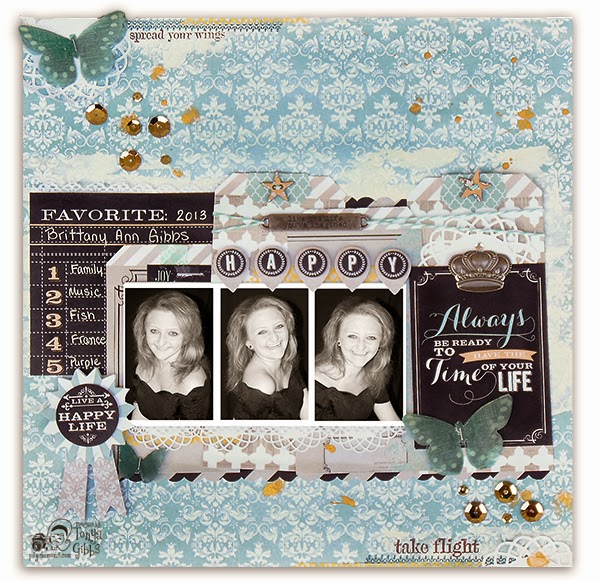
Today is my daughter, Brittany's 20th Birthday.   I'm so proud of her.  She has blossomed into such a beautiful, caring, and happy young woman.   When she enters the room you never know what to expect. She could speak to you in French, or just start singing - you just never know.  I wanted to showcase her fun spirit on a layout this year for her birthday. Teresa Collins' Memorabilia line is so elegant that I thought it would make the perfect backdrop for my formal black and white photos.  During this photo session she was twirling around and singing to me.  It was such a fun day!


The note cards in this line are pefect!  This one says "Always be Ready To Have the Time of Your Life."  This just seemed to be the perfect advice to give a 20 year old.  The only thing missing is "and take lots of photos!"     I wanted to add a little glitz to the layout - so I used the gold sequins from the collection, along with splatters of gold ink from Liquitex.


Here is a process video of me putting the layout together...

I used the Stamps from Teresa's Sweet Afternoon collection as additional accents. I loved the saying on the stamp set. Spread Your Wings, Take Flight. I felt that it really conveys the thoughts a mother has for her 20 year old, and the butterfly gave the perfect touch. I stamped it on vellum and layered two on top of each other, so that they have depth.
 
Thanks for stopping in today,
 
Tonya Gibbs
 
Resources for this layout:
  • Teresa Collins - Memorabilia Collection - 12 x 12 Double Sided Paper - Quotes
  • Teresa Collins - Memorabilia Collection - 12 x 12 Double Sided Paper - Frames
  • Teresa Collins - Memorabilia Collection - 6 x 6 Paper
  • Teresa Collins - Memorabilia Collection - Layered Stickers
  • Teresa Collins - Memorabilia Collection - Sequins
  • Teresa Collins - Sweet Afternoon Collection - Stamps
  • Liquitex - Iridescent Bright Gold Ink
  • Color Box - SurfaceZ Ink - Caribbean
  • Color Box - SurfaceZ Ink - Chocolate
  • EK Success Labels Punch
  • We R Memory Keepers Angel Punch
  • We R Memory Keepers Crop-a-dile
  • Twinery - Aqua Twine
  • Idea-ology - Tim Holtz - Word Plate
  • Idea-ology - Tim Holtz - Crown
  • Idea-ology - Tim Holtz - Tiny Attacher
  • Velum
  • My Favorite Things Stamps - Die-namics First Place Award Ribbon
  • Lace
Read More »

Friday, September 20, 2013

First Birthday Layout - Tonya Gibbs

0
I'm loving the chalk board trend in scrapbooking papers these days.  But I think my favorite one from summer CHA was the Teresa Collins Designs Memorabilia line.  I had to have it all the second that I saw it!  I love that the secondary colors are yellows, and aquas, the embellies are filled with awesome typography, and I'm totally in love with all those flags! 

Today I wanted to share with you a layout that created of my nephew Gage's first birthday party with this collection.


Layout by Tonya A. Gibbs  using Teresa Collins Designs Memorabilia Collection.  #Layout #Scrapbooking #TeresaCollins #Memorabilia #Birthday #TonyaGibbs #Psychomomscrapbooks
 
 
Here is a process video showing how I made the layout.


Thanks for stopping in today,
 
Tonya A. Gibbs
 
Resources for this layout:
  • Teresa Collins - Memorabilia Collection - 12 x 12 Double Sided Paper - Snippets
  • Teresa Collins - Memorabilia Collection - 12 x 12 Double Sided Paper - Recorded
  • Teresa Collins - Memorabilia Collection - 6 x 6 Paper Pad
  • Teresa Collins - Memorabilia Collection - 12 x 12 Die Cut Paper
  • Teresa Collins - Memorabilia Collection - Envelopes
  • Teresa Collins - Memorabilia Collection - Layered Stickers
  • Teresa Collins - Memorabilia Collection - Sequins
  • Prima - Ingvild Bolme - Chalk Fluid Edger - Pastel Blue
  • Sizzix - Tim Holtz - Sizzlits Decorative Strip Die - Alterations Collection - Die Cutting Template - Filmstrip Frames
  • Gold Glitter
  • Studio Calico - Wood Veneers - Heart & Arrows
  • Jenni Bowlin Studio - Fiskars - Squeeze Punch - Large - Blue Ribbon
  • My Favorite Things Stamps - Die-namics First Place Award Ribbon

This post was original published on WeAreArtsyAddicts.blogspot.com
Read More »

Tuesday, September 17, 2013

Mixed Media Canvas - Marion Smith Designs

1
I wanted to share with you a project that I published on Marion Smith Designs today.  If you haven't subbed to the Design Team Blog, please go over a follow.  The team posts daily. 

Hi everyone, today I want to share a piece of art that I created to inspire a group of friends.  For those who have followed me for a while know that I'm in Weight Watchers.  Last week we had an awesome meeting where we shared our  group's success stories.  The three who shared lost a combined weight of over 160lbs.  WOW!  That in itself is encouraging to me!  We discussed the power in believing in yourself.  I was inspired in that meeting to create a canvas that I gave away at our meeting last Monday night.


Showcased at the bottom of the frame is Marion's Rolled Roses.  I love how the black in the roses pulls in the black from the chalkboard.  I also used scraps from her other digital journal lines to create the butterflies.  The butterflies were then dipped into melted UTEE to give them a glass like texture.


I wanted the frame to have a weathered inconsistent look.  The frame is one of the ornate wood frames with an inside opening of 5x7.  I painted a base coat with bronze distress paint, then crackled small portions.  I used an  Off-White linen acrylic paint to white wash over the top.  Once it was dry, I then sanded some areas to further disstress the wood. I used an Unity Stamp that says "If You Can Imagine It, You Can Achieve It!"  repeated all over the top  of the frame's surface.   I like that you are unable to see it printed clearly anywhere.  This makes you really focus on the words, and not just the quote.


For the background, I chose the Mad Tea Party paper "Roses 'R' Red".   I loved the repeated rose and clock patterns.  So I ripped it into irregular pieces, and combined it with some vintage recipes from a low-calorie cookbook.  I then covered it in gesso and recolored it with pink and gold gelatos.   A TCW damask stencil and molding paste were then added and the entire piece was colored again with gesso, gelatos, and finished off  with the bronze distress paint.  When you look at this canvas, the background stays in the background, but a closer look reveals the subtle hints of the patterned below the layers of paint!
 
 
For the quote, I used a saying from another Unity Stamp "Trust in your potential, enjoy the process, try something new, explore possibilities, but most of all BELIEVE!"   The stamp was ATC size, so I had to hand write it on the 5x7 cardstock.  Hidden inside the spray at the bottom, I have a clock - to remind you to take time for yourself.  A token that says "courage"  so you remember to have the courage to change your habits. And one that says "Believe" To reinforce belief in yourself!  

To me - this piece looks like a Tuscan kitchen.   The strong terracotta colors, combined with the rich roses and the chalkboard draw me in, and take me to another place. 


Thanks for stopping in today,

Tonya Gibbs
http://www.psychomomscrapbooks.blogspot.com

Resources:

Marion Smith Designs  Roses R Red, Rolled Roses
Faber Castle Design Memory Craft:   Gelatos - Pink, Hot Pink, Gold
Liquitex -  Gesso & Surface Prep Matt Medium
Ashley Home Decor - Vine
Martha Stewart Crafts - Butterfly Punch
Ranger - Utee, Distress Paint in Bronze. Coffee & Jet Black Archival Ink
Idea-ology - Tokens
Gely Roll - White Gel Pen
Cardstock
Cookbook
Doily
Prima - Clock
Unity -  Stamps
Read More »

Saturday, September 14, 2013

Bubble Art - Watercolor Technique

0
I wanted to share with you a project that I published on Marion Smith Designs today. If you haven't subbed to the Design Team Blog, please go over a follow. The team posts daily. 
 
Hi everyone, today I want to share a mixed media technique that I saw in the April 2013 issue of Martha Stewart Magazine.  In that issue they used paint to achieve this look, but I decided to use my Tattered Angels Mists instead. 


You will need a package of Children's Bubbles, a drinking straw, and your favorite mist colors - make sure you choose a bright color for great contrast.  Also (not shown) you will need a large container for your solution, and a drying mat. I lined a cookie sheet with paper towels.


Pour about a half an inch of bubble solution into a large bowl. Then using the drinking staw blow bubbles. Make sure you don't suck the solution up the staw, and supervise small children.


Then Spray your Tattered Angels sprays over the top of the bubbles. Make sure they are very saturated for even results.

 
Place your cardstock ontop of the bubbles, but do not allow it to touch the liquid below. 

 
Lift the cardstock and blot dry with a paper towl.  Repeat these steps until desired pattern is achieved.

 
I die cut mine with the Tim Holtz Tag and Tab die, and tied a piece of seam binding to the top.


The tag makes an interesting layer on this card.  This technique would also be super cool in mixed media canvases, on layouts, and the article used it on butcher paper as gift wrapping. 


We experimented with adding multiple colors and the results were super fab. Blue, Green, and Gold were my nephew Cooper's favorite combo.  He really enjoyed playing with these bubbles. 

Thanks for stopping in today,

Tonya Gibbs
http://www.psychomomscrapbooks.blogspot.com

Read More »

Friday, September 13, 2013

Persimmon Layout - Grandson

0
Fall is probably my favorite season, we are coming off the hot days of summer, and the air starts to turn crisp and cool. The kids going back to school are full of excitement. Rich vibrant color pallets are everywhere. Even the sunrises have more drama.  All of these are great, but the best of all...it is FOOTBALL season! 
 
My son, Brighton, has played football since he was 7 years old. This year starts his second year at Varsity.  I'm going to miss those Friday night lights soon!  Every football game, my entire family rally at the game to cheer Brighton and his team mates to victory.  But the part that really just steals my heart is after the game, when everyone approaches the field. MY SON - always takes a moment to kiss and hug on his grandmothers!  ALWAYS without fail - in front of all of his friends.  Now trust me when I tell you that he does not smell like fresh linen or even roses, but it doesn't matter!  There is NOTHING better than a victorious SWEATY HUG.  I've never turned one down, and I never will!   
 
Mixed Media Layout designed by Tonya Gibbs for Artsy Addicts. #Psychomomscrapbooks #TonyaGibbs  #ArtsyAddicts #Scrapbooking #MixedMedia #Persimmon #BasicGrey #CosmoCricket
 
These moments happen fast and we often take them for granted. However, lately I've been reminded rather abruptly at how fast life moves, and those small moments can never be captured once missed. These women are the backbone of our families.  They are ALWAYS there and I mean ALWAYS! I love them both dearly, and to see that public display of affection from my child extended to his grandmothers - well I don't have to tell you about the tears that are rolling down my face, just typing this!  
 
 
Mixed Media Layout designed by Tonya Gibbs for Artsy Addicts. #Psychomomscrapbooks #TonyaGibbs  #ArtsyAddicts #Scrapbooking #MixedMedia #Persimmon #BasicGrey #CosmoCricket
 
The photo above is my Mother, Nama and the photo below is my Mother In-law, Nannie.  I have very few photos of these women less of my mother than Nannie, because she hates having her picture taken.   I uploaded these photos to Instagram and printed them from the gallery prints on Facebook.  So I decided to make them "insta" frames on my layout. 
 
 
Mixed Media Layout designed by Tonya Gibbs for Artsy Addicts. #Psychomomscrapbooks #TonyaGibbs  #ArtsyAddicts #Scrapbooking #MixedMedia #Persimmon #BasicGrey #CosmoCricket
 
 
For the layout, I wanted to use up the scraps of papers laying on my desk - reminants from last Monday's Ustream.  As you can see nothing on the layout is larger than 3x3. Most of these pieces many  would have tossed.   An interesting way to use up those tiny scraps is through your punches, die cuts, and electronic cutters.  Even the less than perfect punched pieces get used!  Layers are the perfect way to hide those imperfections, and when pooled together, the smaller pieces really make an impact.
 
 
Mixed Media Layout designed by Tonya Gibbs for Artsy Addicts. #Psychomomscrapbooks #TonyaGibbs  #ArtsyAddicts #Scrapbooking #MixedMedia #Persimmon #BasicGrey #CosmoCricket
 
 
Basic Grey's persimmon line really helps me capture the essence of fall! I love how the elements are bright colored and gender neutral.  I also love how Cosmo Cricket's new Glitter Adhesive sheets add a little sparkle without a mess!
 
I have recorded a process video showing step by step how this layout came together.


Thank you for stopping in today. I want to leave you with one bit of advice. Remember that you can never have too many photos-  Good lighting, raining day, doesn't matter - SNAP THE PHOTO!  You can never have too many, and 20 years ago we will look back at the fun surrounding that moment and not be so critical of the quality of the picture.
 
Tonya Gibbs
 
Resources:
 
  • BasicGrey - Persimmon - 6 x 6 Paper Pad
  • BasicGrey - Persimmon - Die Cut Cardstock and Transparency Pieces
  • Cosmo Cricket - Glitter Adhesive Sheets - Crystal Lake
  • Jenni Bowlin Studio - Feathers - Vellum
  • ColorBox - Surfacez - Multi-Surface Inkpads - Dolphin
  • Prima Marketing Inc., Chalk Ink - Farmer's Jeans

Other:
  • American Crafts - Ribbon Value Pack - Jute - 24 Spool
  • Stampers Anonymous - Tim Holtz Visual Artistry CITY CENTRAL (Ticket)
  • Stampers Anonymous - Tim Holtz Seamless Experience (Stitch)
  • Advantus - Tim Holtz - Idea-ology - Tiny Attacher
  • Ranger - Tim Holtz - Distress Ink - Vintage Photo
  • EK Success - Paper Shapers - Slim Profile - Edger Punch - Zig Zag Chain
  • EK Success - Paper Shapers - Nesting Punch - Scallop Circle 1 1-2"
  • Fiskars - Limited Edition - Squeeze Punch - Large - Leaf it to Me, CLEARANCE
  • Sizzix - Originals Die - Jewelry - Die Cutting Template - Large - Hearts, Primitive 3
  • Heidi Swapp - Stencil - Honeycomb 6x6
  • My Favorite Things Stamps - Dizzy Doily Die
  • Kraft Cardstock
  • Hymnal Pages
  • Buttons
  • Pale Blue Cardstock
  • Lindy's Stamp Gang - Starburst Color Shot - 2 Ounce Jar - Glory of the Seas Gold
  • Faber-Castell - Mix and Match Collection - Gesso 
  • Liquitex - Yellow Oxide Ink


Read More »

Tuesday, September 10, 2013

Persimmon Mini Album - Ustream Sept. 9, 2013

0
Thank you to everyone who participated in the Ustream on Monday night.  I made a mini album using the Persimmon Line from Flamingo Scraps. 

I'm going to use this little mini to document my fall activites.  The pages are open envelope pockets that are great for storing memorabilia and extra photos.  The photo frames are perfect for storing my Instagram uploads with a size of 3x3 and 2 1/2 x 2 1/2.

Here is a glimpse of each page in better detail than the Ustream showed.  As always let me know if you have any questions. 


Make sure to visit Flamingoscraps.com to purchase the products used in class. 


Persimmon Line from Basic Grey available in the store - click the image to purchase!


Cosmo Cricket Glitter Sheets - Crystal Lake
(LOOOOOVVVVVVEEEEEEEEE)  Click the image to purchase!

 
If you missed the ustream class - it is on my YouTube channel in two parts.
 
Here is Part 1


Here is Part II


Thanks again for all your support.
 

Tonya Gibbs
 
Read More »
I love seeing things you create using my tutorials or project shares. Please use the following handles/tags in social media to insure that I get to see your creations:

INSTAGRAM: #FollowingTonyaGibbs    |   TWITTER:  @gibbst    #FollowingTonyaGibbs   |      FACEBOOK:Tag  Tonya Gibbs   #FollowingTonyaGibbs

I Design for:

    http://www.yvonneblair.com

Guest Artist: Click icon to see post!

http://www.teresacollinsdesignteam.blogspot.com/2013/10/family-stories-layout-and-video-by.html#comment-form   http://canvascorp.com/2013/03/21/easter-treat-baskets/


Past Teams

http://www.die-namites.com/     marion