Hey bloggers - welcome to day 3 of the #LoveSummerArt collaborative project with YouTube Artists around the WORLD! The event runs from July 17 - 20th. To find these artist, just type #LoveSummerArt in your YouTube search bar.
This is a super fun way for you to discover new artists on YouTube, and be inspired by their work. All genres of art are participating - Exciting Right!
Today I would like to share with you a mixed media card. This design is super simple, and could easily be duplicated to create a colorful set of cards for a gift.
Doesn't this ocean remind you of summer and walking the beach in Flip Flops? I used mediums from Faber-Castell Design Memory Craft® to achieve this look. I'll show you how in the video tutorial below.
This is also a great way to use those Gelli Arts® Gelli Prints® that we have been doing the last few months in our Ustream classes. I used one for die-cutting out the Fancy Flip Flops Die from Die-Versions.Isn't it just adorable as the center piece for my card?
I typed the sentiment in a word processor and cut it into a fish tail banner. The fonts that were used were: KG Only Human Reg (Life is better in ) & SA Cinta Normal (Flip Flops).
Here is a quick process video showing how I created the card.
Don't forget to head over to YouTube and see what other artists are doing with #LoveSummerArt. Check back tomorrow I will have a Mixed Media Canvas to share.
Thanks,
Tonya Gibbs
Save The Date: Our next Ustream is scheduled for August 3, 2015 at 8:30 p.m. EST
Supplies:
Faber-Castell Design Memory Craft® - Glass Bead Glitter Gel
Hey bloggers - welcome to day 2 of the #LoveSummerArt collaborative project with YouTube Artists around the WORLD! The event runs from July 17 - 20th. To find these artist, just type #LoveSummerArt in your YouTube search bar.
This is a super fun way for you to discover new artists on YouTube, and be inspired by their work. All genres of art are participating - Exciting Right!
Today I wanted to share with you a layout that I created from some of the Prints we pulled in the July Ustream. Remember these... If you missed the ustream, it is linked up in the right bar.
I decided to create a layout and use these guys as my frame around my photo, and as part of my ephemera in my embellishment clusters.
I have shared many times in the past few months, I'm falling in love with hand lettering. I love the look of the painted imperfect title that I did with watercolors then fussy cut around the. Isn't this just a fun way to add a title to this wonderfully splashy layout?
I also tucked in several of the die-cuts that I've been using to pull prints with in the last few months. Their interesting patterns keep my layout looking fresh, and unique.
I used Faber-Castell Design Memory Crafts® Glaze Medium, Prima's Bubble stencil and little Lindy's Stamp Gang Magicals to create the splashed background. I love customizing my layouts this way.
To see how I did this, I've prepared a process video
Thank you for stopping in today. I hope I have inspired you to create a fun summer layout. Don't forget to check back tomorrow. I have a Mixed Media card for you.
Also don't forget to check out the #LoveSummerArt over on YouTube. I've been inspired by so many wonderful artists this week, and have found some new people to stalk (I mean follow).
Have a great weekend,
Tonya
Save the Date - Our next Ustream is scheduled for August 3, at 8:30 pm est. Supplies:
Lindy's Stamp Gang - Limor Webber Designs Signature Tres Chic - Magicals - Merci Beaucoup Mint
WOW - what a fun class. I know I keep saying that, but we had a full house with lots of new faces tonight. So it was fun meeting you, and I hope you had a great time. Look at all these fantastic prints that we pulled tonight. We had enough time to create 2 cards, but we pulled a dozen or so prints.
I also showed you guys how simple it was to give some interesting color patterns to your die-cuts, while making interesting patterns for your backgrounds.
I think this was one of my favorite prints. I didn't have time in tonight's show to make anything with this, but check back each week this month, and I will create cards from all of these prints and the colored die-cuts from tonight's show.
Here is the recording in case you didn't make it to the show live.
Thank you to everyone who came to watch the show live. I had a great time tonight. I can't wait to start making cards for you this month. Don't forget to check back! Our next Ustream will be August 3, 2015 at 8:30 p.m. EST.
Tonya
Supplies:
Gelli Arts® Gelli® Plate - 8x10
Gelli Arts® Gelli® Plate - 3x5
Cardstock - 110lb White
Cardstock - 80lb Black
Hymnal page
Plaid - Apple Barrel - Bimini Blue
Plaid - Apple Barrel - Pink Parfait
Plaid - Apple Barrel - Kiwi
Plaid - Apple Barrel - Yellow Flame
Sizzix - Tim Holtz - Alterations thinlets Scribble and Splat Die
Happy Independence Day to my fellow Americans. Today I wanted to bring you a little canvas that I created yesterday for the Gelli Arts® Stars and Stripes Challenge.
I've prepared a step out process of how I did the background image.
Step 1: You want to use full bodied paints for this project, because they allow you more time to work since they dry slower. Start by braying on the red. Tape off your flag with masking tape. Don't forget to tape off the star section in the upper right hand side of the plate, so that when you pull the print the stars on the left. I'm using a 110lb white cardstock for my print, and an 8x10 Gelli Arts® Gelli® Plate.
Step 2: Create your star background. I started by painting a 3x5 Gelli® plate with Ultramarine Blue Paint. Then using the Crafter's Workshop Balzer Designs Mini Punchinella stencil, I removed paint through the stencil with a baby wipe. The stars only cover the bottom section of the plate, so I moved the stencil up and repeated this step for the top area. I know there are more stars here than are needed for an American Flag. But the general concept was here, and I felt it too overwhelming to count out 50 stars, JUST go with it! (LOL) . Also note: It is not necessary to use the 3x5 plate for this project. You could use any size plate that you have, and easily use the taped area as a guide from the previous step. But I had this plate so I decided to use it.
Step 3: The photo above is what the plates looks like after the stars are lifted. Using the plate like a stamp, press it into the area on the print you pulled of the stripes.
I just love how this flag is starting to look. It is rough - but that is really what gives it character.
Step 4: To help the stars really stand out, I applied a coat of Texture Paste from Prima Marketing. This paste must dry before going to the next step. When it is dry, the paste crackles leaving my stars looking more distressed and yummy!
Step 5: Sorry there is no photo for this step - but I added a thin coat of Matte Medium to the entire paper. NOTE: Use Matte Medium, because it is looser than Gel, and you can get a really fine coat. Allowed it to dry before going to the next step.
Step 6: Make sure your print is dry from step 5. Then crumple it into a loose ball. Then flatten the paper out again, to see the texture. Clean off the 8x10 Gelli® Plate.
Step 7: This step will create a stain for our flag. Bray on some light brown paint with yellow ocher, and Golden Acrylic Glaze. Pull another print directly onto your flag. Be sure to press firmly so that the glaze gets past the crinkles in the paper. Sorry I forgot to get a picture, because I had to work super fast and my hands were messy. But I promise, this will look super scary. The entire flag will be a horrible brown color. Allow the glaze to sit for about 30 seconds, Then using baby wipes, begin to remove the brown color. This glaze will stick to the cracks in the stars, and around the negative areas of the stars, and along the crinkles. JUST LOVE THE LOOK!
Step 8: Look at how beautiful my flag looks. I trimmed it down to an 8x10 removing the boarder around the outside. To make your stripes white again, simply apply gesso with a cosmetic sponge. Don't worry with the red or blue, because the off color helps the red and blue areas look antiqued.
Step 9; I prepped an 8x10 canvas with Matte Medium, then applied my flag to the top. Squeegee it well with your fingers, and press hard to make sure there are no air bubbles. I also applied the Matte Medium to the top of the flag.
Then comes the OOPS! That little opportunity for additional embellishment!
Step 10: Never fear! This actually turned out to be a blessing. I combined the Matte Medium with some of the Ranger Tim Holtz Distress Stain in Vintage Photo and painted it into the areas where the paper had peeled back. NOTE: Mixing the Matte Medium with the Distress creates a varnish and seals the distress so it doesn't run when liquid is applied. Now my flag looks as if it were painted onto wood. Once the entire Flag was completely dry! Then take an archival or permanent ink pad in brown in and lightly rub it over the surface of the flag to further enhance the texture.
All that is left is to embellish the flag - unfortunately I did not have time to create a process video and do the editing. So I do not have the step outs for that process. But if you have followed me for a long time, you will know how I did everything in the embellishment clusters, as it is techniques that I use often.
In this video - I will talk you through the embellishment clusters and other details about the canvas.
Here are some close up photos of the other sections of the canvas.
I decided to use Psalm 33:12 for my chalkboard: "Blessed Is The Nation Whose God Is The Lord." I used chalkboard paint to paint a piece of foam board. Several coats were needed. Then I sketched my design with a pencil, and traced over it with a White Gel Pen from Marvy. Allow the ink to dry, then spray with a fixative. I used Clear Acrylic Spray Paint to add a fine mist to protect my drawing.
The Hymnal I chose was "God Save America" by William G. Ballantine The second verse really spoke to me, and I wanted to include it. "God Save America! Here may all races mingle together as children of God, Founding an empire on brotherly kindness, Equal in Liberty made of one blood! "
You can really see the texture in the stars. I used a pair of old Jeans and the Tim Holtz Jumbo Tattered Floral's Die from Sizzix to cut out flowers for my embellishment cluster. Then of course I added my mixture of Finnabair - Clear Beads and Glass Glitter to Glossy Gel Medium to fill in and add a little sparkle.
Thank you so much to the men and women who serve this country in the military, and to the loved ones whom lived without them while they served for our freedom. Your selfless acts have given us our freedoms.
To get more details about the Gelli Arts® Challenge, please visit their Facebook wall! Thank you for visiting.
Now I'm signing out to go celebrate the 4th!
Tonya
SUPPLIES:
Gelli Arts® - 8x10 Gelli® Plate
Gelli Arts® - 3x5 Gelli® Plate
Speedball - Brayer
Daler Rowney - Acrylic Full Bodied Paints - Ultramarine Blue
Daler Rowney - Acrylic Full Bodied Paints - Light Brown
Daler Rowney - Acrylic Full Bodied Paints - Yellow Ochre
Daler Rowney - Acrylic Full Bodied Paints - Scarlet
First off I want to say thank you to everyone for your support of my creative journey. It has been awesome sharing my tutorials, and projects with you. I hope I have encouraged you to explore your own creativity and hopefully convinced you to try something new along the way. My goal is always to help you find ways to use scraps creatively, and share ways to use products that you have on hand!
This month has been so much fun. I've been overwhelmed by the response to my cute little mini journal. It was fun week after week seeing you share and comment. Some have sent me private messages asking for suggestions and showing me sneak peeks of their books. I LOVE seeing what you guys have created. I have met a lot of really nice artists this month too!
SO THANK YOU!
TODAY I'M SUPER PROUD TO ANNOUNCE THE WINNER FOR MY 6x6 Gelli Arts® Printing Plate.
Congratulations - Felicia Aaron
Please send me an email at: TonyaAGibbs@gmail.com with your address, and I will get this in the mail, along with some other fun Gelli® Printing goodies.
Thanks again for all your support
Tonya
Disclaimer - this contest was not sponsored by Gelli Arts® or its affiliates in any way.
Hi everyone, all month I've been sharing with you ideas for using your Gelli Arts® Gelli® Plate. I'm having so much playing with my prints. I've made a mini album, a few father's day projects, and today I'm going to share a cute whimsical card idea using those prints we had left over from the June class.
They were all so colorful - I just can't leave them hiding in a drawer! So I decided to cut a few oblong circle shapes, add a few doodles and look at how adorable these cards turned out!
Above is the front of the card, and below is the inside. SO fun - and who wouldn't love to receive one of these. Best part - they are super thin and light weight so you can easily mail them!
My card measurements are: Top Folding A2 Folded 41/4 x 5 1/2 inches.
The white liner and inside card panel are cut to 4 x 5 1/4
The Birds are 3 3/4 x 5
Here is a video tutorial showing you how I created this card.
Few Reminders -
You still have a few more days to get your comments on the other June posts where I used the Gelli® Prints, to be entered in the drawing for the 6x6 Gelli Arts® Gelli® Plate give away. One entry per comment per post. So make sure you are reviewing the all for as many opportunities as possible. Also you must be a subscriber of this blog to be eligible, so if you haven't done so - go ahead and click the subscribe button in the side bar on the right. Entries must be in by Midnight June 28, 2015. I will draw a winner on June 29.
Next - Don't forget our next Ustream is scheduled for July 6, 2015 at 8:30 p.m. EST
Thanks so much for stopping in today, I hope you have enjoyed these cute little birds.
Ok - So I just can't tell you how excited I am to get the overwhelming likes and shares from my little Mini 4x4 Gelli Print Art Journal book. You guys have really set my creative heart on fire!
Today I got home from work and saw that Gelli Arts® shared my posts about my little book. Then I had such an overwhelming response to the posts on Facebook in several groups. I feel totally blessed by your support of my creative journey.
Today I would like to share one more surprise...
I've decided to give away a 6x6 Gelli Plate to one of my blog subbies.
All you have to do is,
SUB to this blog
Leave a comment (1 per blog post) on the Gelli Print journal posts that I have shared through out the month. (umm hmmm - this post counts too)
Make sure your comments are posted before Midnight EST on June 28, 2015.
That's it!
Then on Monday June 29, 2015 I will pick a random winner.
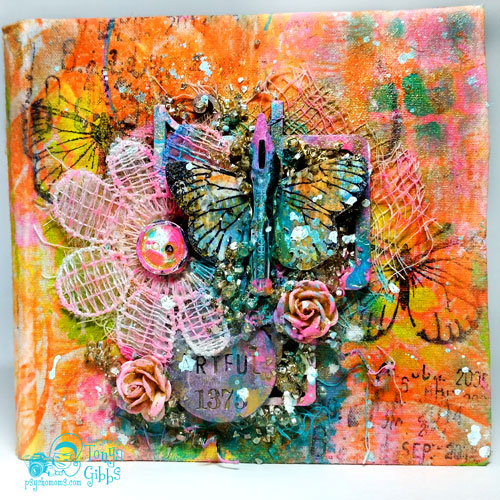
WOW - this has been a super exciting project. I've had so much fun bringing you page after page of this cute little book each week. But as we say goodbye to June, it is time for me to share with you my final entry with this project. The Cover!
Serious bright vibrant luscious sparkly goodness here SO many rich vibrant layers of color. Every thing you see here came from my "one hit wonder pile of scraps on my desk!" Clusters like this are an awesome way to purge odd and ends that seem to clutter up over time. Drizzle a little gesso and paint (even to your metal elements) and they suddenly looks as though they belong together.
We did the cover of the book in the Ustream class and pulled it on Muslin. Muslin is a soft thin cotton material that can be found at all fabric retailers. It comes in bleached and unbleached (a light tan color), and is usually inexpensive. In most cases, you can find it where the bolted interfacing and canvas is located. It is an awesome fabric for covers of your mini albums.
Here is a glimpse at the back cover for this book. Look at all those layers of paint and stamping. YUM YUM. For an added bit of sparkle, I sprayed Heidi Swapp's Gold Lame Color Shine on the covers.
It has been a blast sharing this project with you through out the month. Thank you for visiting week after week. I hope you can join me on July 6, 2015 for our next Ustream at 8:30 p.m. EST.
I love seeing things you create using my tutorials or project shares. Please use the following handles/tags in social media to insure that I get to see your creations: