I wanted to keep this page simple, and let the quote speak for itself. So I printed a moon image from the internet, and painted myself a giant wave! Here you can see the texture left behind by the thick paint and the variations of paint color. I love the contrast of the copper embossing powder on the sea foam greens.
Here is a final glimpse at the Journal Page. You can see the moon peek-a-booing out of the far left corner. It is hard to tell what it is at first glance, but I know what it is.
I really believe that you have to sometime make a few waves to make a difference in your life every now and then. If we move through life afraid to shake things up, then we never seem to get anywhere. This page will serve as my reminder to not be afraid to ride one of those waves and see where it takes me! I hope you enjoyed this page. Thanks for hanging out with me today, I hope you had fun, and learned a few new techniques.
Oh I love home crafted Christmas ornaments. Every year I try and make a few new ornaments for my tree. This has become a tradition that my family looks forward to each year. Today, I would like to share with you one of this year's new designs using Yvonne's Compass stamp from Impression Obsession.
You can also use several of Yvonne's other stamps, I give you some ideas in the video link below.
For the base of the ornament I'm using these wooden shapes I grabbed at a local craft shop. This bag was under $5 and as you can see we will be able to make lot of ornaments.
I filled in the knots on the wood with Modeling paste so that I can get a smooth surface for stamping. You can leave these natural with a white wash of gesso or you can paint them if you like.
In the video below, I will share with you two versions that I created, so that you can decide which technique you like best. But both are gorgeous.
It was easier to add the foiling on the chalkboard version because the paint helped to make the surface smooth. But if natural look is what you like, I think it turned it nice as well. It is just harder to see the foiling. If you decided to go with this technique, I suggest bold and heavy designs for your stamping. Thick and large fonts will show up better.
Here is the video sharing how I did the technique.
Wasn't that fun? I want to make a bunch these. They would be great to add to packages, and share with your friends and family. Or create a set and give them as a gift. Thank you so much for hanging out with me today.
Oh imagine the possibilities when you say I'll try instead of I can't. Well today I have a fun little project for you to try. A little doodle art. I'm using these great stamps from Yvonne Blair, to finish off my project, to create the perfect card!
These little doodle projects are easy to do and I find them very therapeutic. You can easily complete one in a matter of minutes, and look at how fabulous they look on cards.
You can keep them black and white or watercolor them like I did here to give them more interest. The possibilities are endless. I think these little guys would be fabulous on Christmas cards, Birthday cards, and even Holiday Tags. If you only filled in part of the circle they would even be interesting.
Wasn't that easy as pie? Ok I want to start seeing the internet filled with doodle wreaths. If you decide to do one, make sure you #YBArtGirlFun in social media so I can see what you did!
After a weekend of torment created by Hurricane Matthew up and down the south eastern coast line, I thought I would spend some time reflecting on how grateful I am for the many blessings I have in my life. During my extra time off, I spent a little time in studio while the storm raged outside with my watercolors and a few of Yvonne's stamps. Today I would like to share with you a few cards I created during this time of reflection.
I reached for these two stamps sets that Yvonne Designs for Impression Obsession Stamps to create these cards:
I'm going to create two cards in today's share the first is using the "Count Your Blessings" from the Words of Art stamp set. This set has so many amazing sayings in it. Perfect for card makers!
In the video below, I share with you a technique for creating watercolor flowers using kitchen plastic wrap! You allow the paint to dry on the paper and then follow the text that is left behind with watercolor pencils to give more details to your flowers. It is so simple and perfect if you don't know how to draw flower shapes. You literally let the plastic wrap and wet paint do the work for you!
I struggled a bit more with this flower shape as the colors seemed to blend more in and I really wasn't feeling it when I added the colored pencils. In hindsight I probably should have left it alone when I removed the plastic wrap. I really liked the abstract of the dried paint. But oh well, this is creative play, and sometimes you just have to follow the journey that the art takes you. To fix my painted mess I reached for Yvonne's French Script stamp and the Heidi Swap Navy Blue ink (which is my new favorite over black!), and started stamping. After assembling the card I realized the only thing missing was flower centers on both cards and my flowers came to life!
The paper stacks that I used were found in Target's dollar bin, and I fell in love with the copper foiling. I decided to duplicate this with copper embossing for Yvonne's Stamps.
I'm so grateful that my family survived this terrible storm. I know so many that sustained damage to their homes, and several communities are still without power. Some have lost their lives and I pray for their families to find peace. My heart is saddened for the country of Haiti and for the Residents along the coast of Florida, Georgia, North Carolina, South Carolina, and Virginia many of these communities will never be the same. If you are inclined, and have the capacity to do so, I encourage you to give to the American Red Cross. I know there is a need for relief both at home and in Haiti where so much life has been lost.
Supplies Used in these two Cards:
Impression Obsession - Yvonne Blair Designs - Words for Art Stamp
Impression Obsession - Yvonne Blair Designs - French Script Stamp
Canson Watercolor Paper 140lb
Artist Loft - Watercolor
Royal Langnickel - Brush Value pack #3 Round, #10 Flat
Wheat Jute Twine
My Mind's Eye On Trend Cardstock 6x6
Halloween Cardstock 6x6 Target Dollar Bin 375772
Fall Cardstock 6x6 Target Dollar Bin Kraft Copper Foil 375773
Faber-Castell Design Memory Craft - Stamper's Big Brush Artist Pen Cadmium Yellow 107
Faber-Castell Design Memory Craft - Stamper's Big Brush Artist Pen Scarlet Red 118
Faber-Castell Design Memory Craft - Stamper's Big Brush artist Pen Caput Mortuum #169
We are celebrating being picked as the editor’s choice in
the Oct-Dec Issue of Stampers Sampler by Stampington. Each one of us Yvonne Blair Art Girls will be giving away a journal buddy on Friday
Oct. 7. Leave a comment on each of our blogs by
noon October 7, and we will each select a random winner.
If you leave a comment on each blog you will be put in for a
drawing to win a Journal Buddy, Art Journal and Stamper's Sampler Magazine
Bundle. The winner will be announced October 7th at 7:00 pm.
All winners will be notified by email and announced on
Yvonne’s blog Oct 7 at 7:00pm.
Journal Buddy
The Journal Buddy is a multi-functional tool that helps you
add artful journaling to any paper crafting project. The Journal Buddy is made out of high quality stencil
material that is not only pliable, but see through so you can see where you are
adding lines. It features a wavy edge and straight edge with a
ruler two short straight edges on each side to line it up so your journaling stays
straight, as well as line guides for you to ink, trace, paint, or
spray onto your page.
You will be amazed at how easy it is to use adding decorative
journaling to your art journals, scrapbook layouts, cards, envelopes and
more.
Today I will share with you how easy it was to use the Journal Buddy to create this fabulous chalkboard for my front porch area. I found the chalkboard on clearance at a craft and hobby store left over from back to school merchandise. With a little elbow grease I sanded down the school themed edges and now it is perfect for my front porch.
Next I used standard chalk and the Journal Buddy as a guide to draw out my quote. In the short 15 minute video below. I will demonstrate just how simple it was to draw my design. In real time it took about an hour. After Thanksgiving, I can simply erase the chalkboard and draw a design for Christmas. The flexibility of the Journal Buddy helps when moving around the board, and the ruler is essential in helping to space out your design. The wave edge is great for creating banners and writing on a curve. It was so nice having all these guides in one simple tool.
Hi everyone It is my day over on Yvonne Blair's blog today, and I'm sharing with you a project that I've created using her fabulous products designed with Impression Obsession and Paplin.
Hi everyone it is YouTube Video Hop Day! I'm joining up with a few amazing artists over on YouTube to do a fun collaborative hop to help showcase and promote designers on YouTube. This will hopefully help to introduce you to new channels to explore.
Here are the other channels participating in today's hop:
For my project, I decided to showcase a layout using Prima's Almanac collection. I have been hoarding my limited stash of this collection for years now, and it was time to use it up! Its feminine country theme was perfect for today's layout.
For me - Memory keeping isn't just about family photos - It is also about remembering those moments that define our days. Sometimes we take for granted those quick laughs or daily reminders, or simple parts of our daily routines. My Sister and I share a little daily laugh, and today's layout spot lights that memory.
Please meet Laughing Lucy, one my Sister's goats. My sister, Kim, owns a small farm where she takes in rescue animals. Some are abused, some the owners have passed on and have no one to care for them, and some were just abandoned. Well Ms. Lucy was one of those rescues. Through months of love she has been one of those animals that our entire family has grown to love. Kim sends me a daily photo of Ms. Lucy and her sweet smile. It is my daily reminder to Laugh. I literally open my phone and belly laugh out loud. I mean seriously how could you not laugh out loud when you see this sweet face staring at you?
For today's layout, I chose the Almanac paper because it had so many farm type images. I also really loved the feminine soft colors as well. I imagine the "sounds" of the farm being like an orchestra early in the morning, with the crowing and clucking, so the music paper fit right in - don't you think?
I kept the design simple, but the overall layout looks very detailed due to the paper layers.
Here is a process video showing you all the details and lots of techniques.
Hi everyone, I hope you had a fantastic weekend, today is my first post over on Yvonne's blog. Have you seen Yvonne's new stamp release this CHA2016? I have to tell you her blog is going to be buzzing with tons of inspiration this year. Her stamps are fantastic and LARGE enough for art journals, but small enough for cards. I just LOVE them! I love that you can order these stamps in one of three mounts - Wood Mounted, Cling Mounted or Plain Rubber. This makes them perfect for your style of stamping! I'm featuring four of Yvonne's new stamps today with Impression Obsession. I created this canvas using 4 of her stamps from this year's release:
I hope you have a minute to go check it out. I created this gorgeous canvas. There is also a process video over there for you showing several techniques including how I created a clay embellishment using one of her stamps.
Thank you to everyone who came to the live class on Monday night. I had a lot of problems getting the show to air live on YouTube so we moved over the Ustream. If you guys had trouble finding us, I'm so sorry. I'm just going to keep at it until I figure it out! Good news! We did get it recorded.
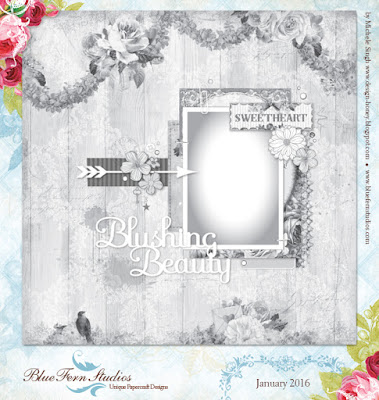
We kept it light and discussed the CHA releases. I based this month's class on a sketch challenge by Blue Fern Studios. Details can be found on their blog!
I used the Love Story Collection and their Doodle Flowers Chipboard Coordinates for my layout.
I used a photo that I had taken during the Holidays of my Mom & I for the layout. In the class I shared with you how to use the Pentel Fude Brush Pen to draw a trendy title. Here is the pen that I used. The ink from this pen takes a LONG time to cure. Sometimes a day or so depending on the paper. It is also a bit tricky to use. If you purchase the pen, don't forget to remove the washer that separates the ink well from the brush tip (or it will never work - ::WINK WINK::)
I also shared with you how I created & painted these cute little clay birds. Aren't they adorable? They are the perfect embellishment to compliment this paper collection. So affordable and easy to create. I love including small clay pieces like this in my embellishment clusters.
Here is the video of the class.
Happy New Year everyone. Thank you again to everyone who came to the show live.
Tonya
Supplies:
Blue Fern Studios - Love Story - True Harmony 12x12 paper
Blue Fern Studios - Love Story - Calling Cards 12x12 paper
Blue Fern Studios - Doodle Flowers Chipboard Coordinates
Pentel Fude Brush Pen - Medium Black
Stickles (Glass dots) - Peach
Martha Stewart - Silicone Mold - Birds & Lady Bugs
I love seeing things you create using my tutorials or project shares. Please use the following handles/tags in social media to insure that I get to see your creations: